All in One SEO includes a WordPress Product block, which you can use in the WordPress Block editor to display products anywhere on the page.
This is a great solution if you don't want to use an eCommerce plugin to sell products, and you only want to display products on your site.
IMPORTANT:
WordPress Blocks only work with the WordPress Block Editor. They don't work with the Classic Editor or any page builders.
NOTE:
The AIOSEO Product Block is available to customers with a Basic plan or above for All in One SEO Pro.
Upgrade to All in One SEO Pro today to get the Product Block and many more features!
In This Article
Displaying Products Using the AIOSEO Product Block
To get started, edit any content using the WordPress Block editor and click the Add Block icon.
You can search for the block by typing AIOSEO in the search field.
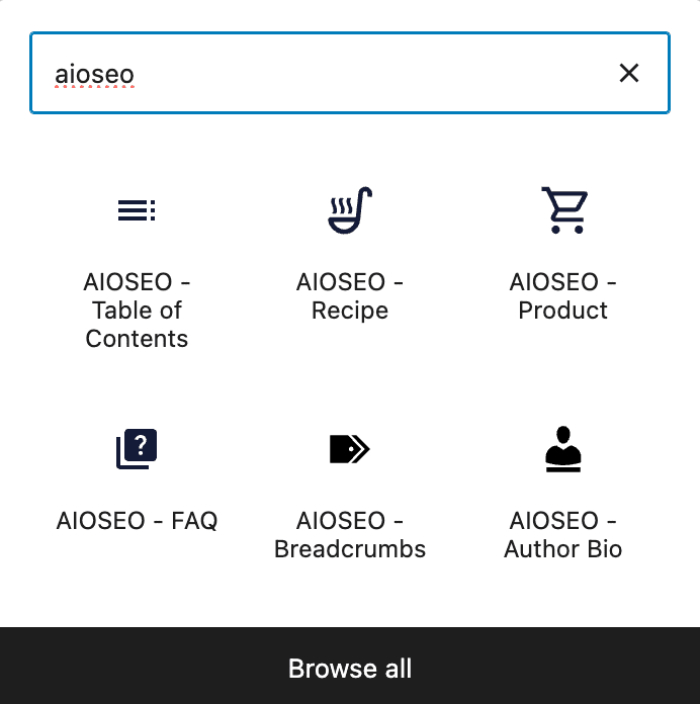
You’ll see the AIOSEO – Product block in the search results. Click on it to add it to your page.
You'll now see the fields that you can complete with your product details. There are tabs at the top for General, Identifiers, Offer, Attributes, Audience, Reviews, Review Rating, and Shipping Destinations.
Configuring the Product Information
General tab
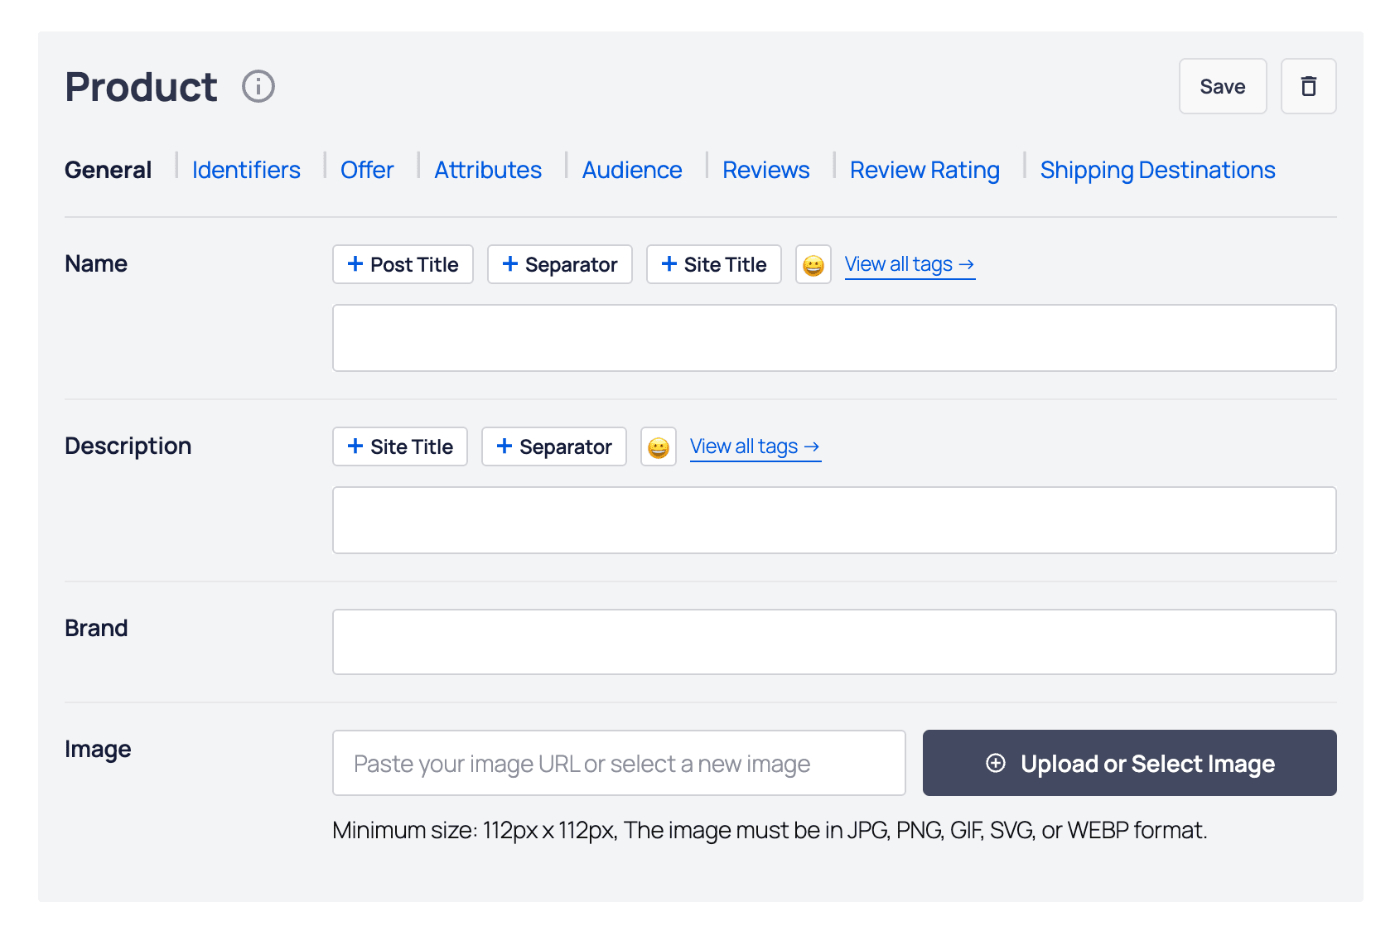
On the General tab, complete the fields as described below:
- Name – Enter the name of your product. You can select one of the smart tags shown above the Name field, or click View all tags to choose from additional smart tags.
- Description – Enter the description of your product. You can select one of the smart tags shown above the Description field, or click View all tags to choose from additional smart tags.
- Brand – Enter the brand of the product.
- Image – Select or upload an image that represents your article. You can also paste in the URL for an image into this field.
Identifiers tab
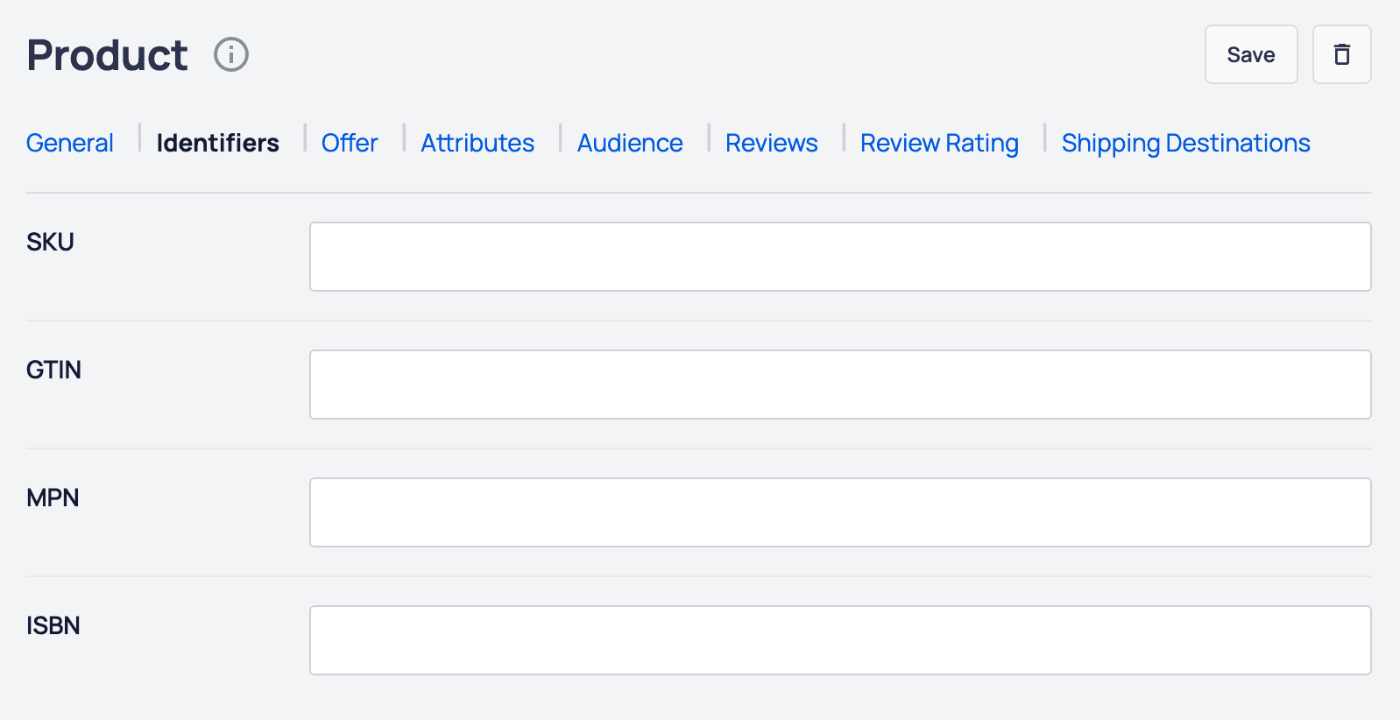
On the Identifiers tab, you can set the following:
- SKU – Enter the SKU of the product.
- GTIN – Enter the GTIN of the product.
- MPN – Enter the MPN of the product.
- ISBN – Enter the ISBN of the product.
Offer tab
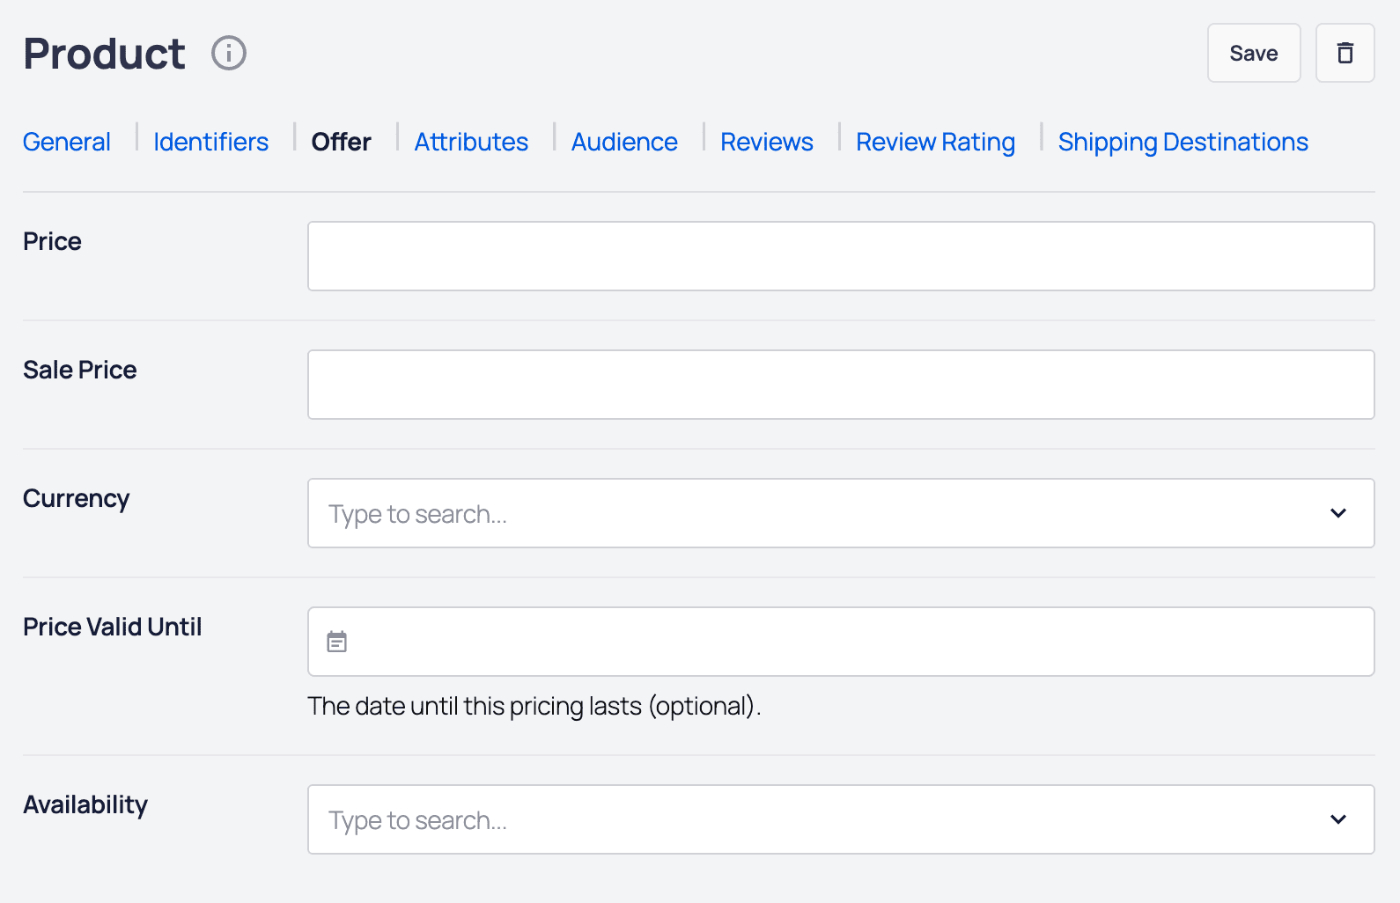
On the Offer tab, you can set the following:
- Price – Enter the price for your product.
- Sale Price – Enter the sale price for your product.
- Currency – Select which currency your price is in.
- Price Valid Until – If this is a sale or limited time price, then select the date that the price is valid until.
- Availability – Select the availability for your product.
Attributes tab
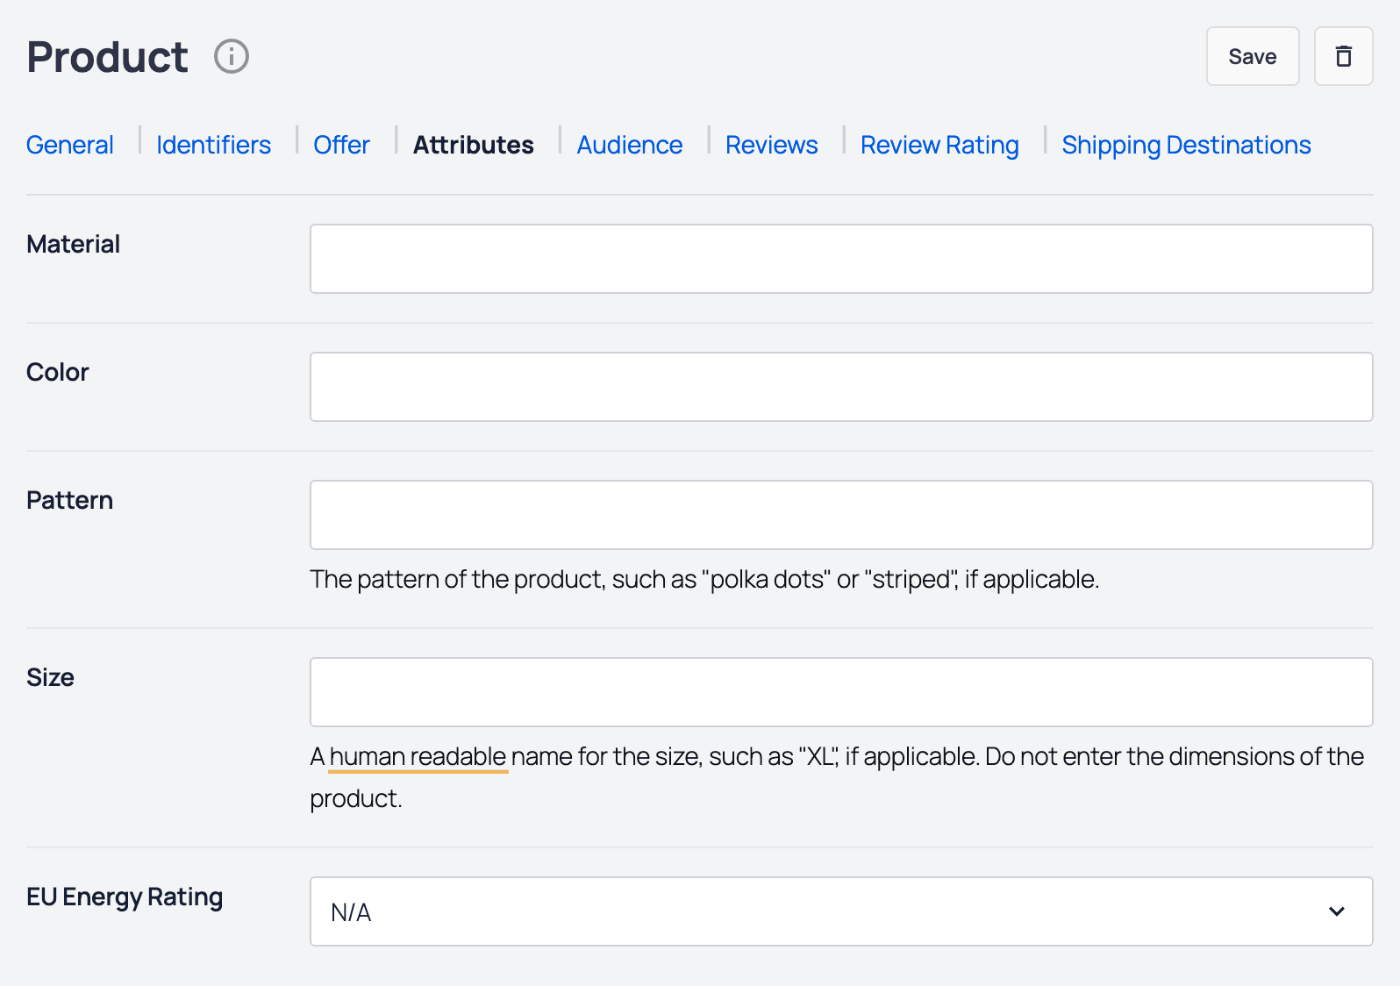
On the Attributes tab, you can set the following:
- Material – Enter the material or combination of materials that your product is made from. Separate each material with a slash, for example: cotton/polyester. See Google's article on Material here.
- Color – Enter the color or combination of colors that your product comes in. Separate each color with a slash, for example: Red/Green/Black. See Google's article on Color here.
- Pattern – Enter the pattern that your product comes in. Only one pattern is accepted. See Google's article on Patterns here.
- Size – Enter the size or sizes that your product comes in. Separate each size with a slash, for example: small/medium/large. See Google's article on Size here.
- EU Energy Rating – Select the EU energy rating for your product from the drop down.
Audience tab
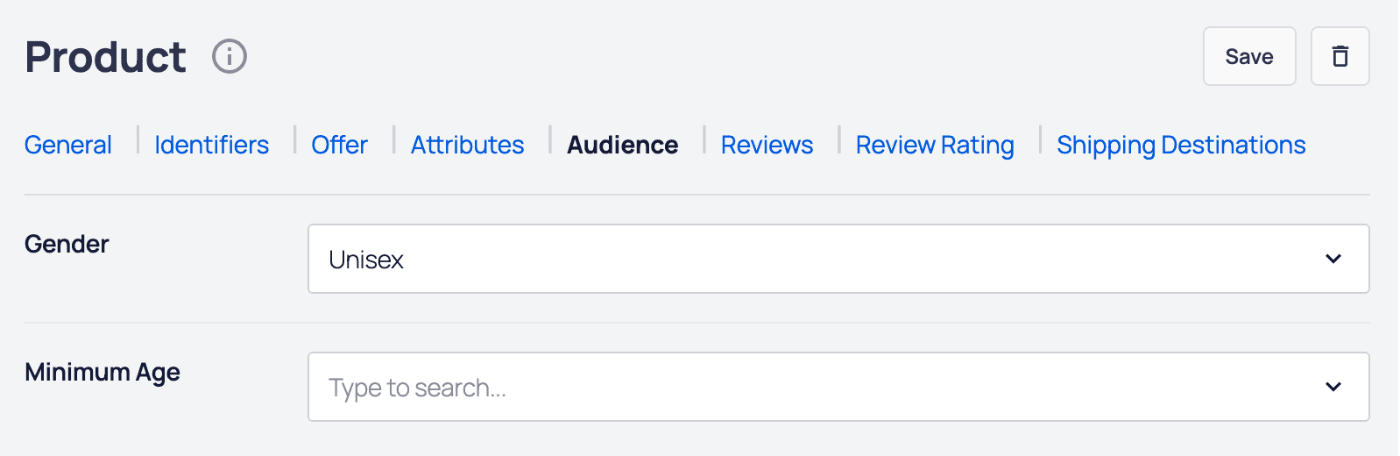
On the Audience tab, you can set the following:
- Gender – Select the gender from the drop down of the intended audience for your product. See Google's article on Gender here.
- Minimum Age – Enter the minimum age of the intended audience for your product. See Google's article on Age here.
Reviews tab
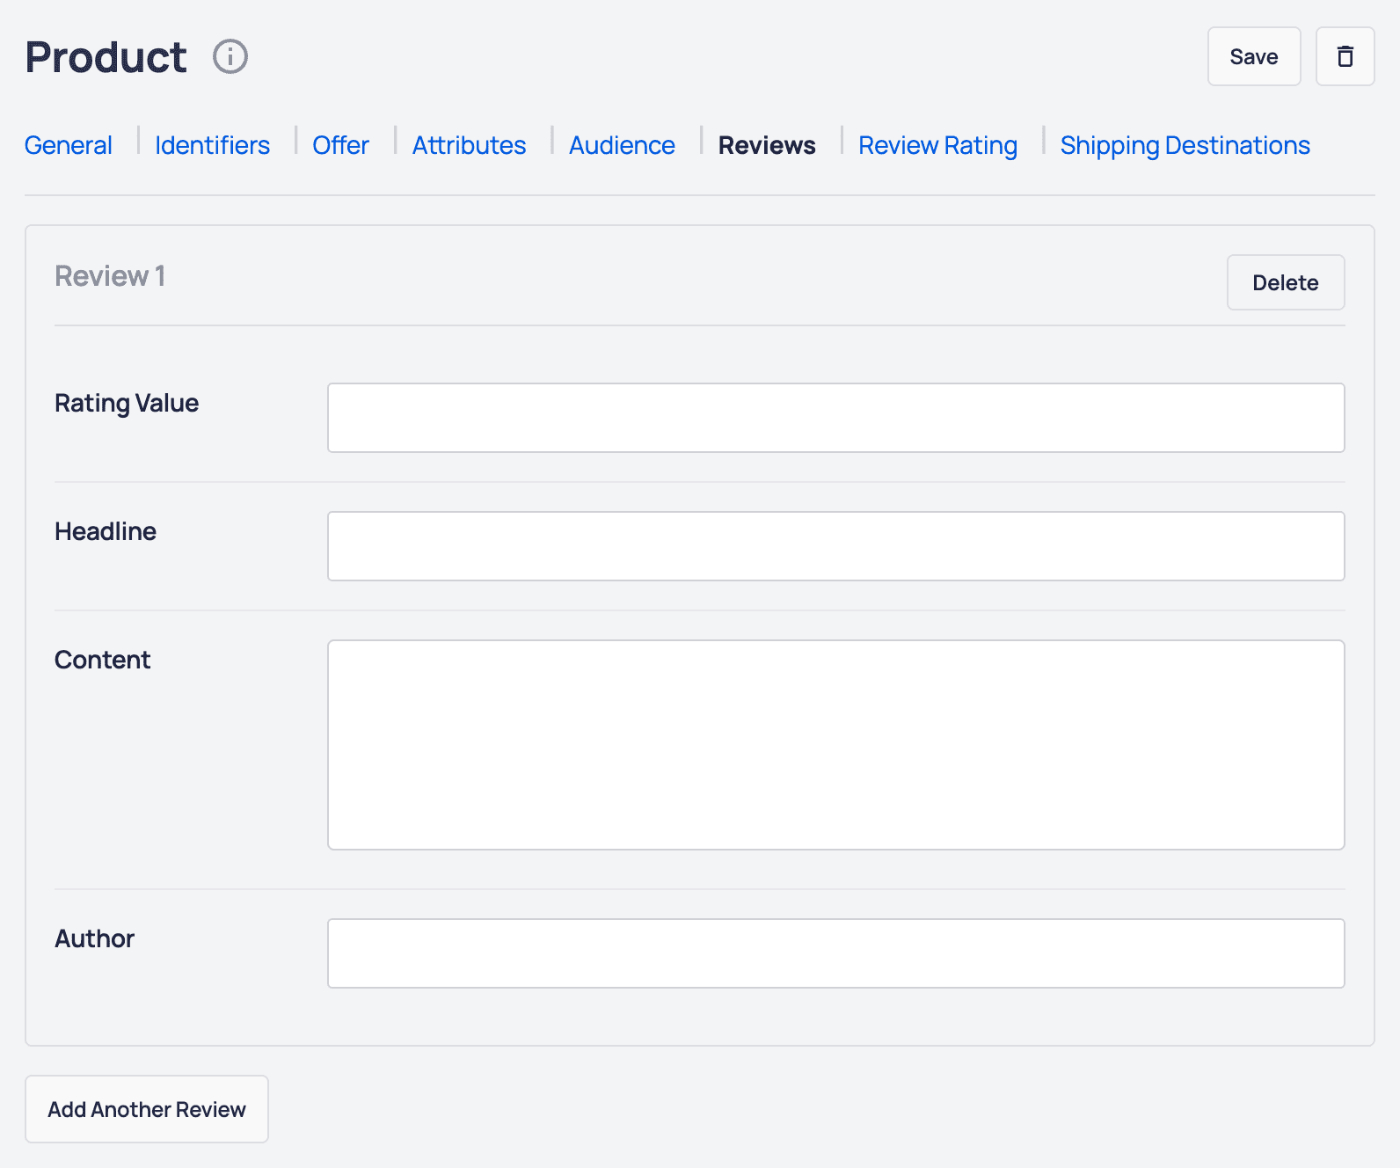
On the Reviews tab, you can add reviews for your product. In a review, you can set the following:
- Rating Value – The rating value for the review.
- Headline – The headline for the review.
- Content – The content of the review.
- Author – The name of the review author.
Click on the Add Another Review button to add more reviews for your product.
Click the Delete button to delete a review.
Review Rating tab
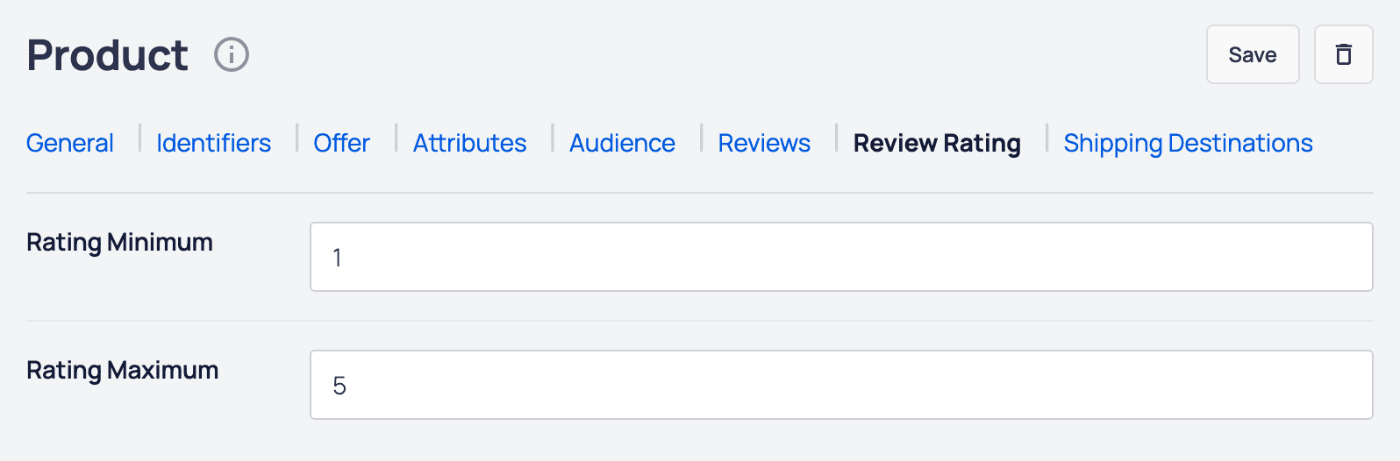
On the Review Rating tab, you can set the following:
- Rating Minimum – Enter the minimum rating value.
- Rating Maximum – Enter the maximum rating value.
Shipping Destinations tab
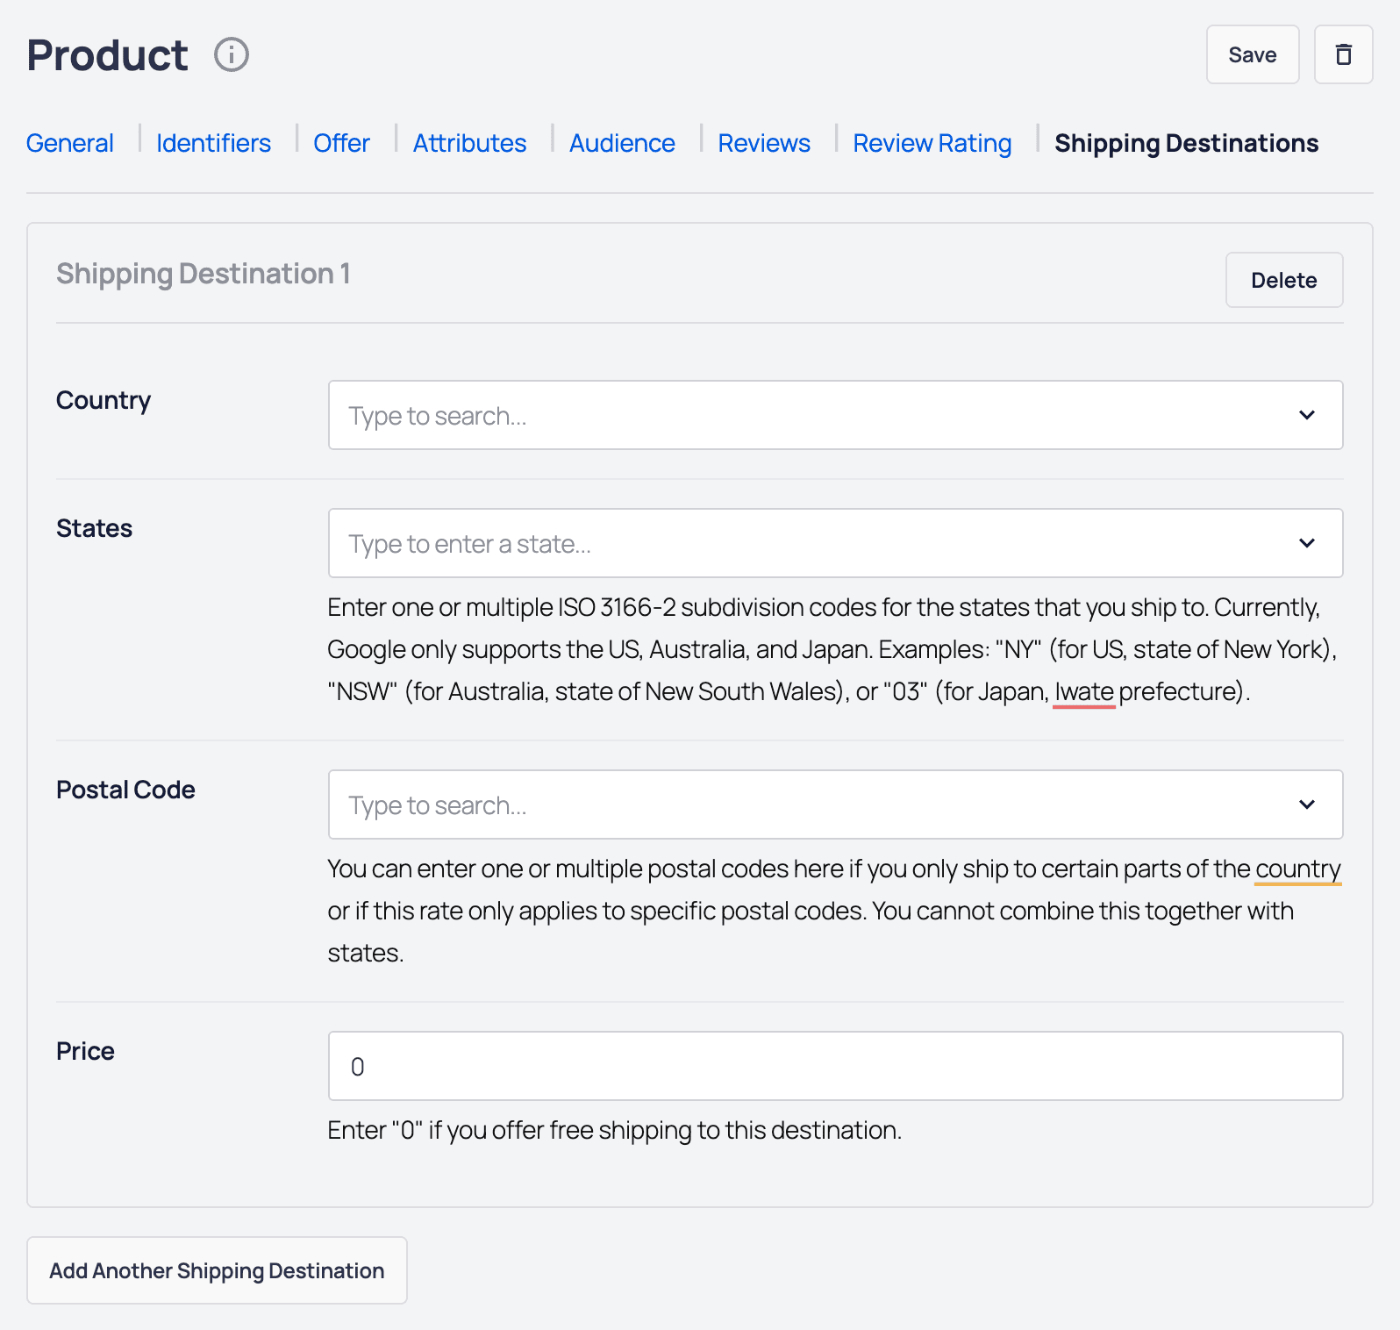
On the Shipping Destinations tab, you can set the following:
- Country – Select the country you ship to from the drop down.
- States – Enter the states you ship to.
- Postal Code – Enter the postal codes you ship to.
- Price – Enter the shipping cost for this destination.
Click on the Add Another Shipping Destination button to add more shipping destinations for your product.
Click the Delete button to delete a shipping destination.
Click the Save button to save your product details, or the Delete button to delete your product.
That's all! You can now save your post or page and view the product on the front end of your site.
NOTE:
Not only will your product be displayed on your site, but all the Product Schema markup will be displayed in the source code.
This means that you don't need to add Product Schema in the AIOSEO Schema settings.
All in One SEO includes a WordPress Recipe block, which you can use in the WordPress Block editor to display recipes anywhere on the page.
IMPORTANT:
WordPress Blocks only work with the WordPress Block Editor. They don't work with the Classic Editor or any page builders.
NOTE:
The AIOSEO Recipe Block is available to customers with a Basic plan or above for All in One SEO Pro.
Upgrade to All in One SEO Pro today to get the Recipe Block and many more features!
In This Article
Displaying Recipes Using the AIOSEO Recipe Block
To get started, edit any content using the WordPress Block editor and click the Add Block icon.
You can search for the block by typing AIOSEO in the search field.
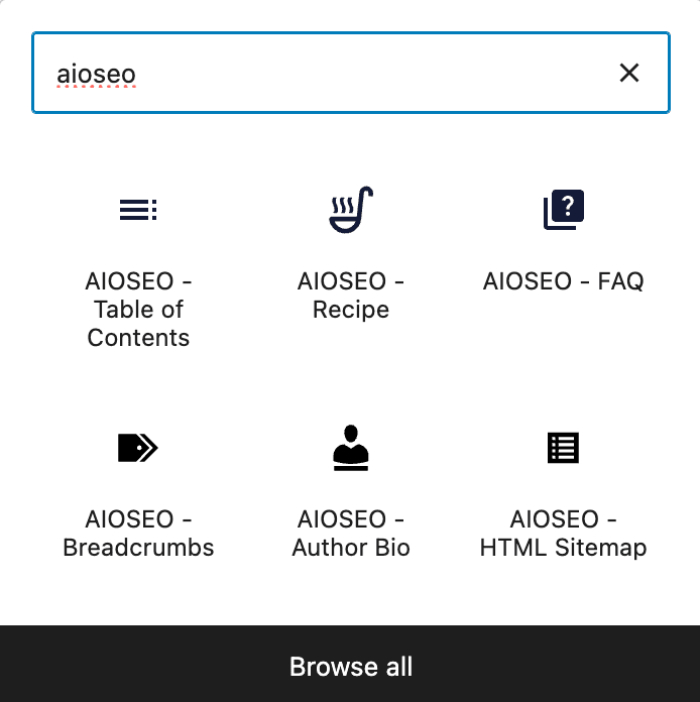
You’ll see the AIOSEO – Recipe block in the search results. Click on it to add it to your page.
You'll now see the fields that you can complete with your recipe details. There are tabs at the top for General, Nutrition, Time Required, Instructions, Reviews, and Review Rating.
Configuring the Recipe Information
General tab

On the General tab, complete the fields as described below:
- Name – Enter the name of your recipe. You can select one of the smart tags shown above the Name field, or click View all tags to choose from additional smart tags.
- Description – Enter the description of your recipe. You can select one of the smart tags shown above the Description field, or click View all tags to choose from additional smart tags.
- Author – Enter the name of the author of your recipe. You can select one of the smart tags shown above the Author field, or click View all tags to choose from additional smart tags.
- Ingredients – Enter the name of each ingredient including measurement, i.e. 1 tablespoon of flour. Click the Enter button to add the ingredient, then continue adding more ingredients.
- Dish Type – Enter the type of dish.
- Cuisine Type – Enter the type of cuisine.
- Keywords – Enter any other terms such as season, holiday, or other descriptors.
- Image – Select or upload an image that represents your recipe. You can also paste in the URL for an image into this field.
Nutrition tab
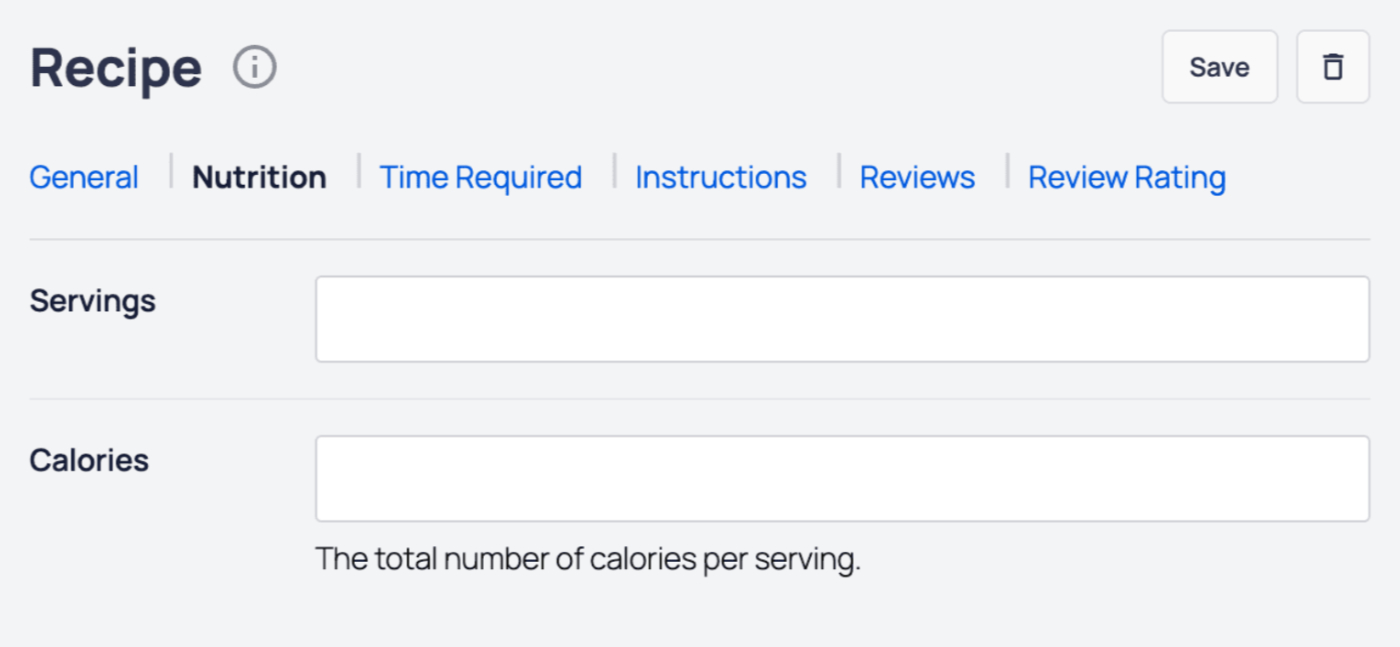
On the Nutrition tab, complete the fields as described below:
- Servings – Enter the amount of servings that the recipe yields.
- Calories – Enter the number of calories per serving.
Time Required tab
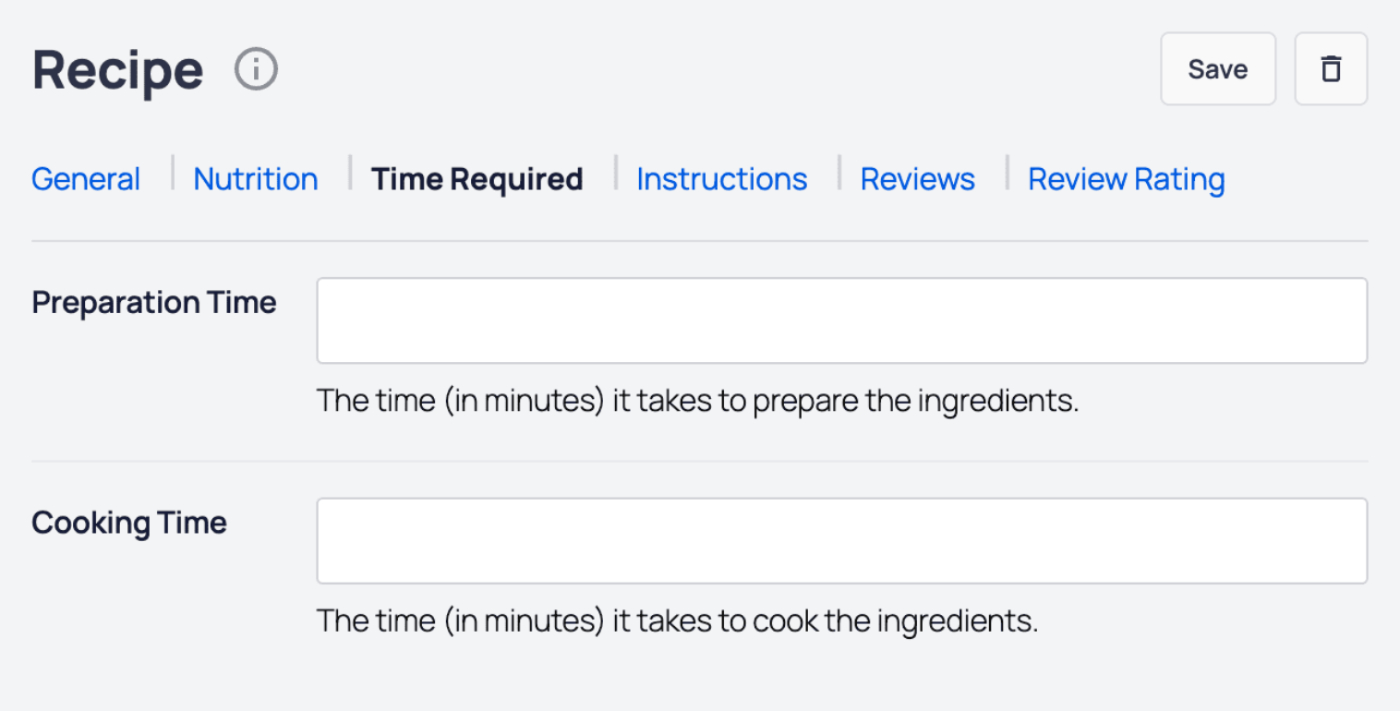
On the Time Required tab, complete the fields as described below:
- Preparation Time – Enter the time in minutes that it takes to prepare the ingredients.
- Cooking Time – Enter the time in minutes that it takes to cook the ingredients.
Instructions tab
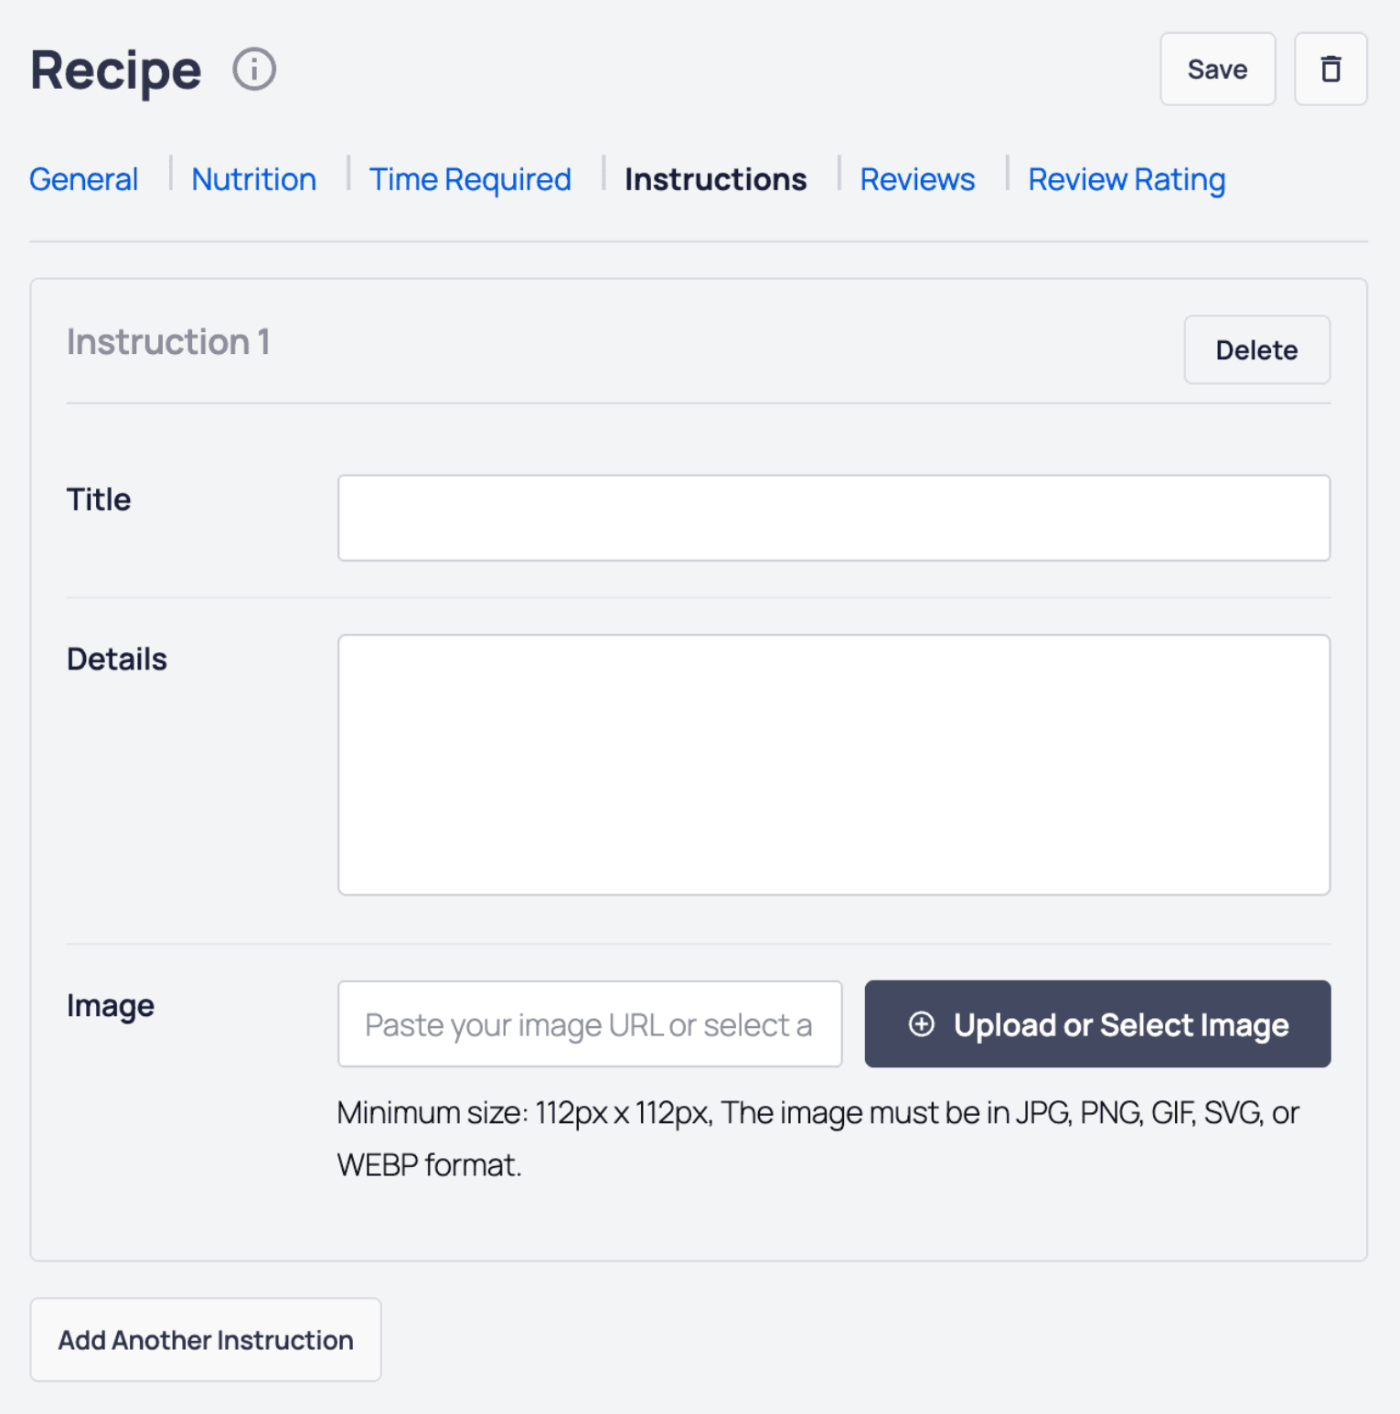
On the Instructions tab, add the steps to prepare the recipe. For each step, you can set the following:
- Title – Enter the title for the step.
- Details – Enter the details for the step.
- Image – Select or upload an image that visualizes the step. You can also paste in the URL for an image into this field.
Click on the Add Another Instruction button to add more steps for the recipe.
Click the Delete button to delete a step.
Reviews tab
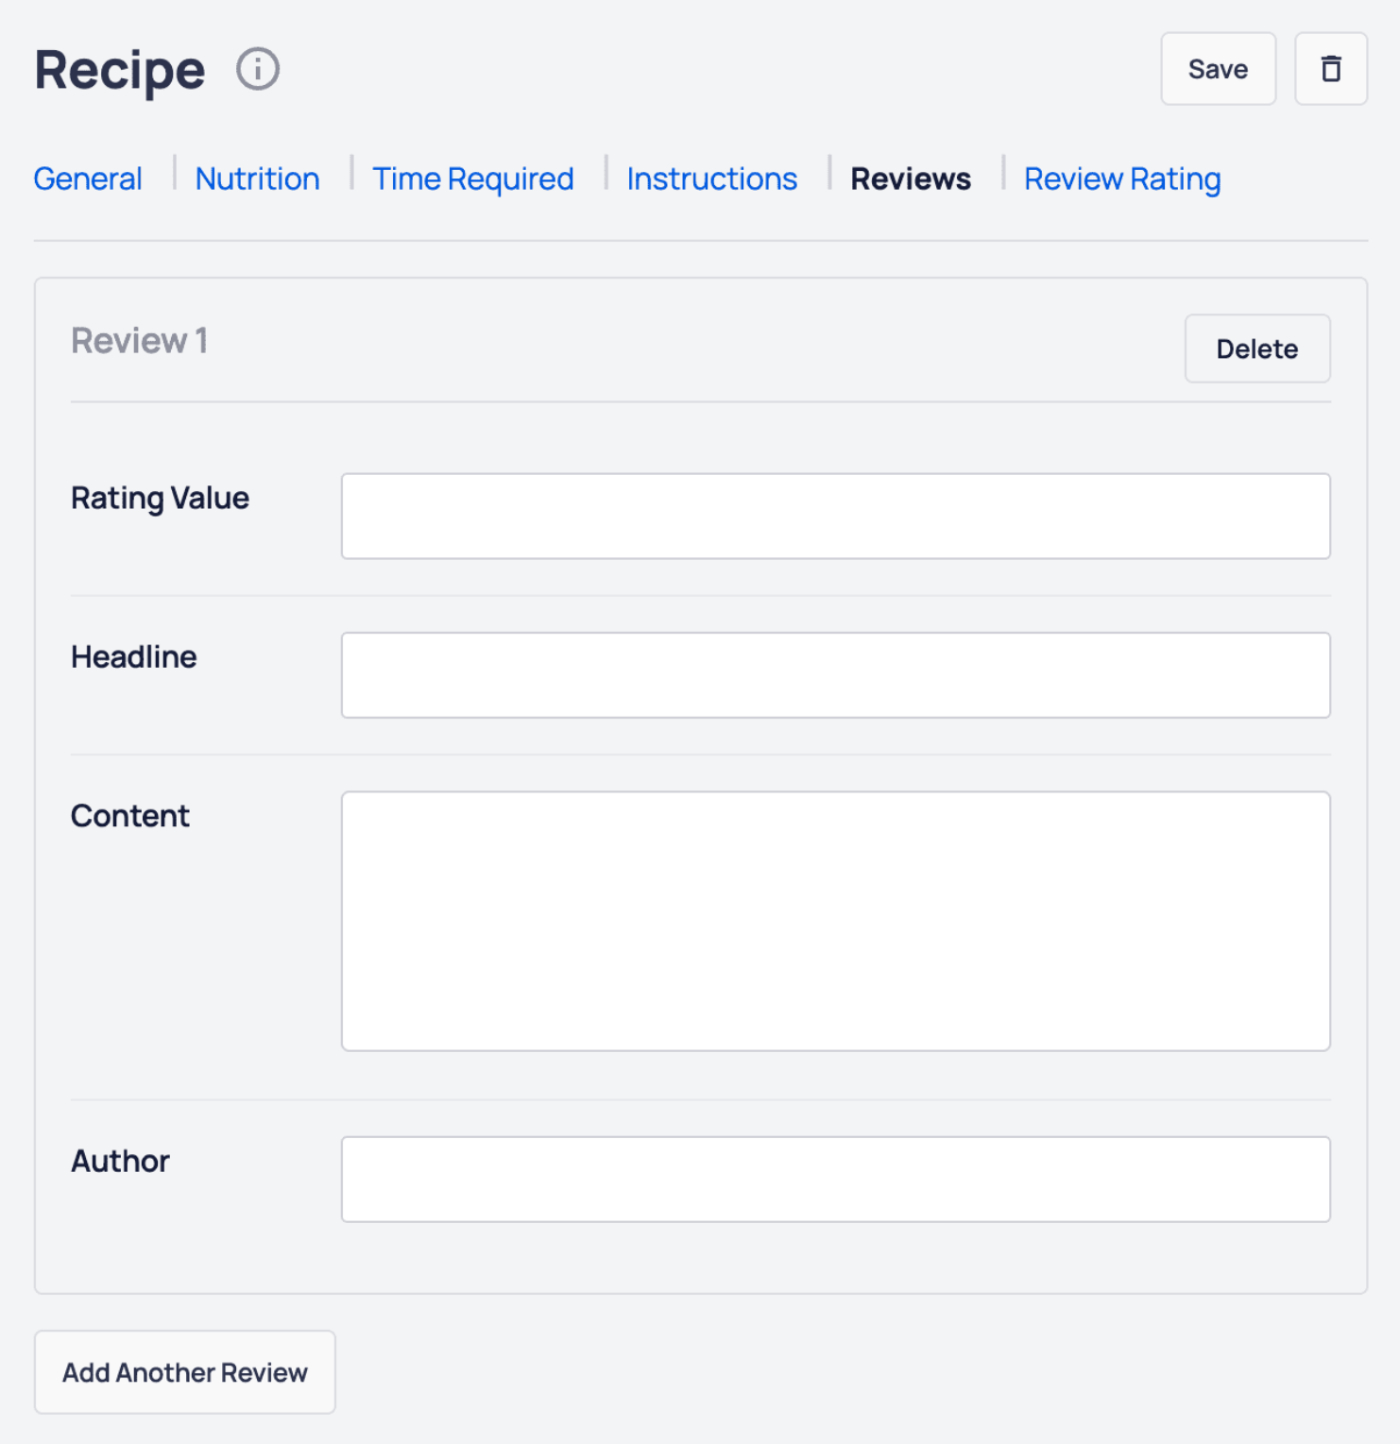
On the Reviews tab, you can add reviews for your recipe. In a review, you can set the following:
- Rating Value – The rating value for the review.
- Headline – The headline for the review.
- Content – The content of the review.
- Author – The name of the review author.
Click on the Add Another Review button to add more reviews for your recipe.
Click the Delete button to delete a review.
Review Rating tab
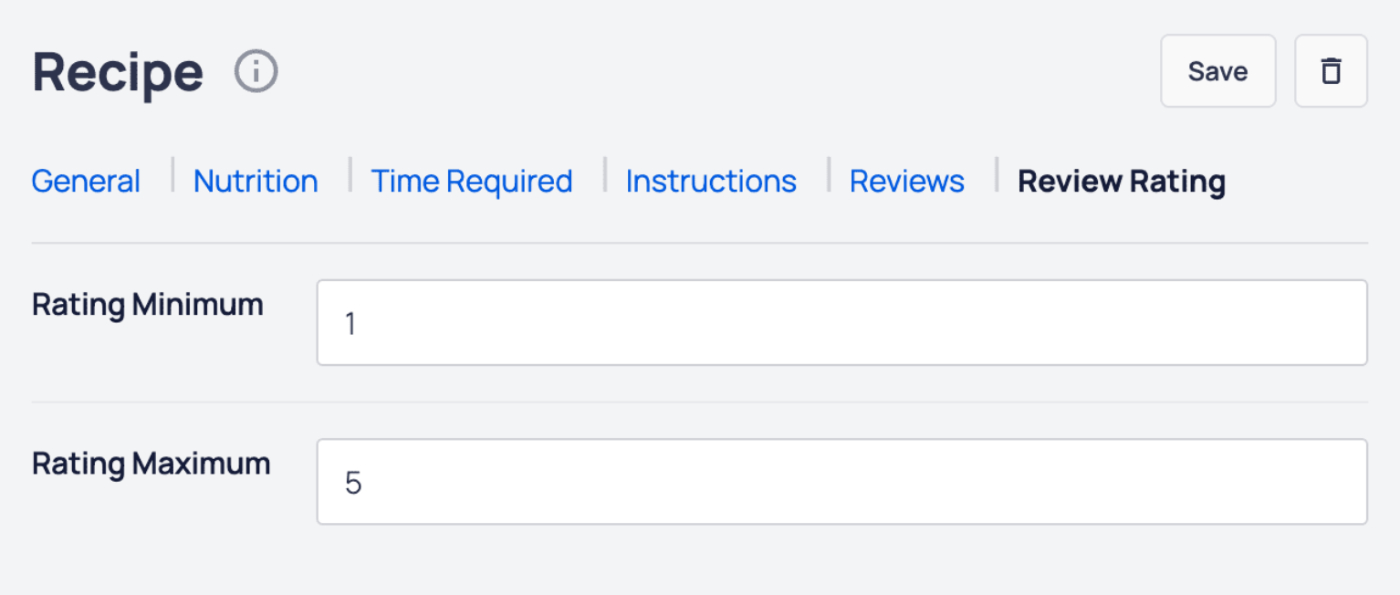
On the Review Rating tab, you can set the following:
- Rating Minimum – Enter the minimum rating value.
- Rating Maximum – Enter the maximum rating value.
Click the Save button to save your recipe details, or the Delete button to delete your recipe.
That's all! You can now save your post or page and view the recipe on the front end of your site.
NOTE:
Not only will your recipe be displayed on your site, but all the Recipe Schema markup will be displayed in the source code.
This means that you don't need to add Recipe Schema in the AIOSEO Schema settings.
The answer is that Broken Link Checker doesn't use license keys. Instead, it's linked to your account.
Our Broken Link Checker is a free plugin that uses our servers to scan your site for broken links. You can sign up for a free account by following the steps in our Broken Link Checker documentation here.
Once you've signed up for an account, you can connect to it within the Broken Link Checker plugin, and then start using the plugin. No license key is needed.
The post Do I Need a License Key to Use Broken Link Checker first appeared on AIOSEO.]]>The AIOSEO Details column displays the TruSEO score, Headline Analyzer score, SEO Title, Meta Description, Index Status, and Link Assistant details for each post or page.

Occasionally, the information in the AIOSEO Details column may not load, and instead will display a pulsing circle as shown below:

When this happens, we recommend following the troubleshooting steps below:
- Go to Plugins > Add New and install and activate the Health Check & Troubleshooting plugin.
- Go to Plugins > Installed Plugins and click on Troubleshoot below the All in One SEO plugin.

This will temporarily disable all other plugins and switch to the default WordPress theme only for your user only, without impacting what your visitors see. - Check if you’re able to reproduce the problem again on the Posts or Pages screen.
- If you're no longer able to reproduce the problem, activate your theme and check again.
- If you're still unable to reproduce the problem, activate your plugins one at a time, checking to see if the problem can be reproduced.
- If you can reproduce the problem after activating a specific plugin, then you've found the cause of the issue.
- Once you’re done troubleshooting, deactivate and delete the Health Check & Troubleshooting plugin.
You can also follow the steps in our How to Open the Browser Error Console article here.
These troubleshooting steps should provide the cause of the problem.
You can reach out to our Support team via the submit our Basic question form on our Contact page here. Please include all of the details from the troubleshooting steps performed above.
The post Troubleshooting Issues with the AIOSEO Details Not Loading first appeared on AIOSEO.]]>With All in One SEO's built-in AI Image Generator feature, you can easily create images to use within content, or as your featured image with just a simple prompt.
In this article, we'll go over how to use this AI feature.
In This Article
Getting Started with AIOSEO AI
The AI features in All in One SEO rely on a credits system. You can buy blocks of credits, or use credits you receive as part of your subscription for All in One SEO Pro.
To get started, you'll need to verify that you have AI credits. To do this, click on General Settings in the All in One SEO menu.

Next, click on the AI Content tab.
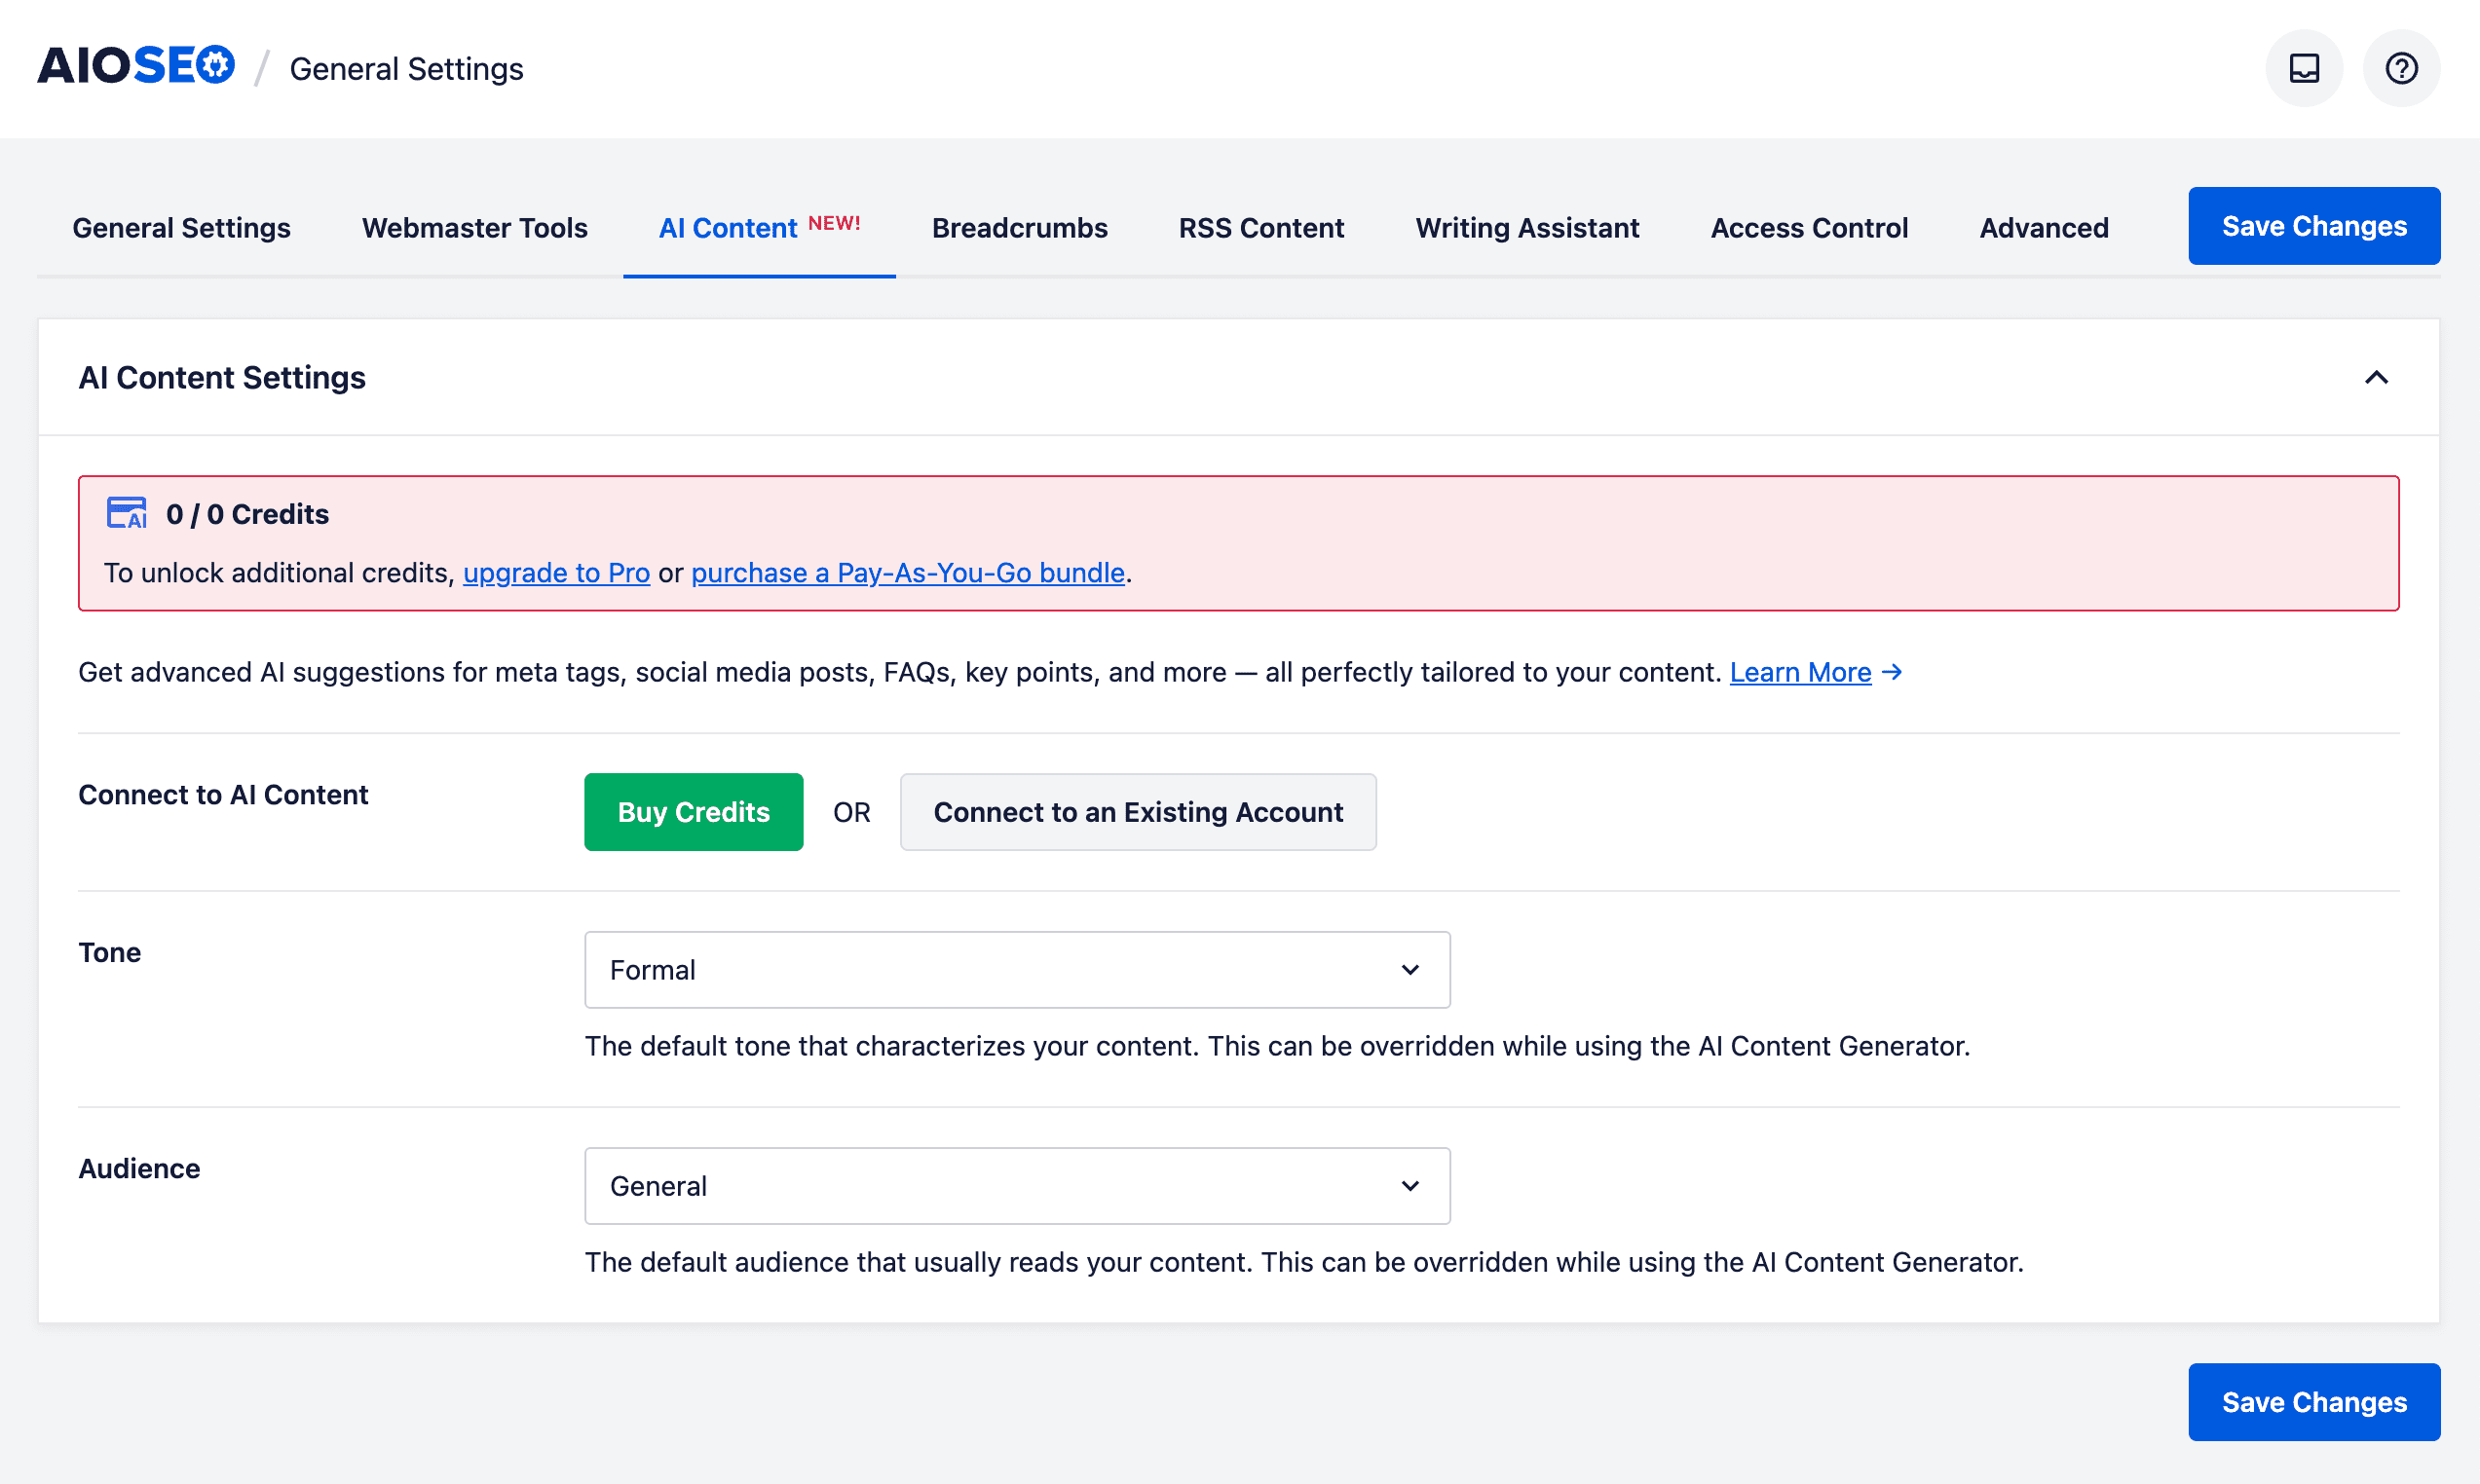
You can click on the Buy Credits button to purchase a block of Pay-As-You-Go credits, or you can click on the Connect to an Existing Account button if you already have an account for AI credits.
If you activate a license key for All in One SEO Pro, then you'll see that your account is automatically connected and the number of credits available to you.

In the screenshot above, you can see that we have 190,000 credits remaining out of 200,000 credits.
For more information about the AI credits system for All in One SEO and how to manage your account, please check out our article on Buying and Managing Credits for the AIOSEO AI Features.
Now that we've verified that we have some AI credits, let's check out the AI Image Generator feature.
Creating Images in Your Content Using the AIOSEO AI Image Generator
NOTE:
This feature works with the WordPress Block Editor (also known as Gutenberg), the WordPress Classic Editor, and our supported page builders.
To get started, edit or create a new post using the default WordPress Block Editor and click on the Add Block icon.
Select the Image Block to add an image to your content.

Next, click on the Generate with AI button to open the AI prompt.

The Image Generator window will be displayed that shows the Prompt field, as well as some options, and a Preview of the generated image.

In the Prompt field, type a description of the image you want to generate. For example, “A cute cat wearing a wizard hat, reading a spell book”.
Image Options
You can then select from the image options listed below:
- Quality – In this drop down, you can select the image quality from Low, Medium, and High.
- Style – In this drop down, you can select the image style from Auto, 3D Render, Cinematic, Creative, Illustration, Minimalist, Stock Photo, and Vibrant.
- Aspect Ratio – In this drop down, you can select the aspect ratio from Landscape, Portrait, and Square.
NOTE:
The image quality will affect the number of AI credits that will be used to generate the image.
You can set the sitewide defaults for these image options in the AI Content Settings by going to All in One SEO > General Settings and clicking on the AI Content tab.
Once you've entered your prompt and selected from the image options, click on the Generate Image button to create your image.

Notice that the Generate Image button shows the number of AI credits that will be used to generate the image.
In the bottom left-hand side of the window, you'll see the number of credits you have, along with the amount remaining.
IMPORTANT:
Using AI to generate images can be time-consuming, depending on the complexity of the prompt, and the quality of the image.
You should be patient and wait for the image generation process to complete, before closing the Image Generator window.
Once the image generation process has completed, the image will be displayed in the Preview area.

You can click on the Insert Image button to add the image to your content.
You can also edit your prompt, or change the quality and regenerate the image.
That's all! You've now used the AI Image Generator in All in One SEO to create images to use in your content.
Editing Existing Images Using the AI Image Generator
Now that we've discussed creating new images using the All in One SEO AI Image Generator, let's look at editing existing images in your content.
First, edit your content and click on the image you want to edit.

Click on the Edit with AI button to open the Image Generator window.

Now you can enter your prompt and select the image quality.

Click the Regenerate button to generate the new image using AI.
Notice that the Regenerate button shows the number of AI credits that will be used to generate the image.
In the bottom left-hand side of the window, you'll see the number of credits you have, along with the amount remaining.
IMPORTANT:
Using AI to generate images can be time-consuming, depending on the complexity of the prompt, and the quality of the image.
You should be patient and wait for the image generation process to complete, before closing the Image Generator window.
Once the image regeneration process has completed, the image will be displayed in the Preview area.

You can click on the Insert Image button to add the image to your content.
You can also edit your prompt, or change the quality and regenerate the image.
That's all! You've now used the AI Image Generator in All in One SEO to edit an image in your content.
Creating a Featured Image Using the AIOSEO AI Image Generator
Not only can you create and edit images in your content using the AI Image Generator in All in One SEO, but you can also create a featured image.
To get started, edit or create a new post using the default WordPress Block Editor and click on the Generate with AI button next to the Set featured image button.

The Image Generator window will be displayed that shows the Prompt field, as well as some options, and a Preview of the generated image.
In the Prompt field, type a description of the image you want to generate. For example, “A cute cat wearing a wizard hat, reading a spell book”.
Select the Image Options as described above.
Once you've entered your prompt and selected from the image options, click on the Generate Image button to create your featured image.
Notice that the Generate Image button shows the number of AI credits that will be used to generate the image.
In the bottom left-hand side of the window, you'll see the number of credits you have, along with the amount remaining.
IMPORTANT:
Using AI to generate images can be time-consuming, depending on the complexity of the prompt, and the quality of the image.
You should be patient and wait for the image generation process to complete, before closing the Image Generator window.
Once the image generation process has completed, the image will be displayed in the Preview area.
You can click on the Insert Image button to add the image as your featured image.
You can also edit your prompt, or change the quality and regenerate the image.
That's all! You've now used the AI Image Generator in All in One SEO to create a featured image.
AI Generated Content Disclaimer
The use of artificial intelligence (AI) to generate images involves a range of considerations that users should be aware of. AI-generated images may not always accurately represent real-world objects or scenarios, and there is a possibility of unintended biases or inaccuracies being present in the output. Users are advised to exercise caution and critical judgment when utilizing such images, particularly in contexts where authenticity and precision are paramount.
Furthermore, it is important to recognize the ethical and legal implications associated with AI-generated visuals. These images may inadvertently infringe upon intellectual property rights or misrepresent individuals and entities. Users should ensure that they have appropriate rights or permissions when using AI-generated content and remain mindful of the potential impact on privacy, reputation, and compliance with applicable laws and regulations.
The developers of All in One SEO do not guarantee the absolute accuracy, impartiality, or rights and permissions of the generated images.
Further Reading
Check out more articles on how to use the AIOSEO AI features here.
The post Using the AI Image Generator in All in One SEO first appeared on AIOSEO.]]>The AI Assistant in All in One SEO is a block for the WordPress Block Editor that will create whatever text content you need.
In this article, we'll go over how to use this versatile assistant.
In This Article
Getting Started with AIOSEO AI
The AI features in All in One SEO rely on a credits system. You can buy blocks of credits, or use credits you receive as part of your subscription for All in One SEO Pro.
To get started, you'll need to verify that you have AI credits. To do this, click on General Settings in the All in One SEO menu.
Next, click on the AI Content tab.
You can click on the Buy Credits button to purchase a block of Pay-As-You-Go credits, or you can click on the Connect to an Existing Account button if you already have an account for AI credits.
If you activate a license key for All in One SEO Pro, then you'll see that your account is automatically connected and the number of credits available to you.
In the screenshot above, you can see that we have 190,000 credits remaining out of 200,000 credits.
For more information about the AI credits system for All in One SEO and how to manage your account, please check out our article on Buying and Managing Credits for the AIOSEO AI Features.
Now that we've verified that we have some AI credits, let's check out the AI Assistant feature.
Creating Content Using the AIOSEO AI Assistant Block
IMPORTANT:
The AIOSEO AI Assistant is a WordPress Block that only works with the default WordPress Block Editor.
Support for page builders will be added in future releases.
To get started, edit or create a new post using the default WordPress Block Editor and click on the Add Block icon.
You can search for the block by typing AIOSEO in the search field.
You’ll see the AIOSEO – AI Assistant block in the search results. Click on it to add it to your post.

You'll see the AI Assistant block added to the content area. If you have other content blocks in the content area, then you can drag and drop this new block to wherever you want to add this content.
Next, type your prompt into the block and click on the Generate button.

The AI Assistant will generate content and insert it into the content area where you placed the AI Assistant block.
You'll see icons at the top of the generated content that you can use to translate the content into various languages, summarize the content, and make the content longer or shorter.
In the sidebar of the Edit Post screen, you'll see the AIOSEO – AI Assistant block settings, where you can set the tone and the audience for the generated content. You can also see how many credits are used each time you use the AI Assistant, as well as how many credits you have left out of your total number of credits.

Finally, at the bottom of your content, you'll see the AI Assistant block where you can regenerate or delete the content that was generated.

That's all! You've now used AIOSEO AI to create text content for your post, giving you an easy way to generate your content.
AI Generated Content Disclaimer
The content generated by artificial intelligence tools may not always be entirely accurate or reliable. While these systems are designed to provide helpful and informative content, they are based on patterns in data and may inadvertently produce information that is outdated, incomplete, or incorrect. We recommend that you verify critical details through reputable sources before publishing AI-generated content.
Additionally, AI models can sometimes reflect biases present in their training data, which may lead to unintentional skewing of information or perspectives. It's important for users to approach AI-produced content with a critical mindset and consider multiple viewpoints to ensure a well-rounded understanding. The developers of All in One SEO do not guarantee the absolute accuracy or impartiality of the generated output.
Further Reading
Check out more articles on how to use the AIOSEO AI features here.
The post Using the AI Assistant in All in One SEO to Create Content first appeared on AIOSEO.]]>In this article, we’ll explain what this status means, why it occurs, and how you can resolve it using AIOSEO’s features.
In This Article
- What Does Excluded by ‘noindex’ Tag Mean?
- How to Find the Excluded by 'noindex' Tag Status in Google Search Console
- How to Find the Excluded by 'noindex' Tag Status using Index Status in All in One SEO’s Search Statistics Feature
- How to Fix the Excluded by ‘noindex’ tag with AIOSEO
- Preventing Future Issues
What Does Excluded by ‘noindex’ Tag Mean?
The Excluded by ‘noindex' Tag status occurs when Google discovers a page on your website but does not index it because the page contains a noindex robots meta tag. This tag instructs search engines not to index the page.
This situation often arises from:
- Pages that are not intended for public indexing, such as account login pages, privacy or terms pages, or thank-you pages.
- Misconfigured SEO settings or plugins.
- Old or unused pages that were previously excluded from indexing.
How to Find the Excluded by ‘noindex' Tag Status in Google Search Console
To identify pages with the Excluded by ‘noindex' tag status in Google Search Console (GSC), follow these steps:
- Log in to your Google Search Console account and select the appropriate property (website) in the Search property drop-down (if you manage multiple websites).
- Click on Pages under Indexing in the left-hand sidebar.

- In the Page indexing report, scroll down to the Why pages aren’t indexed section and look for Excluded by ‘noindex' tag. Click on this to see a list of URLs flagged for this reason.

- After you click on Excluded by ‘noindex' tag, scroll down to the Examples section to view the list of affected URLs. This will help you understand whether the URLs are intentionally set to noindex or if there are issues.

How to Find the Excluded by ‘noindex' Tag Status using Index Status in All in One SEO’s Search Statistics Feature
IMPORTANT:
Before getting started, make sure to connect Search Statistics to your Google Search Console account. You can find instructions on how to connect to your Google Search Console account here.
NOTE:
The Index Status feature is available to customers with an Elite plan for All in One SEO Pro. Upgrade to All in One SEO Pro today to get Search Statistics and many more features!
The Index Status feature enables you to see Google Search Console errors directly within your WordPress dashboard. To do this, follow these steps:
- Click on Search Statistics in the All in One SEO menu and then click on the SEO Statistics tab.

- In the Content Performance report, you’ll find a column labeled Indexed, which shows the index status of your pages using color-coded icons.

- If any of these icons are orange or red, hover over them to reveal a detailed popup. If the issue is an Excluded by ‘noindex' tag status, then the popup will provide specific information.


- Alternatively, navigate to the All Posts or All Pages screen in WordPress. The AIOSEO Details column on this page displays the same index status icons as the Content Performance report. Hovering over an icon here will also show details of any errors.

By using these methods in All in One SEO, you can effectively locate and address URLs affected by the Excluded by ‘noindex' tag status, ensuring a smooth user experience and optimal indexing for your site. You can learn more about Checking the Index Status of Content in our article here.
How to Fix the Excluded by ‘noindex’ tag with AIOSEO
AIOSEO provides a user-friendly interface to identify and resolve issues related to the noindex tag. Follow these steps to address the error:
Review and Update No Index Settings
Noindex can be set in two ways in All in One SEO: at the individual page or post level, and for your content types in general.
Here’s how to check noindex at the individual page or post level:
- Start by editing the affected page or post in WordPress. Scroll down to the AIOSEO Settings section and click on the Advanced Tab.
- In this tab, you'll see a setting for Robots Settings with a toggle that's typically set to Use Default Settings.
- If you see that the No Index setting is checked, uncheck it and click the Update button.

Here’s how to check noindex at the content level:
- In the WordPress dashboard, go to the All in One SEO menu and click on Search Appearance.
- Click on the Content Types tab.
- Here you will see sections for each of your content types, such as Posts, Pages, Products, etc.
- Click on the Advanced tab in the section for the content type you want to check.
- Look for the Robots Meta setting and make sure the No Index checkbox is unchecked. If it is checked, uncheck it and click Save Changes.

Addressing noindex for Paginated Content
If you have received error messages for paginated content, such as category or archive pages, you can check the sitewide settings for this.
Here are the steps to check the settings for noindex on paginated content:
- In the WordPress dashboard, go to the All in One SEO menu and click on Search Appearance.
- Click on the Advanced tab.
- Click the Use Default Settings toggle to turn it off, which will display the global robots meta checkboxes.
- You should see a checkbox for No Index Paginated, which will set the noindex robots meta tag on paginated content.
- Ensure the checkbox is unchecked if you want search engines to index your paginated pages.
- Click Save Changes.

Addressing noindex for Feed URLs
RSS feed URLs often appear with a noindex directive, and this is entirely normal. These are not actual pages, but rather basic code versions of your content designed for RSS feed crawlers and readers.
Google typically doesn’t display these feeds in search results because they’re not meant for human consumption. WordPress creates several RSS feeds, and these URLs will always end with “/feed/”.
By default, AIOSEO sets RSS feeds to noindex to align with SEO best practices. If you wish to change this behavior, you can refer to our guide on Setting NOINDEX for RSS Feeds. However, we don’t recommend changing this, and you should leave them as is because Google will gradually remove feed URLs from your Search Console, and there’s no SEO benefit to indexing them.
Check Search Engine Visibility Settings
Noindex can also be controlled sitewide via the WordPress global site settings. To check this, follow these steps:
- Go to Settings from the WordPress dashboard. In the Settings menu, click on Reading.
- In the Reading Settings, ensure that the Discourage search engines from indexing this site checkbox is unchecked in the Search Engine Visibility section.
If it’s checked, uncheck it and Save your changes.

Verify Robots.txt Configuration
Even if the noindex tag is removed, pages might remain excluded if they are blocked in your robots.txt file. This file gives instructions to search engine crawlers about which pages or files they can or cannot request from your site.
A Disallow rule in your robots.txt file tells crawlers not to access specific parts of your site. For example, a rule like Disallow: /wp-admin/ this is a default WordPress rule that prevents search engines from crawling the admin area of your site, which is standard practice. However, if a Disallow rule accidentally blocks important content, it can cause indexing issues.
To verify that the affected pages are not disallowed in your robots.txt, follow these steps:
- Go to Tools from the All in One SEO menu.
- In the Robots.txt Editor, review the rules. If you find a rule that is blocking content you want indexed (for example,
Disallow: /your-important-page/), you should remove that line. - Update the file to allow crawling of these pages if necessary, and click the Save Changes button.

You can learn more about using the noindex or robots.txt rule by reading our article, When to use NOINDEX or the robots.txt?
Submit the URL for Reindexing
After applying these fixes, log in to your Google Search Console and use the URL Inspection Tool to test the affected URL.
Click Request Indexing to notify Google of the changes. This step prompts Google to re-crawl the page and update its status accordingly.

If you’ve resolved all instances of the error, you can ask Google to revalidate your URLs in bulk. On the Page Indexing page in Google Search Console, click the Validate Fix button. This informs Google that the issues have been addressed and the URLs are ready for indexing.
Occasionally, Google might report false positives. In such cases, revalidation ensures these URLs are reviewed again.

NOTE:
If you missed a fix, validation will stop when Google finds a single remaining instance of that issue.
Also, it’s important to remember that, you shouldn’t click Validate fix again until validation has succeeded or failed. You may learn here how Google checks your fixes.
You can monitor the validation progress. Validation typically takes up to about two weeks, but in some cases can take much longer, so please be patient. You will receive a notification via your email when validation succeeds or fails.
Preventing Future Issues
To avoid similar errors in the future:
- Regularly audit your SEO settings and content with AIOSEO.
- Use AIOSEO’s advanced settings to manage indexing preferences effectively.
- Ensure consistent configuration for titles, meta settings, and robots meta tags.
- Monitor your site’s performance using AIOSEO’s Search Statistics and Index Status tools.
The Excluded by ‘noindex' Tag status can highlight intentional exclusions or overlooked configurations. By leveraging AIOSEO’s features, you can resolve this issue efficiently and ensure your site is optimized for search visibility.
The post Understanding and Fixing the Excluded by ‘noindex’ Tag Status in Google Search Console first appeared on AIOSEO.]]>This lets you know that a page is indexed by Google but blocked from being crawled due to rules in your robots.txt file. While this situation is not always problematic, it can lead to incomplete or inaccurate indexing.
In this article, we’ll explain what this means, why it occurs, and how to resolve it using All in One SEO.
In This Article
- Understanding the Indexed, though Blocked by robots.txt Status
- Identifying the Indexed, though Blocked by robots.txt status in Google Search Console
- How to Find the Indexed, Though Blocked By Robots.txt Status using Index Status in All in One SEO’s Search Statistics Feature
- How to Fix the Indexed, Though Blocked by robots.txt Status with AIOSEO
- Avoiding Similar Issues in the Future
Understanding the Indexed, though Blocked by robots.txt Status
The Indexed, though Blocked by robots.txt status arises when Google successfully indexes a page but can’t crawl its content due to a rule in your robots.txt file. Crawling and indexing are distinct processes:
- Crawling is how search engines access and analyze the content on your site.
- Indexing involves adding the page to the search engine’s database so it can appear in search results.
When a page is blocked from crawling, Google may index it using only metadata or information from external links, leading to incomplete indexing.
Identifying the Indexed, though Blocked by robots.txt status in Google Search Console
To identify pages with the Indexed, though Blocked by robots.txt status in Google Search Console (GSC), follow these steps:
- Log in to your Google Search Console account and select the appropriate property (website) in the Search property drop-down (if you manage multiple websites).
- Click on Pages under Indexing in the left-hand sidebar.
- In the Page indexing report, scroll down to the Improve page appearance section and look for Indexed, though blocked by robots.txt. Click on this to see a detailed list of all pages flagged for this reason.

- After you click on Indexed, though blocked by robots.txt, scroll down to the Examples section to view the list of affected URLs. This will help you understand whether this is intentional or if there are issues, like broken links or incorrect redirect types.

How to Find the Indexed, Though Blocked By Robots.txt Status using Index Status in All in One SEO’s Search Statistics Feature
IMPORTANT:
Before getting started, make sure to connect Search Statistics to your Google Search Console account. You can find instructions on how to connect to your Google Search Console account here.
NOTE:
The Index Status feature is available to customers with an Elite plan for All in One SEO Pro. Upgrade to All in One SEO Pro today to get Search Statistics and many more features!
The Index Status feature enables you to see Google Search Console errors directly within your WordPress dashboard. To do this, follow these steps:
- Click on Search Statistics in the All in One SEO menu and then click on the SEO Statistics tab.

- In the Content Performance report, you’ll find a column labeled Indexed, which shows the index status of your pages using color-coded icons.

- If any of these icons are orange or red, hover over them to reveal a detailed popup. If the issue is a Indexed, though blocked by robots.txt status, then the popup will provide specific information, such as details about the redirect.


- Alternatively, navigate to the All Posts or All Pages screen in WordPress. The AIOSEO Details column on this page displays the same index status icons as the Content Performance report. Hovering over an icon here will also show details of any errors.

By using these methods in All in One SEO, you can effectively locate and address URLs affected by the Indexed, though blocked by robots.txt status, ensuring a smooth user experience and optimal indexing for your site. You can learn more about Checking the Index Status of Content in our article here.
How to Fix the Indexed, Though Blocked by robots.txt Status with AIOSEO
AIOSEO provides powerful tools to diagnose and address robots.txt issues. Follow these steps:
- Updating Your robots.txt Rules
If the affected page should be indexed and crawled, you’ll need to update your robots.txt file. You can access the Robots.txt Editor by going to the Tools section in the All in One SEO menu of your WordPress dashboard. Here, you can view and edit your robots.txt file directly.
Look for any disallow rules that may be blocking Googlebot from accessing the affected page. For example: Disallow: /example-page/
If the page should be accessible, modify or remove the rule. Save the changes to apply the updates.
- Editing Rules Using the Rule Builder
To edit any rule you've added, just change the details in the rule builder and click the Save Changes button.

- Deleting a Rule in the Rule Builder
To delete a rule you've added, click the trash icon to the right of the rule.

You can read our article Using the Robots.txt Tool in All in One SEO to learn more.
- Test Your robots.txt Block Using the GSC URL Inspection Tool
Now that you've updated your robots.txt file, you can test if Google is still blocked from crawling the page using the Google Search Console URL Inspection Tool.
- Log in to Google Search Console and use the search bar at the top to inspect the affected URL.
- After the initial inspection, click the TEST LIVE URL button in the top right corner. This shows how Googlebot currently sees the page.
- Wait for the live test to complete.
- In the live test result, check the Crawl allowed? Status.
- If it shows Yes, your robots.txt fix was successful, and Google can now crawl the page.
- If it still shows No, expand the Crawl error section and check the Robots.txt blocking details. You may need to revisit the Robots.txt Editor in AIOSEO to make further adjustments.

- Applying Noindex Meta Tags for Unwanted Pages
When you want a page to be excluded from search results, it’s essential to use a No Index Robots Meta directive rather than relying on robots.txt rules. The key distinction here is that robots.txt only manages crawling, not indexing. Crawling and indexing are two separate processes.
For example, blocking a page in robots.txt prevents search engines from accessing it, but it doesn’t stop the page from being indexed if it has already been discovered through other means, such as backlinks.
To ensure a page is not indexed, you should add a No Index Robots Meta tag. This tells search engines to exclude the page from search results. However, if you block the same page in robots.txt, search engines like Google won’t be able to crawl it to see the No Index directive. As a result, the page might remain indexed because search engines are unaware of the directive.
For instance, imagine you have a page that you don’t want indexed. If you block it in robots.txt and add a No Index tag, search engines won’t crawl the page to recognize the No Index directive, defeating its purpose.
Instead, you should allow search engines to crawl the page, so they can detect the No Index Robots Meta and drop it from their index.
Example Scenario:
- Correct Method: Allow search engines to crawl a URL, such as
https://example.com/private-info, and add a No Index tag in the page's header. - Incorrect Method: Block
https://example.com/private-infoin robots.txt and add a No Index tag simultaneously.
Finally, robots.txt is best used for blocking files like PDFs, images, or feeds, where adding a No Index directive isn’t possible. For example, you might block https://example.com/files/document.pdf in robots.txt because PDFs don’t support Robots Meta tags.
To add a noindex tag to a page, edit the page in WordPress and scroll to the AIOSEO Settings section. Under the Advanced tab, you'll see a setting for Robots Settings with a toggle that's set to Use Default Settings.

Change the toggle to off, and you'll see some checkboxes under the Robots Meta heading.

Check the box for No Index and click the Update button for your post. This post will not be indexed by search engines and will not appear in search results. This process may take a while for Google to de-index your URLs.

- Handling External Links to Blocked Pages
If external sites link to a blocked page, Google may still index it using limited data. To resolve this, contact the external site and request they update their link to a more relevant URL. Alternatively, use AIOSEO’s Redirect Manager to create a 301 redirect from the blocked page to a suitable URL. This ensures both users and search engines are directed to the correct content.
NOTE:
The Redirection Manager feature is available to customers with a Pro plan or above for All in One SEO Pro.
Upgrade to All in One SEO Pro today to get Redirection Manager and many more features!
- Ask Google to Revalidate Your URLs
After applying these fixes, log in to your Google Search Console and use the URL Inspection Tool to test the affected URL.
Click Request Indexing to notify Google of the changes. This step prompts Google to re-crawl the page and update its status accordingly.

If you’ve resolved all instances of the error, you can ask Google to revalidate your URLs in bulk. On the Page Indexing page in Google Search Console, click the Validate Fix button. This informs Google that the issues have been addressed and the URLs are ready for indexing.
Occasionally, Google might report false positives. In such cases, revalidation ensures these URLs are reviewed again.

NOTE:
If you missed a fix, validation will stop when Google finds a single remaining instance of that issue.
Also, it’s important to remember that, you shouldn’t click Validate fix again until validation has succeeded or failed. You may learn here how Google checks your fixes.
You can monitor the validation progress. Validation typically takes up to about two weeks, but in some cases can take much longer, so please be patient. You will receive a notification via your email when validation succeeds or fails.
Avoiding Similar Issues in the Future
To prevent this error from recurring:
- Regularly review your robots.txt file to ensure it aligns with your indexing goals.
- Use Noindex Meta tags for pages that should not appear in search results, rather than blocking them in robots.txt.
- Monitor your site’s crawling and indexing issues using Google Search Console and AIOSEO’s built-in tools.
The “Indexed, though Blocked by robots.txt” error can be resolved by updating your robots.txt file, adjusting meta directives, or managing external links. By leveraging AIOSEO’s comprehensive tools, you can address these issues effectively and maintain a healthy, optimized website.
The post Resolving Indexed, though Blocked by robots.txt in Google Search Console first appeared on AIOSEO.]]>In this guide, we'll show you the best practices for writing reviews that truly inform and influence your readers.
In This Article
The Core Principles of a Great Review
Before you start writing, it's important to focus on a few key principles that separate a truly great review from an average one.
- Be Honest and Build Trust: The best reviews are always written with a specific person in mind. You'll want to address their potential questions and concerns in a relatable way. Most importantly, be balanced and honest. Discussing both the pros and the cons of a product shows that you're a reliable source, which is essential for building long-term trust.
- Show Your Expertise and Provide Proof: Don't just tell your readers something is great—show them. You can back up your claims with high-quality photos, screenshots, or even short videos of the product in action. Sharing your firsthand experience and including specific details demonstrates that you have real expertise on the subject.
- Focus on What Really Matters: Instead of listing every single feature, focus on the key factors that will influence a buyer's decision. For a smartphone, that might be battery life and camera quality. You can also make your review more valuable by comparing the product to its main competitors, which helps your readers make a more informed choice.
- Make It Easy to Read: A clear structure is crucial. You'll want to use an introduction to give a brief overview, use clear headings for different sections, and end with a summary and a final recommendation. This makes your review easy to scan and digest.
Making Your Reviews Stand Out and Rank Higher
With so many reviews online, it's important to make yours stand out. Here are a few tips to take your reviews to the next level.
- Tell a Story and Add Context: Instead of just listing facts, tell a story. Explain how and where you used the product in a real-life scenario. This helps readers connect with your experience and understand how the product might fit into their own lives.
- Go Beyond the Basics: You can provide extra value by discussing how a product has improved from previous versions. Mentioning how it solves old problems or adds new features shows a deeper level of expertise and helps readers who might be considering an upgrade.
- Link to Helpful Resources: You'll want to include links to other helpful resources, like user manuals, the official product page, or even other reputable reviews. If you're using affiliate links, it's essential to be transparent and disclose them to your audience.
How All in One SEO Helps You Create Better Reviews
Our tools are specifically designed to help your high-quality reviews get the visibility they deserve.
- Get Star Ratings in Google with Product Review Schema: This is the most powerful tool for reviews. Our Product Review Schema feature makes it incredibly easy to add star ratings, pricing, and availability information to your content. This information can then appear directly in Google search results, making your review much more eye-catching. You can learn how in our guide to setting up Product Review Schema.
- Optimize for Keywords and Readability: Our TruSEO analysis tool will guide you as you write. You can set a Focus Keyphrase (like “best wireless headphones review”) to ensure your content is optimized for what people are searching for. It also includes a readability checker to help you make your review clear and easy to understand. Check out our guide on how to improve your readability score.
- Make Your Reviews Look Great on Social Media: When your review is shared on Facebook or Twitter, you want it to look professional. Our Social Meta settings let you control the image, title, and description that appear, helping you attract more clicks and shares. You can get started with our beginner's guide to social network settings.
By following these guidelines and using AIOSEO's powerful features, you'll create reviews that not only help your readers but also become a trusted resource that ranks high in search results.
Frequently Asked Questions:
Can I write reviews for my own products or services?
According to Google's guidelines, the answer depends on what you are reviewing.
- For Products or Services: It is generally acceptable to have a review for a specific product or service on your site (for example, a review of a specific pair of shoes you sell).
- For Your Business as a Whole: Google's guidelines state that reviews for a
LocalBusinessorOrganizationare considered “self-serving” if they are on your own site. This means you cannot get star ratings in search results by reviewing your own business. The reviews must come from an independent, third-party source. For more details, refer to the guidelines on self-serving reviews.
Why aren't my star ratings showing up in Google?
Getting star ratings (rich snippets) to appear in search results is not guaranteed, even with a perfect setup. It is ultimately Google's decision. However, here are the most common reasons why they might not be showing up:
- It's Against Guidelines: The most common issue is violating the “self-serving” review policy mentioned above.
- The Schema is Incorrect: Your structured data may have an error or be incomplete. You can use Google's official Rich Results Test tool to check your URL for errors.
- The Review is Hidden: The review content itself must be visible to visitors on the page. The schema markup must reflect content that users can actually see.
- It Just Takes Time: After you add or fix your schema, it can take some time for Google to re-crawl your page and process the changes.
What types of content can I use review schema on?
Review schema is for much more than just physical products! Google supports rich snippets for a wide variety of content types. Using AIOSEO's Schema Generator, you can easily add review schema for items like:
Do I have to use a 1-5 rating scale?
No, you don't. While a 1-5 scale is very common, Google supports different scales. In AIOSEO's Schema Generator, you can define the bestRating and worstRating values to specify your scale. For example, you could use a 1-10 scale by setting the worstRating to 1 and the bestRating to 10. The key is to clearly define the scale you are using within the schema markup.
The post How to Write High-Quality Reviews That Inform and Influence first appeared on AIOSEO.]]>In this article, we’ll walk you through a self-assessment process to help you evaluate your content based on core questions about quality, expertise, and authority.
This guide is convenient for All in One SEO users who want to ensure their pages are well-optimized, people-focused, and poised for better search visibility.
In This Article
Part 1: The Content Quality Check
High-quality content is the foundation of good SEO. Ask yourself these questions about your pages and posts.
- Does Your Content Offer Something New? Search engines reward pages that bring unique information or a fresh perspective to a topic. You'll want to avoid simply repeating what's already on the first page of Google. Offer your own unique insights, analysis, or data to stand out.
- Is It Truly Comprehensive? Does your content fully answer the questions your reader might have? In-depth content that covers a topic thoroughly is more likely to satisfy users, which is a strong positive signal to Google.
- Does Your Title Accurately Reflect the Content? Your main headline should be descriptive and honest. Using clickbait or exaggerated titles can lead to disappointed readers and high bounce rates. You want to build trust, and that starts with an honest title.
- Is the Page Easy to Read? Poor formatting, sloppy text, or spelling mistakes can undermine your credibility. You'll want to ensure your content is well-organized with clear headings and free of errors. This creates a much better user experience.
- Would You Share or Bookmark This Page? This is the ultimate test. If you wouldn't find the content valuable enough to recommend to a friend, it’s unlikely your audience will either. Always aim to create content that you're proud of.
Part 2: The Expertise and Trust Check
Great content also needs to show that it comes from a knowledgeable and trustworthy source.
- Does Your Content Signal Expertise? Readers (and search engines) need to know why they should trust you. You can show expertise by linking to credible sources, providing clear author information with an author bio, and creating a detailed “About Us” page.
- Is Your Content Factually Accurate? Even small factual errors can damage your credibility. It's crucial to double-check any statistics, claims, or references before you hit publish. Make sure your information is correct and up-to-date.
What to Do If Your Rankings or Traffic Drop
If you've noticed a sudden drop in traffic, don't panic. You can perform a simple audit to figure out what happened.
- Step 1: Identify the Affected Pages and Keywords: First, you need to find out which pages lost traffic and for which specific search queries. You can easily find this information using AIOSEO's Search Statistics feature, which brings your Google Search Console data right into your WordPress dashboard.
- Step 2: Analyze the Top-Ranking Content: Next, search for the keywords that dropped and take a close look at the pages that are now outranking you. Ask yourself: Is their content more comprehensive? Is it more up-to-date? Do they show more expertise or include unique data? This will often reveal exactly where your content fell short. Use AIOSEO's Keyword Rank Tracker to understand your keyword rankings compared to other content.
- Step 3: Perform an Honest Self-Assessment: Now, review your own page using the quality and expertise questions from this guide. Compare your content directly with the competition. This process will give you a clear, actionable list of improvements to make. You can use Google's self-assessment guide to determine if your content is helpful. Utilize the SEO Revisions feature in All in One SEO Pro to see what changes you've made to your SEO.
How All in One SEO Helps You Create People-First Content
Our tools are specifically designed to help you create high-quality, trustworthy content.
- Craft the Perfect Title and Description: Your SEO title is the first thing users see in search results. AIOSEO gives you full control to write a compelling, honest headline that encourages clicks. You can learn how in our guide to setting the SEO title and description.
- Check Your Readability Score: Our TruSEO analysis includes a built-in readability checker that scores your content and gives you specific recommendations for improvement. This helps you make sure your content is easy for everyone to understand. You can learn more in our guide on how to improve your readability score.
- Demonstrate Expertise with Schema Markup: Schema markup helps Google understand your content better. You can use our Schema Generator to add an Article schema that specifies an author, an FAQ schema to answer common questions, and more. This enhances your appearance in search results and signals expertise. For more details, see our guide on configuring schema settings.
- Optimize for Social Sharing: Content that's worth sharing is a sign of quality. We make it easy to control how your content looks when it's shared on social media, helping you put your best foot forward. You can see how in our guide to integrating social media.
- Check for broken links within your content: You can use our Broken Link Checker plugin to search for broken links. Here’s a complete guide on using Broken Link Checker to find and fix broken links and images.
- Use of AI: AIOSEO includes AI-powered generative features that can help optimize your content. Our plugin integrates with AI to provide automatic content generation capabilities for your SEO titles and meta descriptions based on your content. Creating optimized content suggestions can help improve your search engine rankings. You can find more information on AIOSEO AI here.
- LLMs.txt File Generation: Automatically create an llms.txt file with a single click. This feature helps guide Large Language Models (LLMs) like ChatGPT to your most important content, improving their ability to understand and accurately represent your business. For detailed instructions, refer to our guide on how to create an LLMS.txt.
- Authority and Trustworthiness (E-E-A-T): While AIOSEO doesn't directly build backlinks, it empowers you to create high-quality, authoritative content that earns trust and is more likely to be cited by AI and linked to by others. Features supporting good internal linking also help establish content relationships on your site. Enhance author credibility with structured data that highlights expertise, experience, authority, and trustworthiness, helping Google recognize you as an authoritative source. Here's our documentation on using Author SEO (E-E-A-T) for long-term ranking improvements.
- AIOSEO helps with Image SEO (e.g., alt text, titles). You can find more details on
using the Image SEO features here. - Our Video Sitemap addon helps get your video content recognized. Here's our documentation on
how to create a Video Sitemap. - Our Local SEO features help you manage and optimize your Google Business Profile information. You can find a complete Local SEO checklist here.
- Link Assistant: Continue to create comprehensive content that thoroughly answers user questions. Our Link Assistant tool can help you build strong internal links to create topic clusters, signaling depth of coverage to search engines. Here's our documentation with more details: using the Link Assistant.
By regularly asking these questions, you'll create content that does more than just rank—you'll build a loyal audience that trusts your brand.
The post How to Self-Assess Your Content to See If It’s Helpful, Reliable, and People-First first appeared on AIOSEO.]]>