The answer is that Broken Link Checker doesn't use license keys. Instead, it's linked to your account.
Our Broken Link Checker is a free plugin that uses our servers to scan your site for broken links. You can sign up for a free account by following the steps in our Broken Link Checker documentation here.
Once you've signed up for an account, you can connect to it within the Broken Link Checker plugin, and then start using the plugin. No license key is needed.
The post Do I Need a License Key to Use Broken Link Checker first appeared on AIOSEO.]]>The AI credits system is separate from the All in One SEO Pro subscription, enabling users of both the free version of All in One SEO and the premium All in One SEO Pro to use these features.
There are two ways to purchase AI credits – Pay-As-You-Go (PAYG) bundles or credit blocks that are included with a subscription for All in One SEO Pro.
In This Article
Buying Pay-As-You-Go AI Credits
Users of our free plugin, All in One SEO, can purchase bundles of AI credits in order to use the AI features.
To purchase a bundle of AI credits, click on General Settings in the All in One SEO menu.

Next, click on the AI Content tab.
Click on the Buy Credits button to purchase a block of Pay-As-You-Go credits.

You'll see a sliding scale where you can select the amount of PAYG credits you want to buy.

Select the number of credits you want and click the Buy AI Credits button.
You'll be taken to the checkout, where you can complete your purchase. Once completed, your credits will show in All in One SEO.

Connecting to an All in One SEO Account to Access AI Credits
If you already have an account for AI credits, then you can click on the Connect to an Existing Account button on the AI Content tab.
You'll be asked to log in to your account on aioseo.com.

Once you've logged in, you'll be asked to authorize the connection to your account on aioseo.com.

Once completed, your credits will show in All in One SEO.
Credits for All in One SEO Pro Subscriptions
If you have a current subscription for All in One SEO Pro, then you'll have AI credits included in your subscription.
Simply activate your license key for All in One SEO Pro and the credits will be displayed on the AI Content tab.
NOTE:
If you have a subscription for All in One SEO Pro and you purchase PAYG credits, then the credits included in your subscription will be used first. Once these credits have been used up, then PAYG credits will be used.
Checking Your AI Credit Usage
You can check your AI credit usage in two ways – from directly within All in One SEO, or from your account on aioseo.com.
Checking AI Credit Usage in All in One SEO
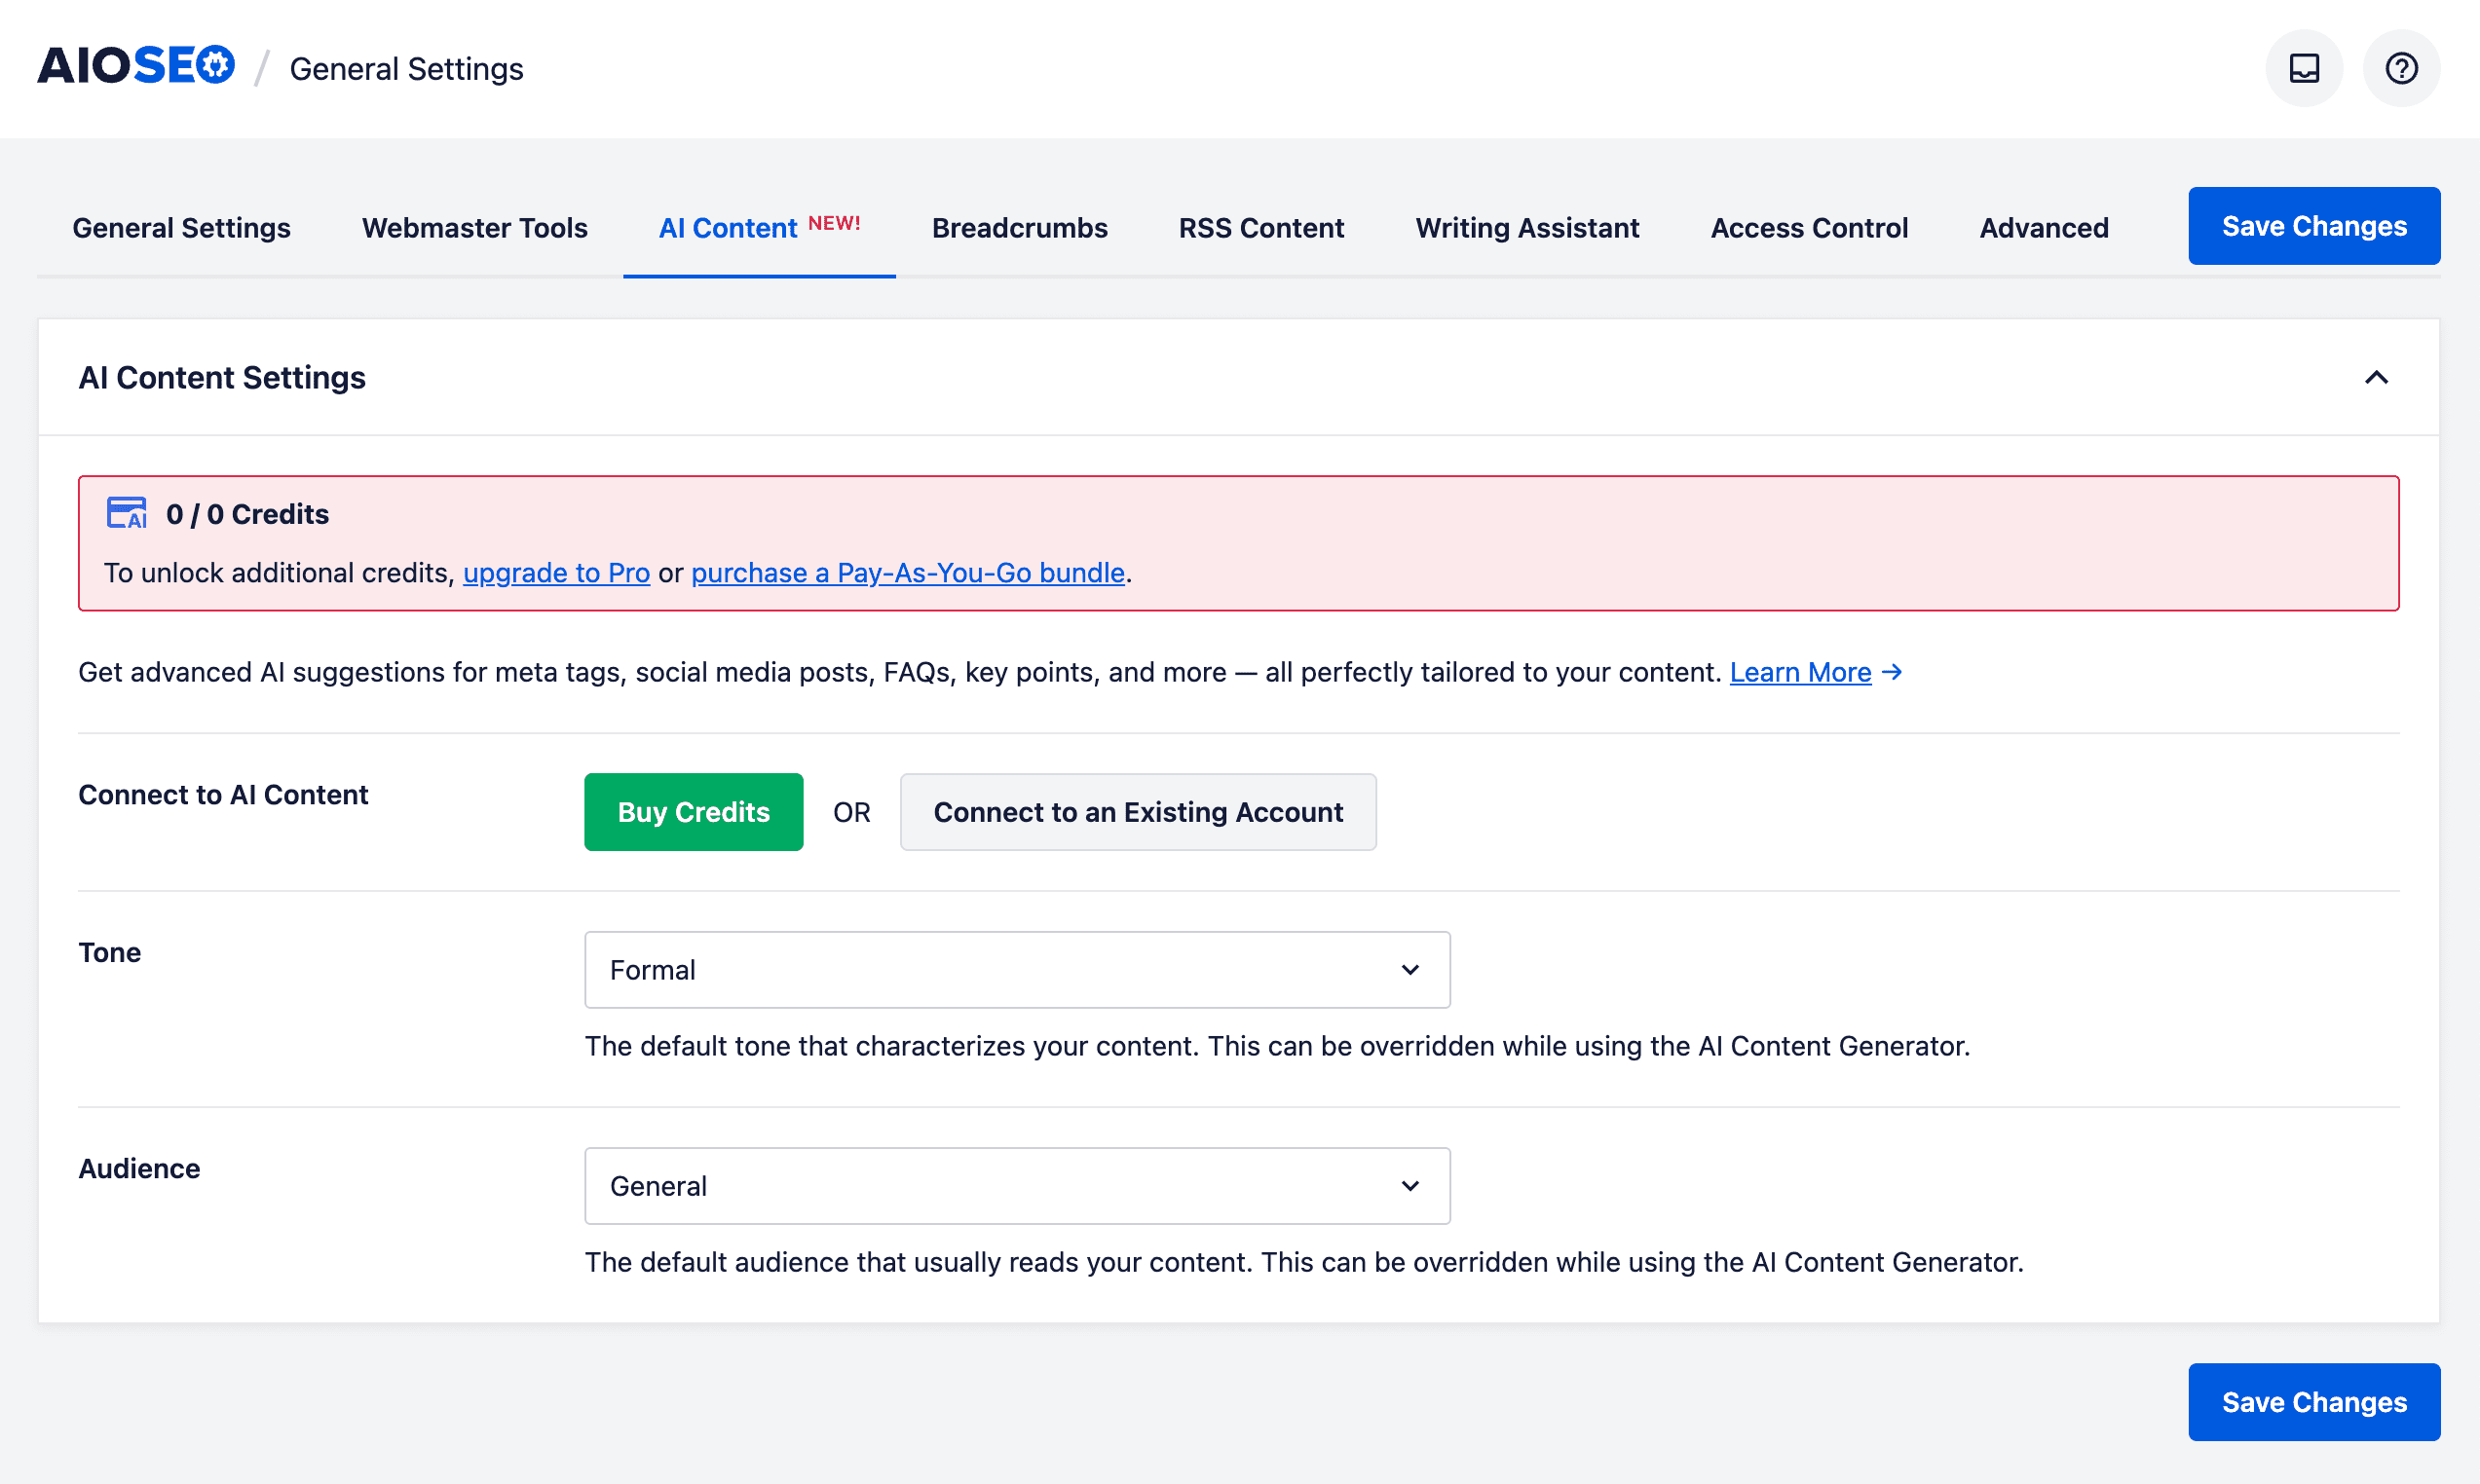
To check your AI credits in All in One SEO, go to the AI Content tab in All in One SEO > General Settings.
At the top of the tab, you'll see a notice that shows two numbers:

The number on the left is the amount of AI credits you have remaining. In the screenshot above, that would be 150,000.
The number on the right is the total amount of AI credits you've received. In the screenshot above, that would be 200,000.
If you hover over the Help icon (?), then you'll see a popup that shows more details, including if and when any AI credits renew.

NOTE:
Customers with an active subscription for All in One SEO Pro will have their AI credits renew each year on their subscription renewal date.
Checking AI Credit Usage on aioseo.com
To check your AI credits on aioseo.com, start by logging into your account at https://aioseo.com/account/
On the Overview tab, you'll see a list of your subscriptions along with the AI credits.

The number on the left is the amount of AI credits you have remaining. In the screenshot above, that would be 30,000.
The number on the right is the total amount of AI credits you've received. In the screenshot above, that would be 50,000.
That's all! You can now purchase, use, and manage AIOSEO AI credits in order to use the AI content features in All in One SEO.
AI Content Settings
The AI Content tab in All in One SEO also includes the default settings for the AI features.

The settings for text generated by the AIOSEO AI features are:
- Tone – In this drop down, you can set the default tone of the text that's generated by the AIOSEO AI features.
- Audience – In this drop down, you can set the default audience for the text that's generated by the AIOSEO AI features.
The settings for the images generated by the AIOSEO AI features are
- Quality – In this drop down, you can set the default image quality for the images that are generated by the AIOSEO AI features.
- Style – In this drop down, you can set the default image style for the images that are generated by the AIOSEO AI features.
- Aspect Ratio – In this drop down, you can set the default aspect ratio for the images that are generated by the AIOSEO AI features.
NOTE:
The image quality will affect the number of AI credits that will be used to generate the image.
IMPORTANT:
These defaults can be overridden by the individual settings in the features when you use them.
For example, when you use the AI Image Generator in a specific post, you can select the image options there, which will override these defaults.
Further Reading
Check out more articles on how to use the AIOSEO AI features here.
The post Buying and Managing Credits for the AIOSEO AI Features first appeared on AIOSEO.]]>While it’s easy to assume that “longer is better,” that’s not entirely accurate. Search engines don’t reward you just for writing more words—they look for high-quality, relevant, and valuable content for your visitors.
Below, we’ll break down everything you need to know about how word count fits into your SEO strategy, based on advice from Google and popular SEO experts like Neil Patel.
In This Article
There’s No Magic Number
- Google’s Take: According to Google’s SEO guidelines, no fixed word count will guarantee improved rankings. It’s more important to use enough words to cover your topic thoroughly and naturally.
- Neil Patel’s Recommendation: Neil Patel suggests that the best content length for SEO often falls between 2,000 and 3,000 words. However, this is not a hard-and-fast rule—it’s simply an observation that longer, more in-depth content tends to perform well.
Don’t obsess over hitting a specific word count. Focus on creating content that’s both detailed and engaging. You can write fewer than 2,000 words and still rank well if you provide genuine insight and value.
Focus on Content Quality and Depth
- Depth Matters: Longer content often ranks well because it’s typically more thorough. Search engines want to see if your content addresses the topic comprehensively.
- Relevance Counts: Even if you write many words, it won’t help if those words aren’t relevant to your topic or valuable to your audience.
Instead of padding your posts with fluff, ensure your content is in-depth. Answer common questions, cover related subtopics, and keep your content organized and scannable.
Natural Keyword Usage Is Key
- Keyword Density Isn’t the Only Factor: While keywords are still important, overstuffing them into your content won’t improve your rankings and may even hurt them.
- User-Focused Content: Search engines analyze whether your content is user-friendly. Are you addressing your readers’ needs? Are you genuinely providing helpful information?
Use keywords where they naturally fit—like in your headings and throughout your text—without forcing them. Focus on making your post genuinely helpful.
Provide Value to Your Readers
- Engage Your Audience: Make your content easy to understand by using images, examples, bullet points, and other elements.
- Comprehensive Coverage: When you cover a topic thoroughly, you’re more likely to be seen as an authority, which can boost your credibility (and your SEO).
Write with your audience’s questions and interests in mind. The more value you provide, the more likely you’ll attract and retain visitors—search engines notice that.
Best Practices
- There’s no “official” minimum or maximum word count for SEO success.
- Aim for thorough, user-focused content that naturally incorporates relevant keywords.
- Longer content (around 2,000–3,000 words) often does well, but only if it’s high-quality and comprehensive.
- The key to better rankings is ensuring your content provides value and answers your visitors’ questions.
- Draft your content by focusing on your audience’s pain points and questions.
- Set your target keyword in All in One SEO, and use it organically in your headings, body text, and image alt tags.
- Break up large blocks of text, add headings, and ensure your paragraphs aren’t too long.
- Use All in One SEO’s content analysis tools to check keyword usage, meta descriptions, and other on-page factors that boost your visibility.
- Keep your content fresh by revisiting and updating it whenever new information is needed.
The quality, relevance, and depth of your content can truly impact your SEO. While a specific word count range (2,000–3,000 words) might often rank well, don’t chase that number just for the sake of it.
Always keep your audience in mind, and aim to provide the most helpful, comprehensive content possible.
The post Does a Minimum or Maximum Word Count Improve My SEO? first appeared on AIOSEO.]]>Sharing private information via email can raise concerns for some. If you’d like to have more assurance, you can use a temporary link so that your password will only be accessible for a short period of time.
This tutorial will show you how to securely and privately share your site’s login credentials with our Support team.
In This Article
Why Support Might Need Site Logins
Sharing your site’s login information isn’t always a necessary step for getting support for All in One SEO. However, some support issues can be specific to individual sites and may require more troubleshooting.
Sharing your login credentials with our Support team allows us to speed up the troubleshooting process and quickly get you back on track.
In the next section, we’ll show you how to access the support form through your All in One SEO account (https://aioseo.com/account/).
Accessing the Support Form
First, go to aioseo.com and click on the Login link in the top-right corner of the page.

Once you've logged in, click on the Support tab.
Scroll down and click on the create a support ticket link.
Now, you’ll see the support form where you can fill out the details of your support request.

Next, we’ll go over a secure way to privately share your password with our Support team.
Sharing Login Credentials Securely
Our support ticket form contains an optional field to share your website’s password.
Though our support system is fully secure, the full contents of your original ticket will be included in the support email thread. This includes your site’s password if you decide to share it with our Support team.
For an alternative and more secure way to privately share your password with our Support team, navigate to the Access to your WordPress website section of the form.

From here, there are two options you can select to provide us with access to your site:
- I will provide access by creating a temporary administrator user account
- I will provide access by sharing my own administrator user account
For this example, we’ll share our temporary admin credentials by selecting I will provide access by creating a temporary administrator user account.
When you select this option, an alert box will appear. Within the box, click on the SupportAlly Secrets link.

This link will open up the SupportAlly Secrets website. Here you can create a temporary link that will let you share your site’s login credentials without including them in the support ticket itself.

On this form, enter the WordPress username and password for the temporary administrator account you created and check the I’m not a robot checkbox.
Once done, click the Create Secret Link button.
Next, copy the link that's generated, then return to the support ticket form.

After you’ve copied your secret link, be sure to include it in the SupportAlly Secrets Link field of your support ticket. Enter your website login URL in the mandatory field.

You don't need to include your website username or password as you're sharing those securely with us using SupportAlly Secrets, so leave those fields empty.
Once you’ve double-checked that all your information is correct, click the Submit button to submit your support ticket.
That’s it! You can now share your site’s login credentials with our support team safely and privately.
This article will answer frequently asked questions and provide you with the guidelines for how to get images to appear in search.
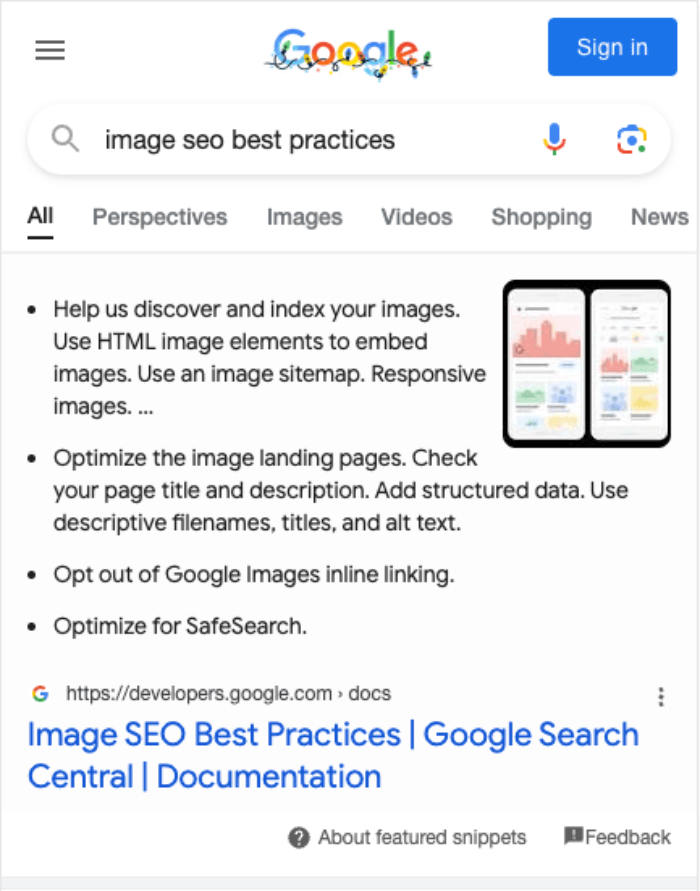
For the purposes of this article, we're going to refer to Google as it's the most commonly used search engine. But the guidance in this article are best practices that can be applied to any search engine.
In This Article
Can You Force Search Engines to Display Images?
The short answer is no, you can’t make search engines display images in search results. Search engines decide what they feel is the best way to display the results, and they do this on a per-search basis, depending on the search term entered.
Do Images Show in Desktop and Mobile Searches?
Yes, it is possible for images to appear in desktop search results but mostly images will only appear in mobile search results.
Most search engines have moved to a mobile-first approach because they've seen most searches come from mobile devices. So it's best to optimize your site, content, and images for mobile devices.
Optimizing Images for Search Engines
There are a number of things that you can do to improve the chances of your images appearing in search results. Below are the details of how to optimize images in your content.
Make Images Responsive
Most searches occur on mobile devices such as phones and tables. This means that your content and images need to be responsive (respond to the size of the screen used to view your content).
Most good WordPress themes should handle this for you, but be sure to check your content on your phone to see how it looks. Attention should be paid to how the image appears, how content around the image looks, and how long it takes to load the image.
Web.dev has a good article on making images responsive here.
Use High Quality Images
Images attract attention, so making sure your images are sharp and high quality is important.
High quality images are usually a contributor to page load times, so ensure you use image optimization techniques to compress the file size. There are a number of great WordPress plugins that can do this.
Use Descriptive Filenames, Captions, Alt Text and Titles
Your images should have filenames that describe what the image is. For example, large-orange-striped-cat.jpg is better than img1234.jpg or image1.jpg. Use hyphens and not underscores in filenames, i.e. black-cat.png not black_cat.png.
Add descriptive Alt text to your image and, if appropriate, a descriptive caption. Both of these really help search engines understand your image much better. Avoid the temptation for keyword stuffing.
The Image SEO addon for All in One SEO Pro can automatically add Alt text, titles, and captions to your images, so it's a great feature, especially if you have a lot of images.
Optimize the Placement of Images
Place important images as high up in your content as possible. Search engines will typically use the first image they see in search results, so the first image should be the most important.
Optimize the Content Around Images
Always ensure that the rest of the content around your images, and your page or post where the images are embedded, are optimized.
Ensure you've added a good SEO title and meta description. You can easily do this with All in One SEO. Check out our article on Setting the SEO Title and Description for Your Content here.
Add the correct Schema structured data. Again, this can easily be done with All in One SEO. Check out our article on Setting the Schema Type for Individual Content here.
The TruSEO Content Analysis features in All in One SEO can help you optimize your content around focus keywords.
Remember Your Visitors
You should always optimize your content for your audience. Search engines want to see helpful content that is informative and interesting for your audience, and that offers something unique over the billions of other web pages on the Internet.
This goes for images as well. Avoid the stock image trap where every business site uses the same stock images. Make your images unique and reflective of who you or your organization are.
Make Your Images Discoverable
Once you've written great quality, helpful, unique content, and optimized the content and images, you now want to ensure your images can be found by search engines.
First, make sure the page or post is publicly accessible. Search engines can't see content that's behind a login or paywall.
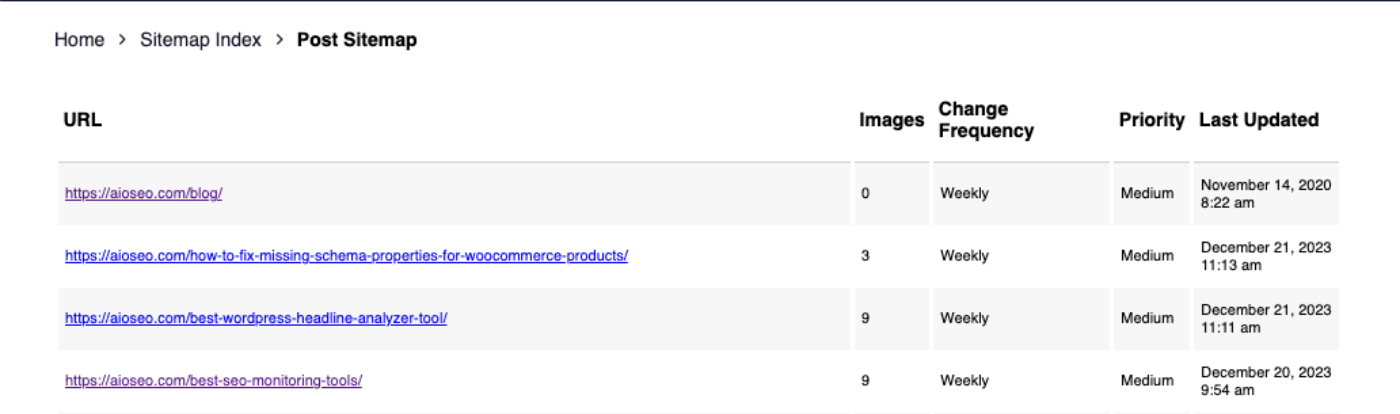
Next, make sure your content and images appear in your XML Sitemap. You can check this by going to All in One SEO > Sitemaps and click on the Open Sitemap button on the General Sitemap tab.
Depending on your Sitemap settings, you'll either see a list of all your content, or a list of sitemaps that contain your content, i.e. one for posts, one for pages, etc. If you see a list of sitemaps, click on the relevant one to see all the URLs.
Once you've located the URL for your content, you'll see a column for Images that lists the number of images contained within that content.
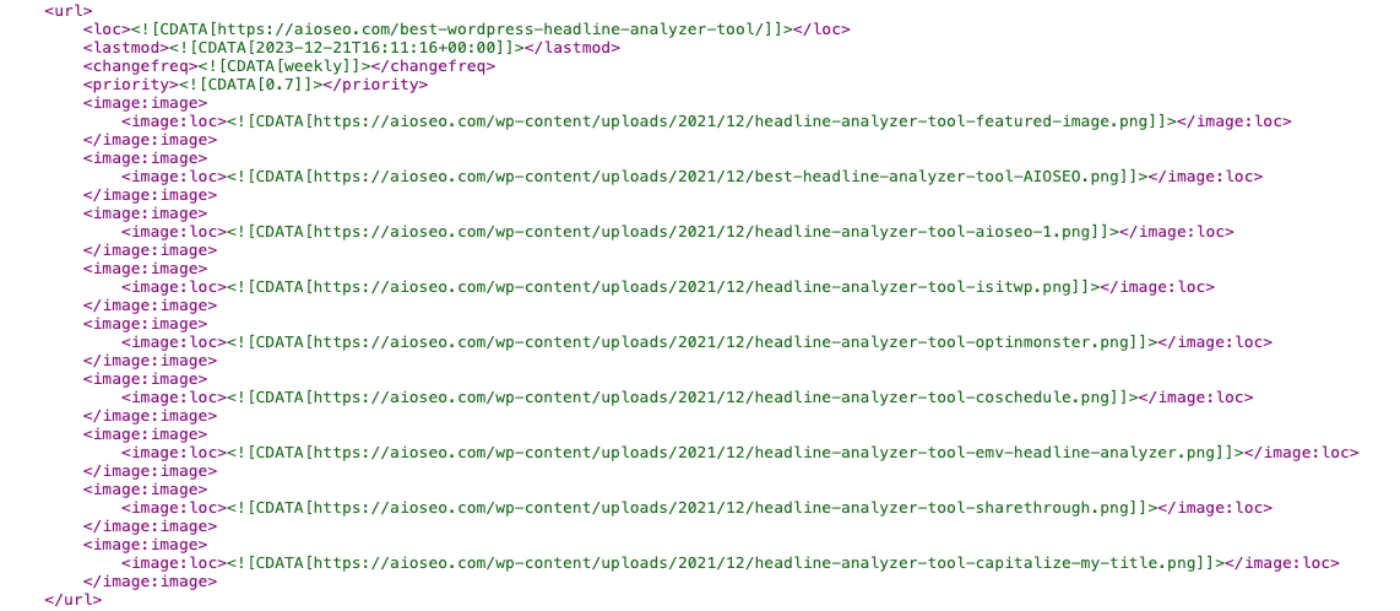
If you right-click anywhere on the page and select View Page Source you can search for the URL of your content and see a list of the images.
You can submit your XML Sitemap to search engines using their Webmaster Tools. We have an article on submitting your sitemap to Google here and one for submitting your sitemap to Bing here.
Additional Information
Google has a number of articles that cover this topic in more depth. You can find these articles here:
The post How to Get Your Images to Appear in Search Results first appeared on AIOSEO.]]>The short answer is no, don't bother with Meta Keywords.
The Keywords meta tag used to be used in the early days of search engines. However, they quickly became useless to search engines as they were abused.
Major search engines such as Google dropped support for Meta Keywords back in 2009.
Here's the announcement from Google back in 2009 that they no longer used Meta Keywords in ranking.
It's possible that Yandex, the Russian search engine, may still use them as they do list it in their documentation here. If you're looking to get on Yandex for Russian searches then you can still use the Meta Keywords feature in All in One SEO.
However, if you're primarily concerned with ranking on Google and Bing then you don't need to worry about adding Meta Keywords to your site.
The post Should I Use Meta Keywords? first appeared on AIOSEO.]]>This is a common way for plugins to connect to and communicate with WordPress.
However, some plugins may block access to the REST API. This can include security plugins and CDN services that have an option to block all communication with the REST API or just allow communication for logged in users.
All in One SEO only communicates when you make changes to the plugin settings, which requires that you're logged in to your site and in the WordPress admin area.
If access to REST API is blocked, then you will see a red warning notice at the top of the screen as shown below.
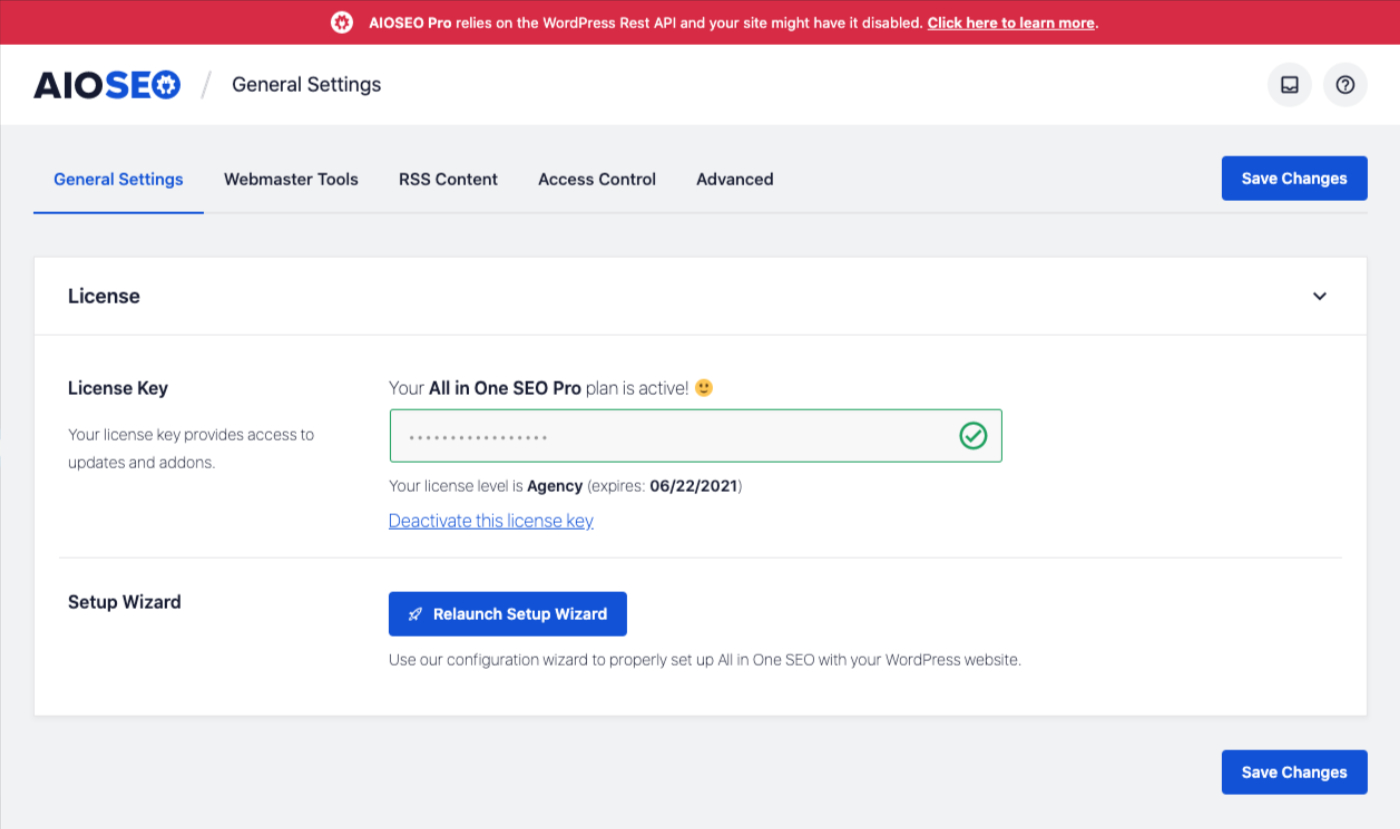
If you see this notice, try deactivating each plugin one at a time until the notice goes away. This should indicate which plugin is blocking access to the REST API.
If the problem still happens after deactivating all plugins, then switch to the default Twenty Twenty theme and see if the notice goes away.
If you're using Cloudflare, we have a related article about Unable to Save Settings Due to Cloudflare Firewall Rules here.
The post All in One SEO uses the WordPress REST API first appeared on AIOSEO.]]>Officially Supported Browsers for AIOSEO’s Admin Area (all features expected to look as great as they perform):
Desktop Browsers:
- Google Chrome: Latest 2 versions
- Mozilla FireFox: Latest 2 versions
- Apple Safari: Latest 2 versions
- Microsoft Edge: Latest 2 versions
- Opera: Latest 2 versions
Mobile Browsers:
- Android: latest 2 versions of Chrome for the most recent stock Android version
- iOS: latest 2 versions of Safari and latest 2 versions of Chrome for the most recent iOS version
Additional Browsers:
- Desktop browsers with > 1% usage based on can I use browser usage table
The official answer from Matt Cutts at Google can be found here –
Here's an updated answer from John Mueller at Google in his Q&A session –
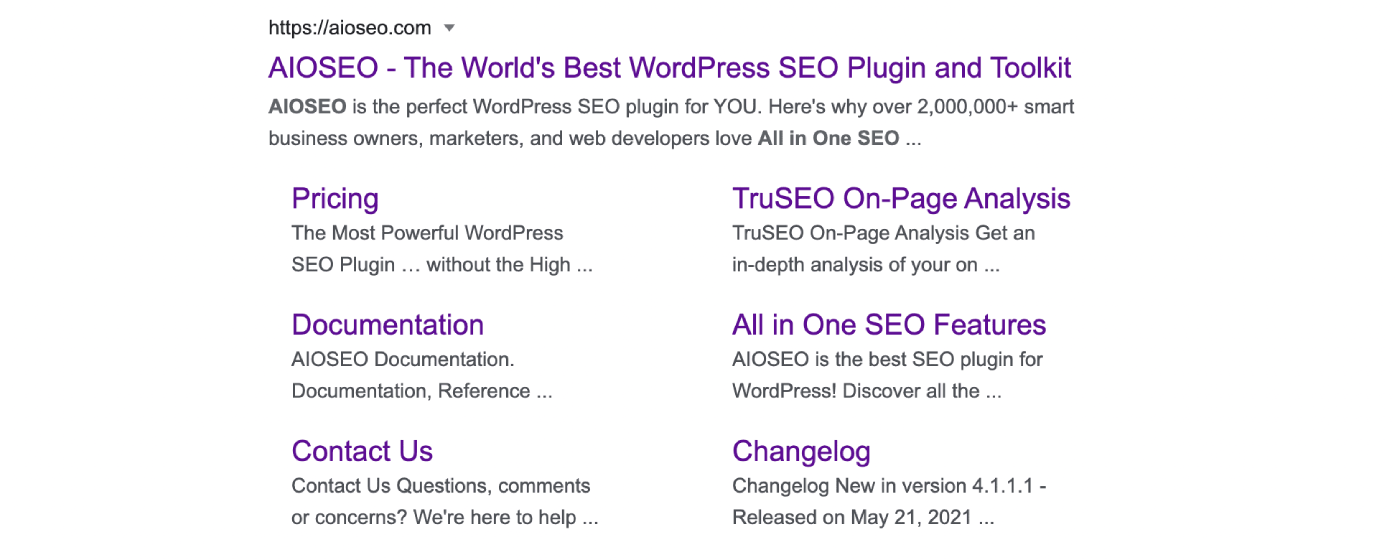
The short answer is that you can't make Google display search results like this. It happens on a per search basis depending on whether they feel it's the best way to display the results. Their official answer is “We only show sitelinks for results when we think they'll be useful to the user.”
However, there are some things you can do to help Google, these are:
- Implement good page structure
- Make sure your navigation menu matches your page structure
- Use breadcrumbs
- Set good anchor text on your internal links to important pages
- Make sure that the text you use as your page titles and in your headings is informative, relevant, and compact.
- Ensure that your internal links' anchor text is concise and relevant to the page they're pointing to.
- Avoid repetitions in your content.
You can read more about this on Google's Search Console Help page here.
The post How do I get Google to show sitelinks for my site? first appeared on AIOSEO.]]>