If that's the case, All in One SEO can help you.
Content is typically submitted to search engines using sitemaps. All in One SEO generates sitemaps that contain your content and it notifies search engines when you've published, changed or deleted content on your site.
Search engines can also find content on their own by either crawling your site and following internal links, or by following links from someone else's site to your content. This is less reliable and takes longer for them to find your content.
You can choose to exclude content from your XML Sitemap so that search engines aren't notified when the content is published, changed, or deleted.
IMPORTANT:
This doesn't stop search engines from finding this content on their own. If you want to stop them from finding and indexing content then you should read our article on using the noindex meta tag to block search engines from indexing content.
Excluding Content from Your XML Sitemap
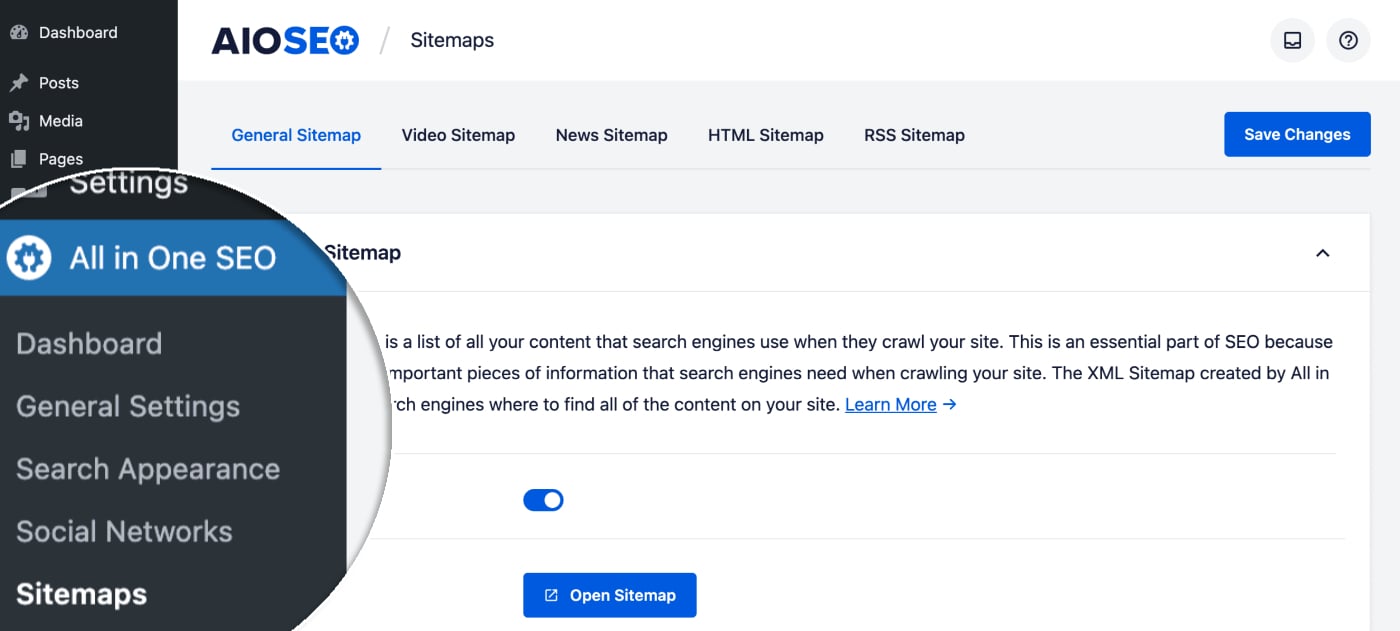
To get started, go to Sitemaps in the All in One SEO menu.
You should see the General Sitemap screen, scroll down to the Advanced Settings section and click the toggle to display the Advanced Settings.

Here you’ll see settings for Exclude Posts / Pages and Exclude Terms.
Excluding Posts
In the Exclude Posts / Pages field, start typing the title of any post, page or other post type in this field and a drop down will appear that shows matching content. Click on the content you want to exclude and it will be added in the field.
You can then repeat this by typing the title of any content and selecting it.
Excluding Terms
In the Exclude Terms field, type the name of any category, tag or other taxonomy term and a drop down will appear that shows matching content. Click on the content you want to exclude and it will be added in the field.

IMPORTANT:
Excluding a term also excludes all content in that term. For example, if you exclude the Uncategorized category then all posts in that category will also be excluded from the XML Sitemap.
In This Article
Disabling the Sitemap Created by All in One SEO
To do this, click on Sitemaps in the All in One SEO menu and then click on each of the sitemap tabs at the top of the screen.
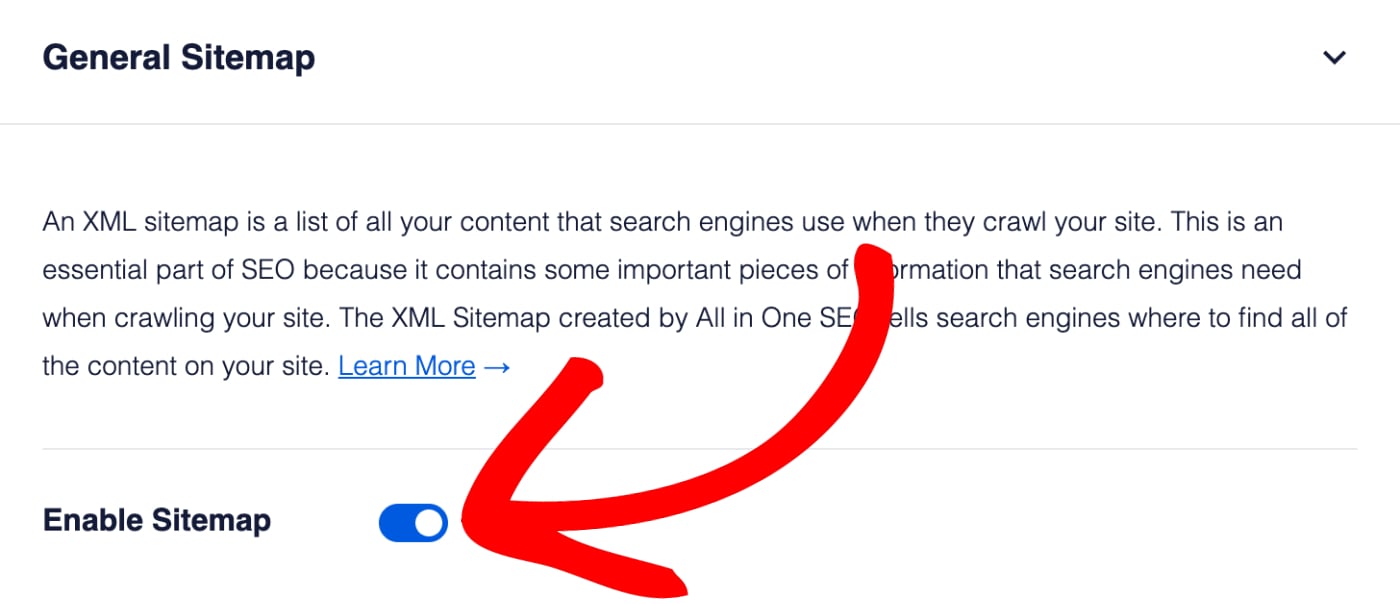
At the top of each sitemap settings screen you'll see an Enable Sitemap setting. Click the toggle to disable that specific sitemap.
Frequently Asked Questions
Does All in One SEO create a physical sitemap file?
No, All in One SEO does not create a physical file for your sitemap. Our sitemaps are all virtual web pages that are dynamically generated whenever a crawler visits the sitemap URL. This way it’s always up-to-date, there’s never an issue with it getting accidentally deleted, and you don’t have to worry about server-side file permissions making it unavailable to search engines.
You can read more about why a dynamically generated sitemap is better in our article here.
What happens if I disable the Sitemap?
If you disable the sitemap by clicking on the Enable Sitemap toggle then All in One SEO will no longer generate a sitemap and the URL will return a 404 page not found error. Search engines will no longer be able to get this valuable information about your site and content, which is why we don’t recommend disabling the sitemap in All in One SEO.
In This Article
Automatic Submission of Sitemaps to Google Search Console
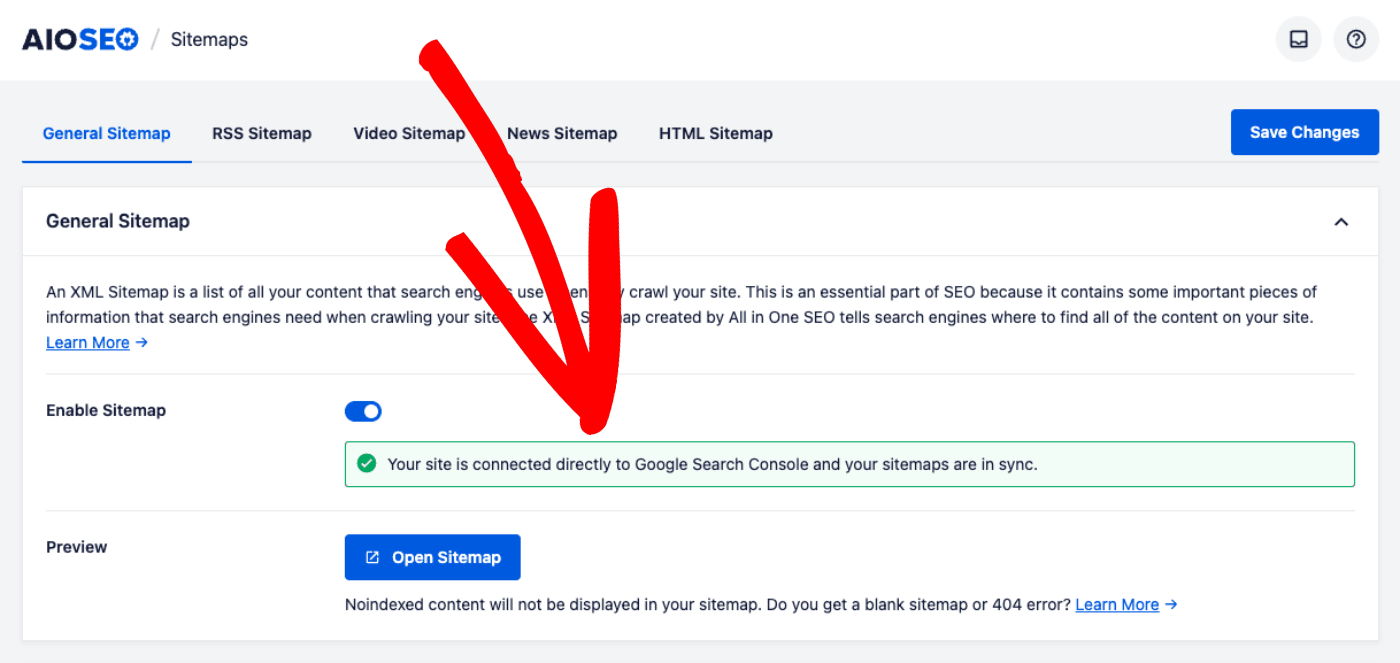
If you've connected All in One SEO with Google Search Console by following the steps in our article on how to add and verify your site in Google Search Console here, then your sitemaps that are generated by All in One SEO will automatically be submitted and synced with Google Search Console.
You'll see a notice confirming this when you go to All in One SEO > Sitemaps.
Your sitemaps will stay synced with Google Search Console for as long as the connection between All in One SEO and Google Search Console is maintained. This applies to the XML Sitemap, RSS Sitemap, Video Sitemap, and News Sitemap if you have these.
Manual Submission of Sitemaps to Google Search Console
Once you have added your site as a property in Google Search Console, navigate to “Sitemaps” in the left-hand menu. You'll see the Add a new sitemap box at the top of the screen.
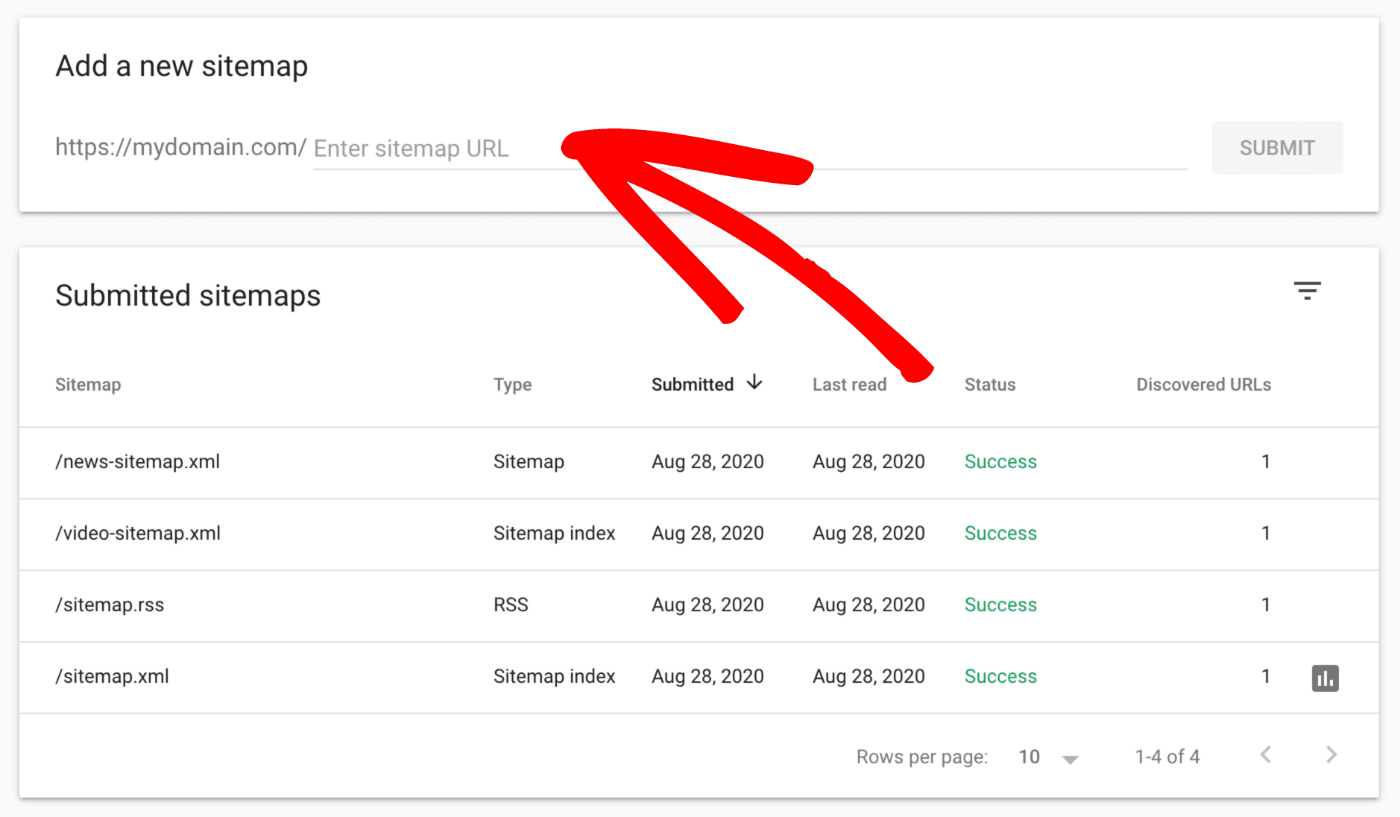
Enter the URL for your sitemap, click the Submit button and you are done.
You only need to enter the last part of the URL as the domain name is already filled out for you. The default names for the sitemaps created by All in One SEO are:
- XML Sitemap: sitemap.xml
- Video Sitemap: video-sitemap.xml
- News Sitemap: news-sitemap.xml
- RSS Sitemap: sitemap.rss
IMPORTANT:
It can take a while for Google to process your sitemap. The length of time they take is entirely up to them and you cannot force them to process your sitemap any faster, so please be patient.
NOTE:
The XML Sitemap created by All in One SEO automatically includes all your images, so it means you don't have to submit a separate Image Sitemap.
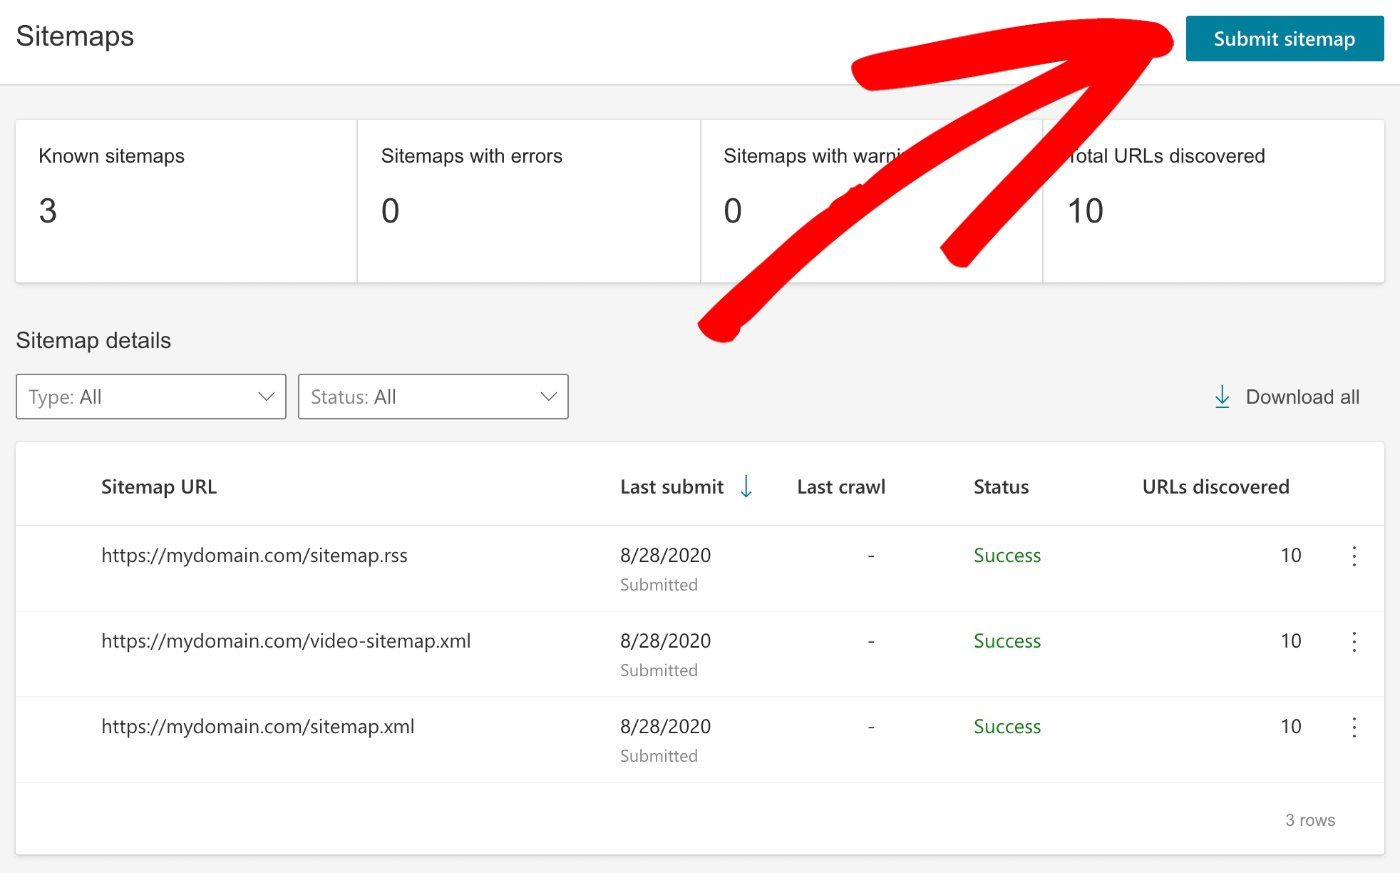
Once you have added your site as a property in Bing Webmaster Tools, navigate to Sitemaps in the left-hand menu.
Now click the Submit sitemap button in the top right corner of the screen.
You should see a Submit sitemap form. Enter the full URL for your sitemap in the field, click the Submit button and you are done.
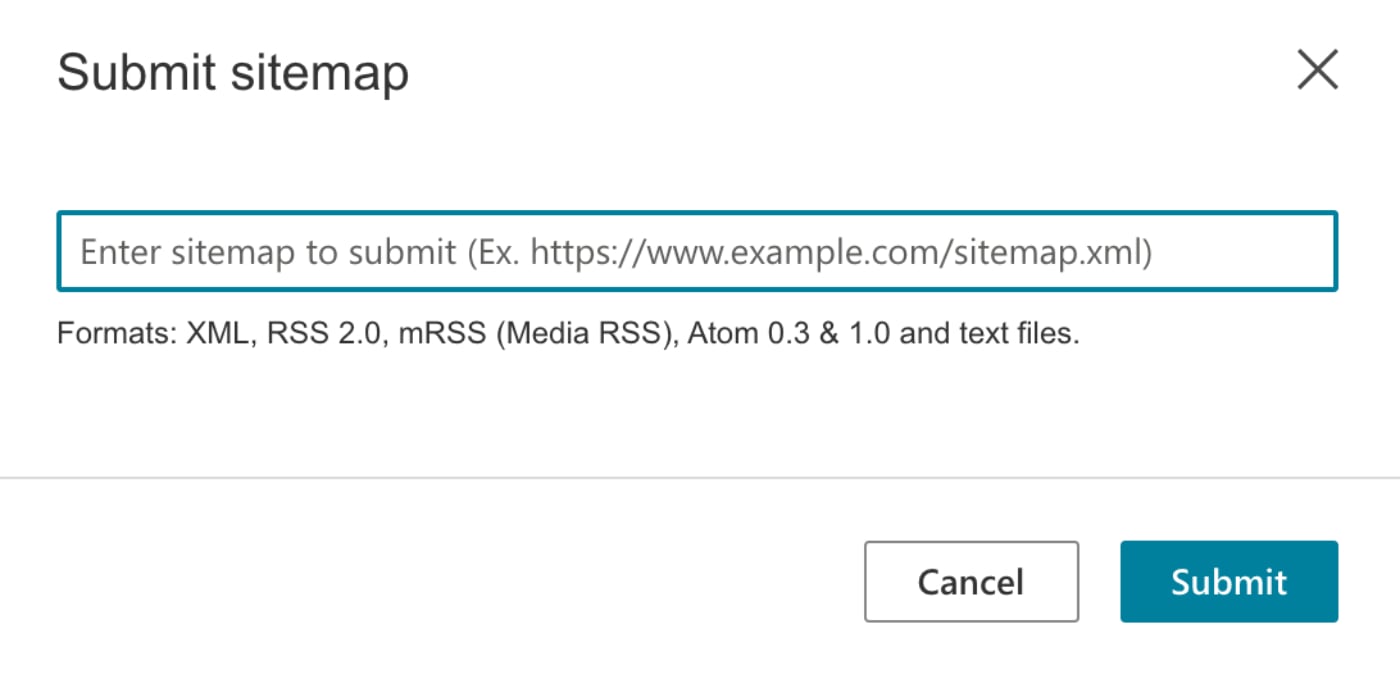
The default names for the sitemaps created by All in One SEO are:
- XML Sitemap: sitemap.xml
- Video Sitemap: video-sitemap.xml
- RSS Sitemap: sitemap.rss
IMPORTANT:
It can take a while for Bing to process your sitemap. The length of time they take is entirely up to them and you cannot force them to process your sitemap any faster, so please be patient.
NOTE:
The XML Sitemap created by All in One SEO automatically includes all your images, so it means you don't have to submit a separate Image Sitemap.
Once you have added your site as a property in Yandex Webmaster Tools, navigate to Indexing » Sitemap files in the left-hand menu.
NOTE:
Currently, Yandex only accepts XML sitemaps and doesn't support RSS sitemaps.
You should see the Add Sitemap file form. Enter the full URL for your sitemap in the field, click the Add button and you are done.
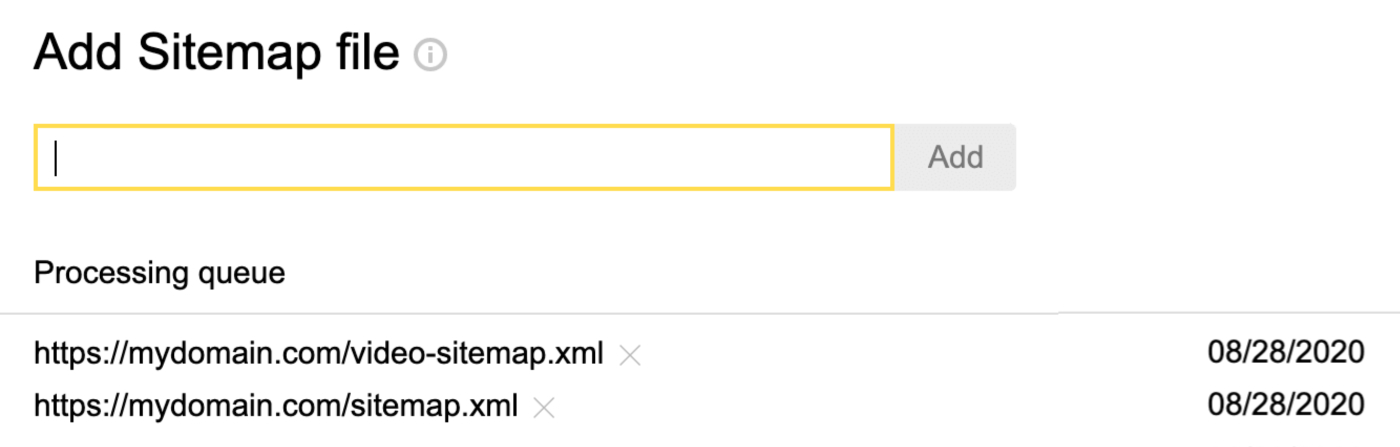
The default names for the sitemaps created by All in One SEO are:
- XML Sitemap: sitemap.xml
- Video Sitemap: video-sitemap.xml
IMPORTANT:
It can take a while for Yandex to process your sitemap. The length of time they take is entirely up to them and you cannot force them to process your sitemap any faster, so please be patient.
NOTE:
The XML Sitemap created by All in One SEO automatically includes all your images, so it means you don't have to submit a separate Image Sitemap.
Sitemap indexes are enabled by default in All in One SEO, and pagination is set to 1000 URLs per sitemap. This makes it easier for search engines to crawl a sitemap on large or slow sites and it avoids any problems with search engines timing out when requesting your sitemap.
In This Article
Disabling Sitemap Indexes
If you have a small site with not much content, you may wish to disable sitemap indexes.

To do this for your XML Sitemap, click on Sitemaps in the All in One SEO menu. In the Sitemap Settings section, you'll see Enable Sitemap Indexes. Set this to Disabled if you want to disable sitemap indexes.
To do this for your Video Sitemap, click on Sitemaps in the All in One SEO menu and then click on the Video Sitemap tab. In the Video Sitemap Settings section, you'll see Enable Sitemap Indexes. Set this to Disabled if you want to disable sitemap indexes.
Setting the Number of URLs per Sitemap
If you want to change the number of URLs listed in each sitemap then you can do this using the Links Per Sitemap setting. This setting is only displayed when sitemap indexes are enabled.
Go to Sitemaps in the All in One SEO menu and you'll see the Links Per Sitemap setting in the Sitemap Settings section.

The default setting is 1000 URLs per sitemap. Once a sitemap reaches this limit a new page is generated. For example, if you have 2500 posts on your site, then your sitemap index will look like this:
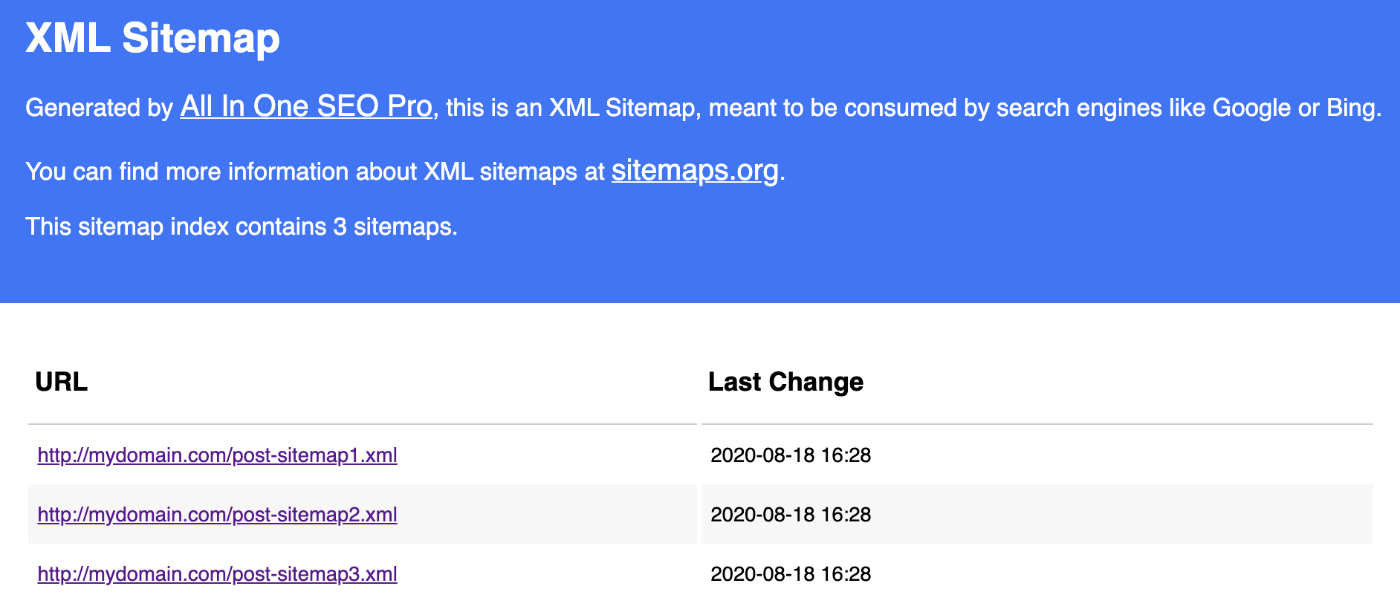
In the example above, post-sitemap1 and post-sitemap2 will each have 1000 URLs and post-sitemap3.xml will have 500 URLs.
NOTE:
The newest content is added to the first sitemap, in this example it would be post-sitemap1.
You can change the number in the Links Per Sitemap field to lower the number of URLs in each sitemap. It's advisable not to increase the number.
There is a Links Per Sitemap setting for the Video Sitemap as well which can be found under All in One SEO » Sitemaps » Video Sitemap » Video Sitemap Settings.
The post Using Sitemap Indexes and Pagination first appeared on AIOSEO.]]>In This Article
What is a Dynamically Generated Sitemap?
Dynamically generated just means that instead of a physical file being created on the server, the content is displayed in the browser when someone goes to the URL.
This is very common when working with Content Management Systems such as WordPress. Every page of content that WordPress outputs is dynamically generated from content in the WordPress database. This is inherently better than creating static web page files like web developers used to 20 years ago.
Why Use a Dynamically Generated Sitemap?
There are four reasons why we do this, these are:
- Dynamically generating a sitemap means it's created every time it is requested meaning it's always up to date and accurately reflects the state of your site at that moment in time
- Dynamically generating a sitemap is usually faster and requires less resources than writing to a static file. Search engines care about how long it takes to access your sitemap, so using a dynamically generated sitemap is much better and avoids them giving up when it takes too long to read
- A static file can be overwritten or deleted, or become corrupt or inaccessible due to server permissions issues. A dynamically generated sitemap doesn't have these problems
- Writing to a static file is a complicated process, it requires a lot of code to accommodate different server configurations and can be prone to bugs and conflicts. Generating a dynamic sitemap is a natural part of how WordPress works so is more reliable.
How to Check if My Sitemap is Dynamically Generated?
If you want to check whether your XML Sitemap is dynamically generated, go to All in One SEO » Sitemaps and click on the Open Sitemap button.
Next, right-click any where on the XML Sitemap and select View Page Source. You should see a green line at the top that says “This sitemap was dynamically generated”.
If you want to check whether your Video Sitemap is dynamically generated, go to All in One SEO » Sitemaps » Video Sitemap and click on the Open Video Sitemap button.
Next, right-click any where on the Video Sitemap and select View Page Source. You should see a green line at the top that says “This sitemap was dynamically generated”.
NOTE:
The Dynamically Generate setting has been removed in All in One SEO version 4.0 as the plugin now dynamically generates all the sitemaps by default.
Is There a Physical Sitemap File on my Server?
No, All in One SEO does not create a physical file for your sitemap.
Our sitemaps are all virtual web pages that are dynamically generated whenever a crawler visits the sitemap URL as explained above. This way it’s always up-to-date, there’s never an issue with it getting accidentally deleted, and you don’t have to worry about server-side file permissions making it unavailable to search engines.
The post What is a Dynamically Generated Sitemap and Why is it Better to Use? first appeared on AIOSEO.]]>There are a number of reasons why All in One SEO cannot generate a sitemap and WordPress returns a Page Not Found error. These are listed below along with steps to check whether this is affecting your site.
In This Article
The sitemap is disabled
First, check whether you've enabled the sitemap by going to All in One SEO » Sitemaps and click on the tab for the sitemap you're having problems with.
Is the Enable Sitemap setting toggle in the On position? If it's not, then click the toggle to enable the sitemap and click the Open Sitemap button to view the sitemap.

If you are using the Video Sitemap and/or the News Sitemap in All in One SEO, then you should also use the main XML Sitemap in All in One SEO.
There is no content
This may seem like a silly question to ask, have you made sure that you have published content on your site that you're including in the sitemap?
Check the Post Types and Taxonomies settings to verify which content you've selected to include in your sitemap.
If this is the News Sitemap, then you must have content that has been published in the last 48 hours. Any content older than this is not included in the News Sitemap as per Google's requirements.
The content is set to noindex
This is directly related to “There is no content” above. All in One SEO does not include content in the sitemap that is set to Noindex.
So if you've set the Show in Search Results to No under Search Appearance or enabled No Index using the Robots Meta settings under Search Appearance or on your content then this content will be excluded from the sitemap.
The NGINX rewrite rules haven't been added
NOTE:
Rewrite rules should no longer be necessary if you're running All in One SEO version 4.2.1 or later.
If your server is running NGINX then you may need to add the NGINX rewrite rules here.
Permalinks are set to Plain
If you're on All in One SEO version 4.2.2 or lower then sitemaps will only work with “pretty permalinks”.
Go to Settings » Permalinks on your site and verify that it's set to something other than Plain.
The sitemap name has been changed in the database
This can be a little more difficult to check for. The easiest way is to go to All in One SEO » Tools » Import / Export and in the Export Settings area, check the box for Sitemaps and click the Export Settings button.
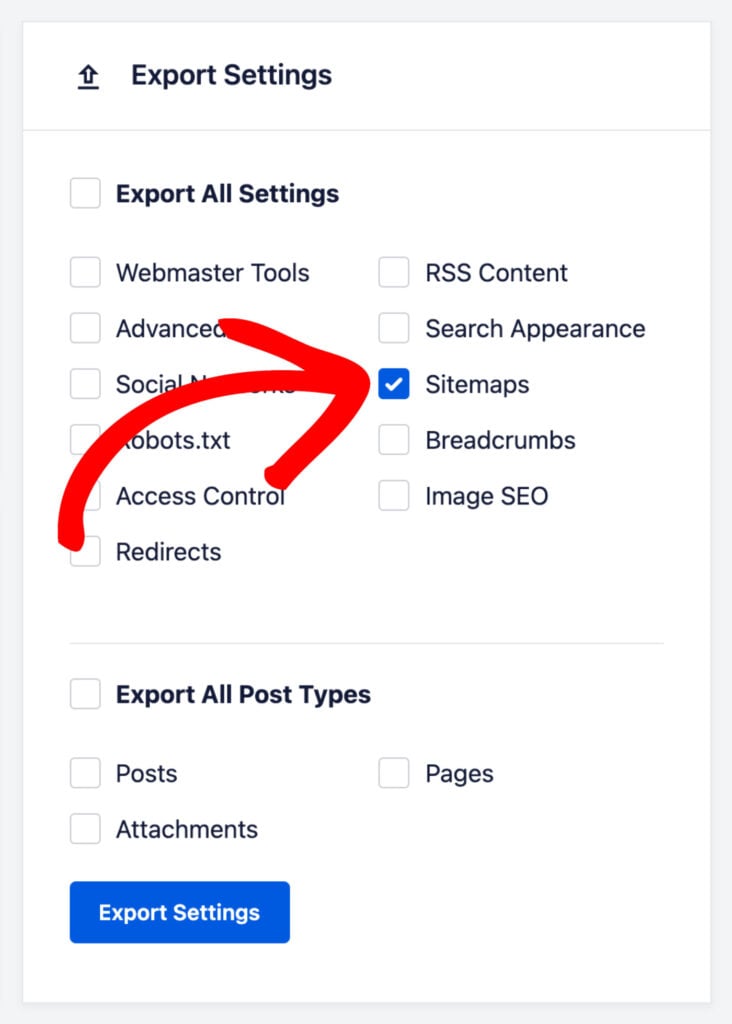
Open the aioseo-export-settings.json file that was downloaded to your computer and search for “filename”. If the value is anything other than “sitemap” for the XML Sitemap and “video-sitemap” for the Video Sitemap then the filename of the sitemap has been changed.
You can change it back in the export file and then import the settings.
CDN Plugin includes XML or XSL
If you're using a CDN service or CDN plugin, then check to see if deactivating the plugin or service resolves the problem. Some CDN services and plugins include XML and XSL URLs when they shouldn't.
To exclude the XML Sitemap from caching, please refer to the instructions here.
If you are using a different plugin or caching is done at the server level then contact the plugin developer, service provider, or your hosting company to find out how to exclude XML and XSL URLs.
The post How to Fix a 404 Error When Viewing Your Sitemap first appeared on AIOSEO.]]>If you have content like this, then you'll want to submit it to search engines using an XML Sitemap. All in One SEO can help with this, here's how.
In This Article
Importing URLs Using a CSV File
Start by going to Sitemaps in the All in One SEO menu.
You’ll see the General Sitemap screen, scroll down until you see Additional Pages and click the toggle to enable this feature.
Click on the Import from CSV button underneath the Additional Pages form.

You'll see a popup where you can upload your CSV file.
Downloading a Sample CSV File
There's a link to download a sample CSV file you can use to create your import file.
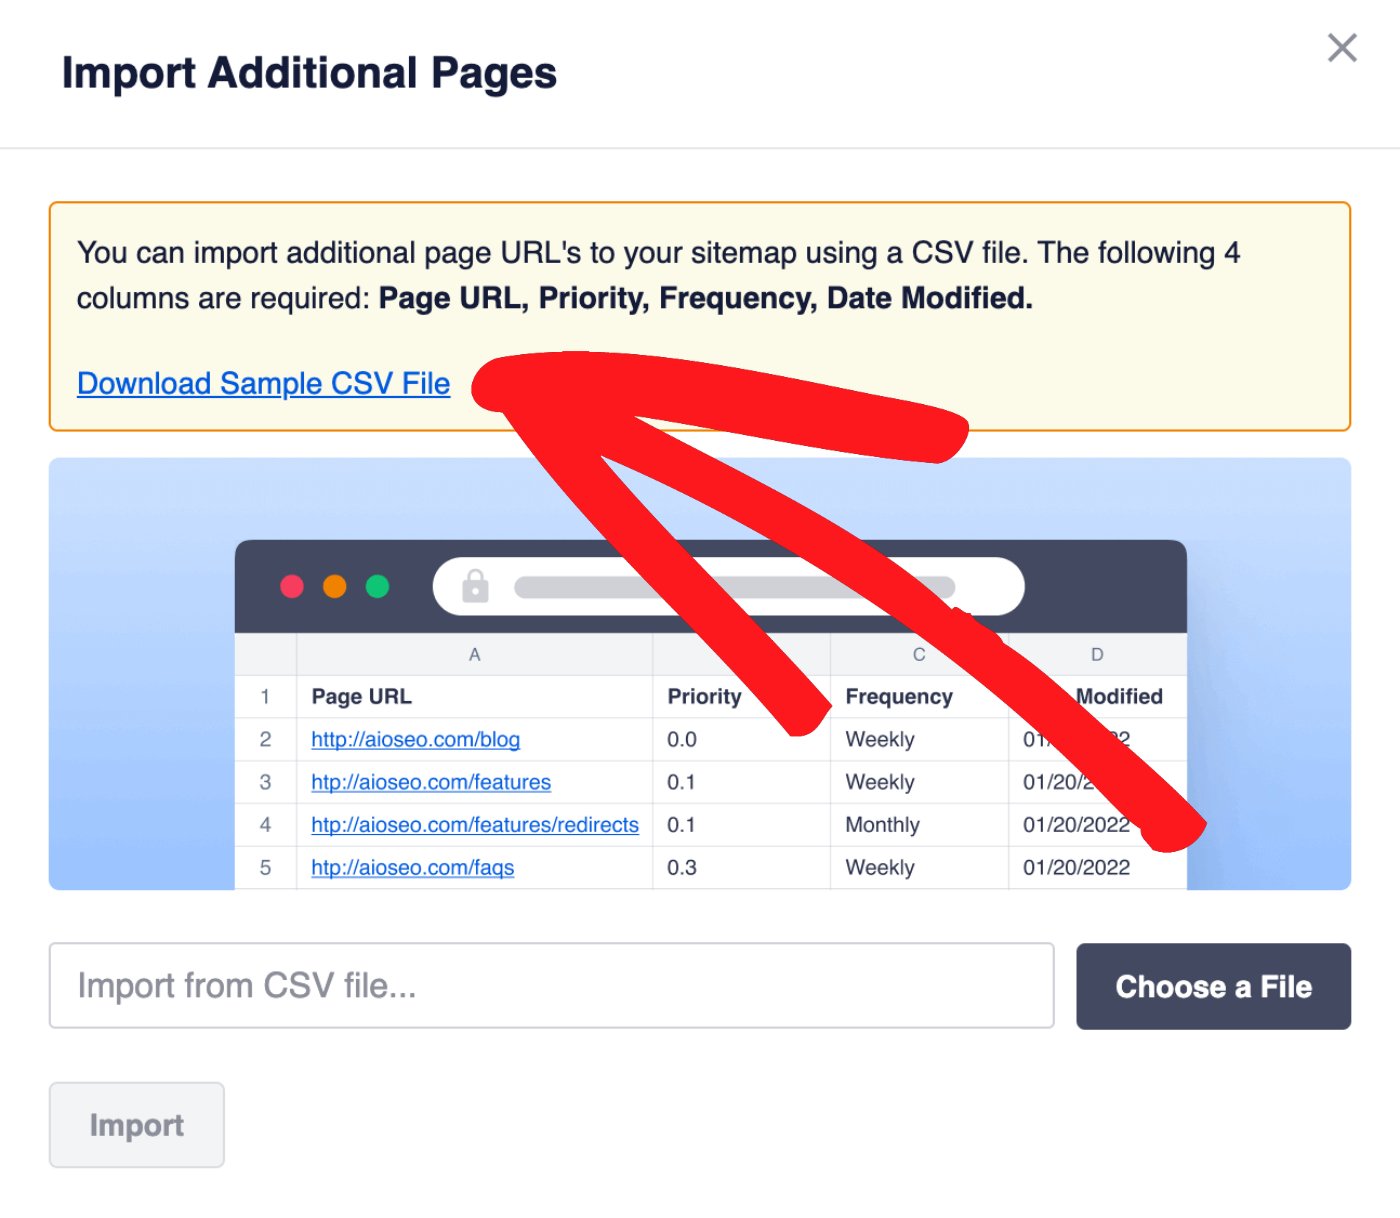
To import your URLs, click on the Choose a File button, select your file and click the Import button.
Explanation of the Information Needed to Add a URL
When importing URLs into the XML Sitemap, you need to provide the following information:
- Page URL:
Enter the full URL of each page of content, i.e. https://mydomain.com/my-content/ - Priority:
Enter a number between 0.0 and 1.0 to describe how important the URL is compared to all the other URLs on your site. Most search engines ignore this now. If you're unsure what to choose, then set this to 0.5. - Frequency:
Enter the frequency of how ofter the content this URL is likely to be changed. Allowed values are:
always, hourly, daily, weekly, monthly, yearly, or never. - Last Modified Date:
Enter the date you last changed this content. The date should be in the format mm/dd/yyyy
You may want to know whether these are important to your site and should be listed on search engines.
For most sites, the answer is no, these have no value or benefit when included in search results.
However, there are some exceptions.
In This Article
What Are Date and Author Archives
Date Archives
This WordPress archive lists all the posts published on a specific date, month or year. For example, if you go to https://aioseo.com/2020/ you'll see all posts we've published in 2020. These archives may be important if you run a news website where visitors want to find posts by date. In this case you would want to include date archives in your XML Sitemap.
Author Archives
This WordPress archive lists all the posts published by a specific person. This may be important if you run a site with multiple authors that have built a following and where visitors want to find posts written by that person. In this case you would want to include author archives in your XML Sitemap.
Including Date and Author Archive in Your XML Sitemap
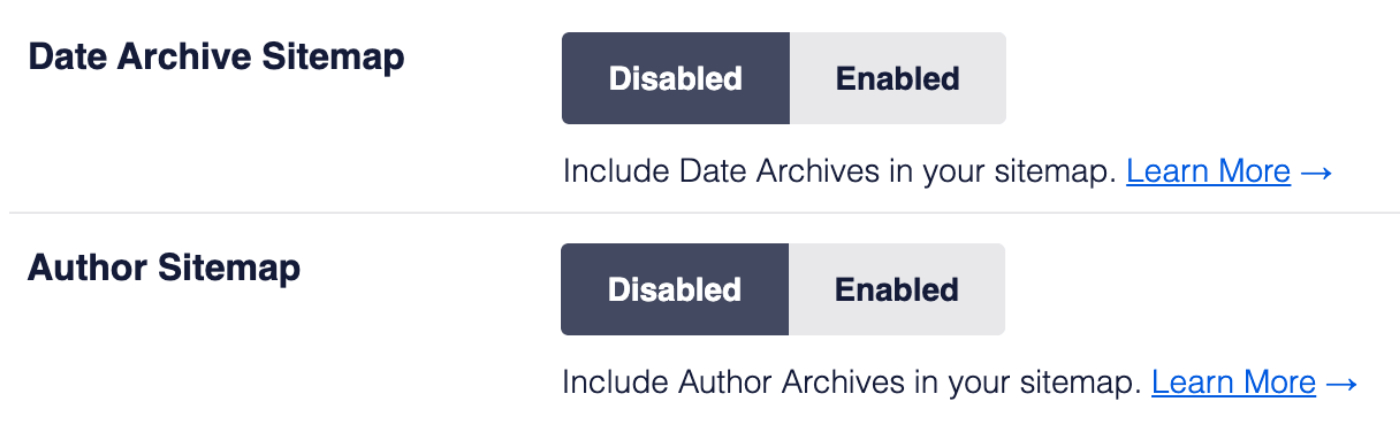
To include these archives in your sitemap, go to Sitemaps in the All in One SEO menu.
In the Sitemap Settings section you'll see settings for Date Archive Sitemap and Author Sitemap. By default, these are set to Disabled. Change the setting Enabled to include the archive.
IMPORTANT:
If the archive has been set to be excluded from search results or set to No index under Search Appearance then these settings will not be shown.
NOTE:
Search engines can still index your archives and display them in search results even if they're not included in your sitemap. Always use noindex to stop search engines indexing content.