Here we'll walk you through the easy steps to do this.
The instructions in this article apply to Posts, Pages, Media Attachments, any Custom Post Types, Categories, Tags and any Custom Taxonomies. We're using the Add New Post screen in the screenshots below.
In This Article
Tutorial Video
IMPORTANT:
Search engines don't have to use the SEO title and description you provide. They will generate the search result snippet on a per-search basis and it's completely automated. They may use your SEO title and description or they may use something they feel is more relevant to the search term.
Controlling the SEO for Your Content
To get started, edit your content and scroll down to the AIOSEO Settings. You should see the SERP Preview, as well as the Title and Meta Description settings.
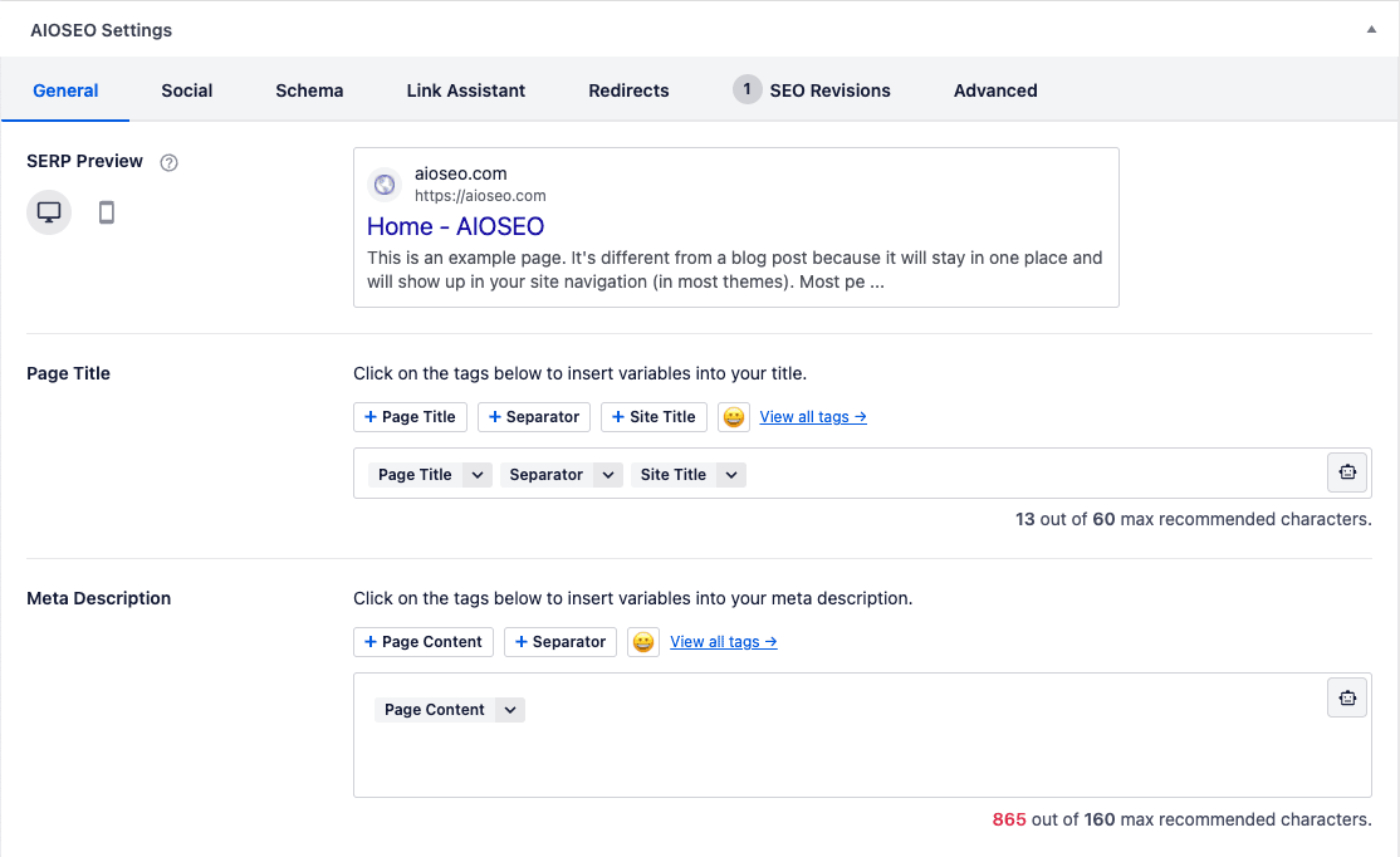
The SERP Preview shows an example of how your content may look in search results based on the Title and Meta Description you set.
Setting the SEO Title
To set the SEO title for this content, click on one of our smart tags shown above the Title field.
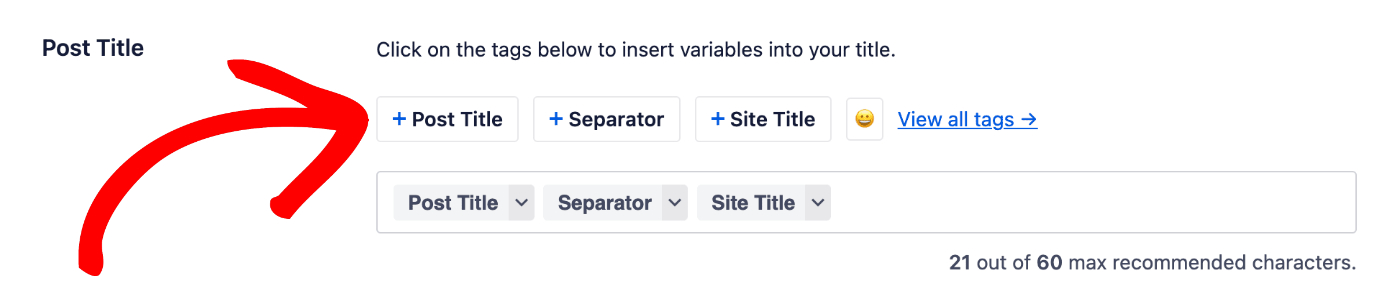
You can also type the hash character ( # ) in the field to display a list of available tags you can choose from.
You can also enter text in the Title field or combine text with the smart tags and there’s an emoji picker where you can add an emoji to give you ultimate control over the SEO title. Whatever you set will override the format set under All in One SEO » Search Appearance.
Setting the SEO Description
To set the SEO description for this content, click on one of our smart tags shown above the Meta Description field.
You can also type the hash character ( # ) in the field to display a list of available tags you can choose from.
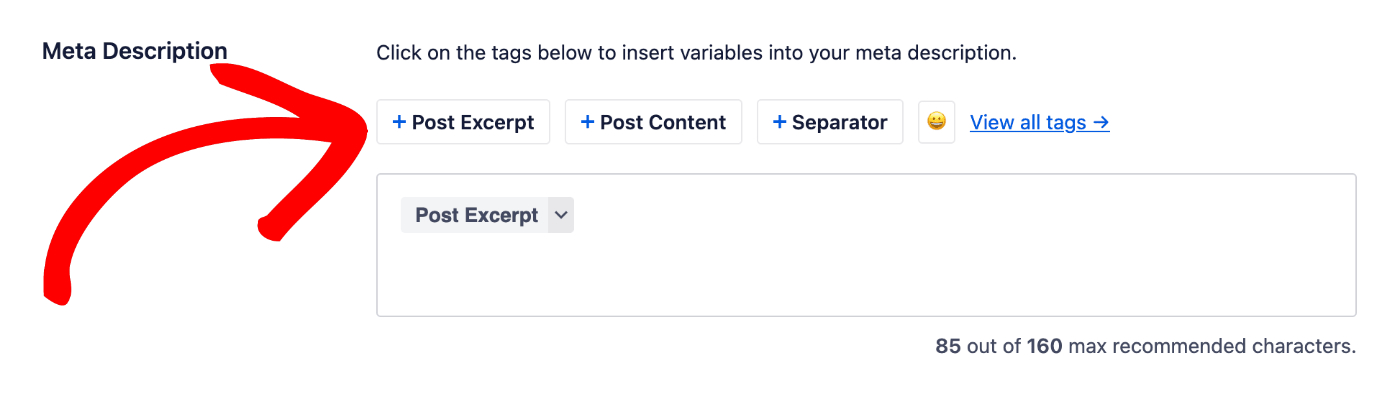
You can also enter text in the field or combine text with smart tags and there’s an emoji picker where you can add an emoji to give you ultimate control over the SEO description. Whatever you set will override the format set under All in One SEO » Search Appearance.
That’s all! You’ve now set the SEO title and description for your individual content.
The post Setting the SEO Title and Description for Your Content first appeared on AIOSEO.]]>Upgrading to the premium version will give you access to even more features and powerful addons, as well as support from us.
In this article, we will show you how to upgrade from the Lite version of our plugin to the Pro version.
You can purchase your desired license of All in One SEO Pro from our website.
In This Article
Tutorial Video
Automatic Installation
When you purchased the Pro plugin, you should have received a purchase receipt email which contains your license key and login for the Account area on our site. Please locate this email and copy your license key.
If you can't find the email, please log into our website here – https://aioseo.com/login/. Click on the Downloads tab to find your license key.
Now, log into your WordPress site and click on General Settings in the All in One SEO menu.

You should see the License Key field. Paste your license key in this field and click the Connect button.

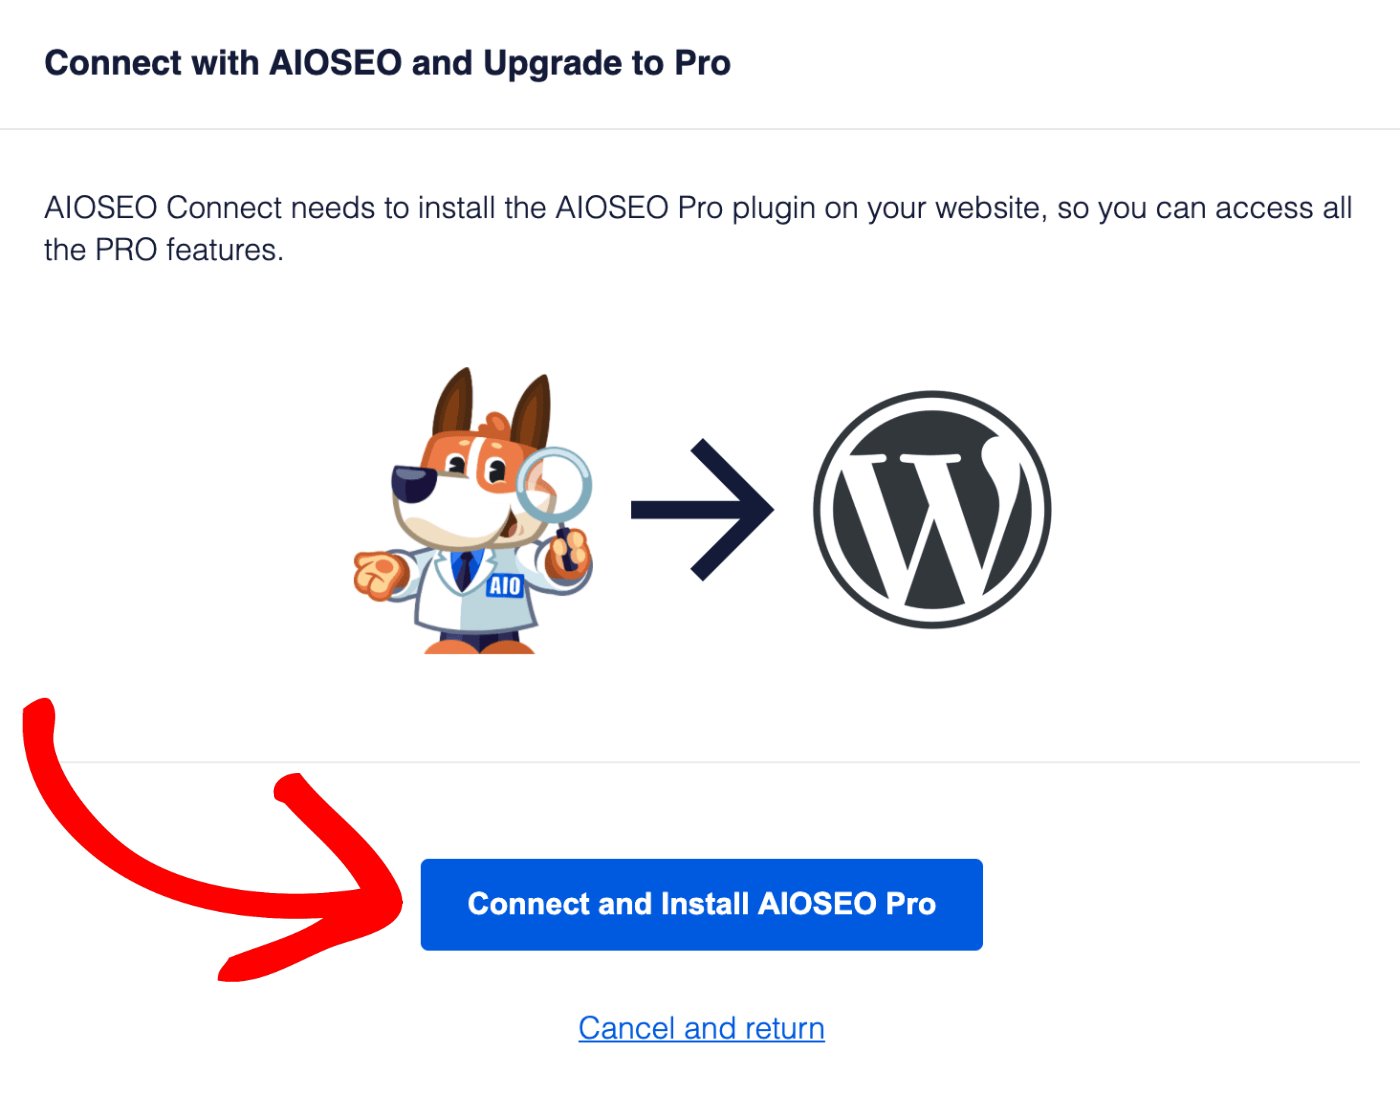
Now you'll see a Connect with AIOSEO and Upgrade to Pro screen. Click the Connect and Install AIOSEO Pro button.
That's all! You've now successfully activated All in One SEO Pro.
You'll see that the free version of All in One SEO has been deactivated and you can now delete that plugin.
Manual Installation
You can follow these instructions for Installing All in One SEO Pro manually.
NOTE:
All of the settings and data will automatically be migrated from the free plugin into All in One SEO Pro.
In This Article
Let's get started!
Tutorial Video
Downloading All in One SEO Pro
Before installing All in One SEO Pro on your site, you first need to download it to your computer.
Start by logging into our website here – https://aioseo.com/login/.
You should have received a purchase receipt email from us that contains your username and password.
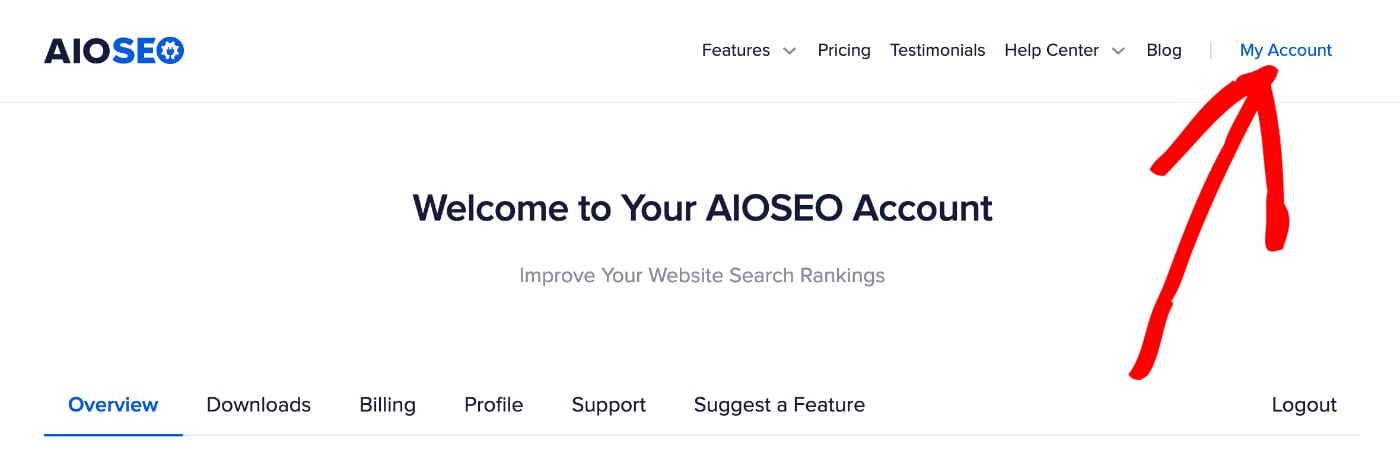
Next, click the My Account link in the top right corner of our site.
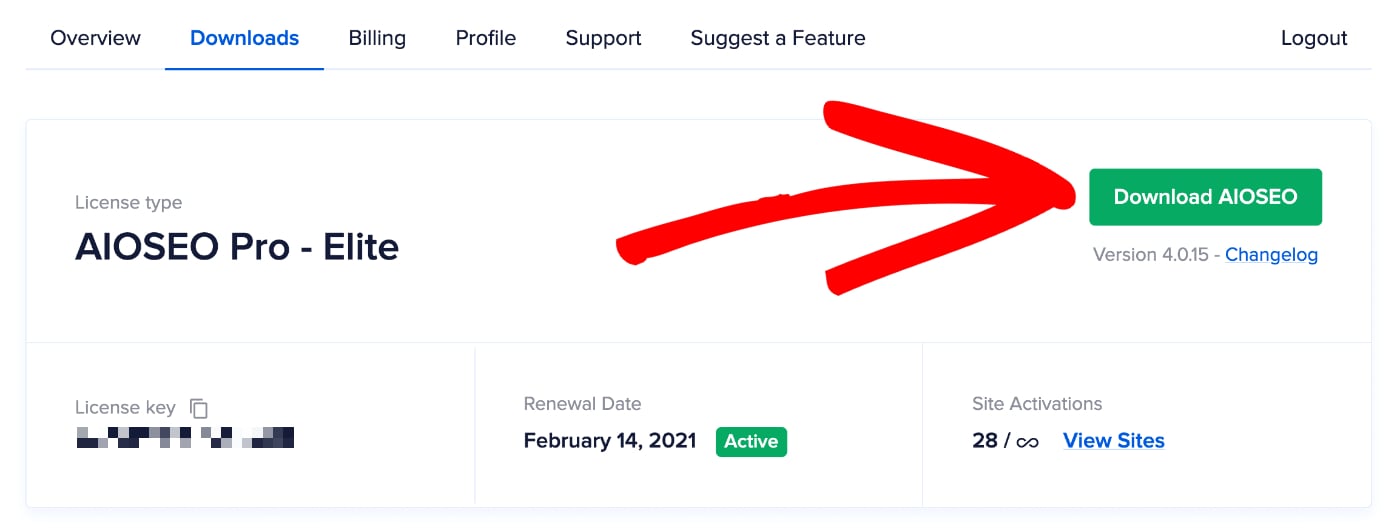
Next, click on the Downloads tab and then click the Download AIOSEO button.
A ZIP file called aioseo-pro-v###.zip (v### indicates the version number) will download to your computer.
IMPORTANT:
If the file gets unzipped when you download it, make sure you check your browser settings to ensure downloads don't get unzipped and then download the file again. WordPress will not accept an unzipped file.
Installing All in One SEO Pro
Now, you need to upload the ZIP file to your WordPress site.
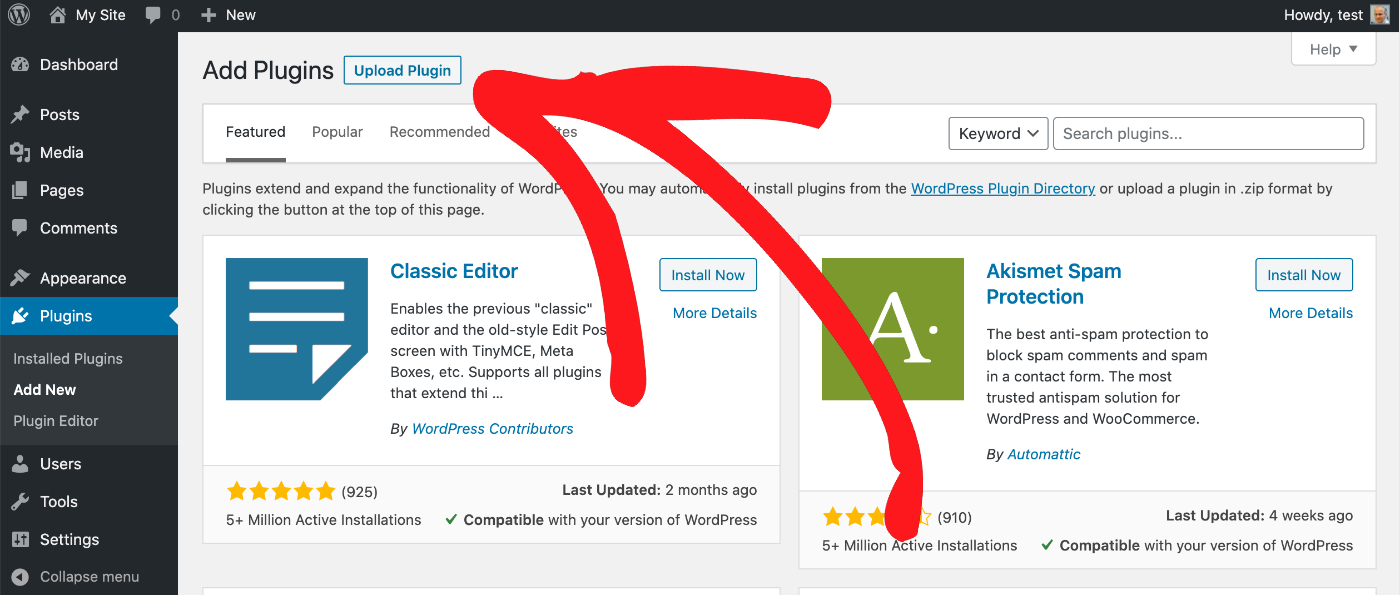
To do this, log in to your WordPress site and go to Plugins and click on the Add New button.

Then click the Upload Plugin button at the top of the screen.
Click the Choose File button and browse your computer for the downloaded ZIP file of All in One SEO Pro.
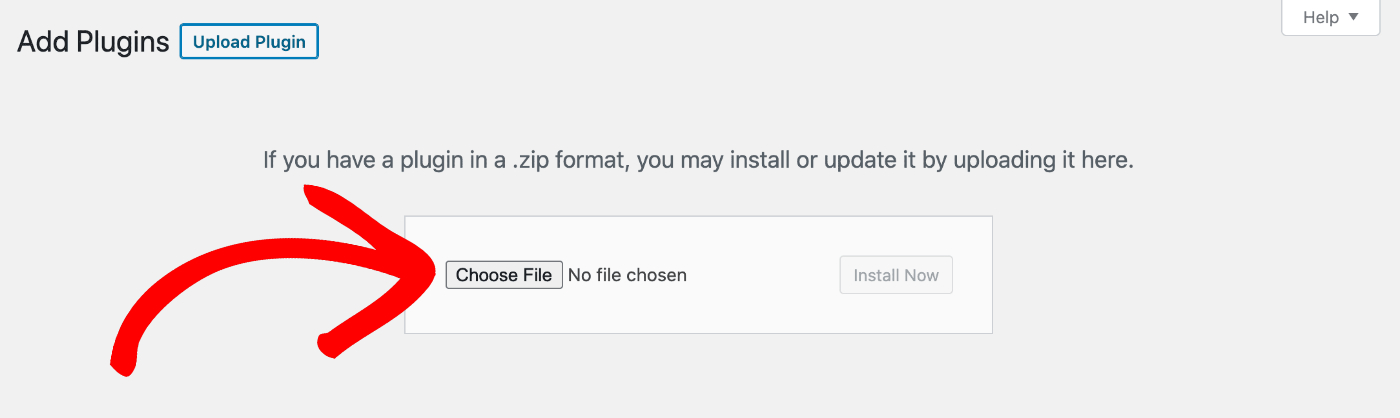
Once you've found it, select it and click the Install Now button.

IMPORTANT:
If you get an error message related to maximum upload file size whist installing All in One SEO Pro, please refer to the instructions here.
Once the plugin has installed, click on the Activate Plugin button.

NOTE:
Activating the Pro version will automatically import all SEO data and configuration settings from the free version with no data loss.
Activating your License Key
Finally, you need to activate your license key.
Click on General Settings in the All in One SEO menu and you'll see the License screen.

Enter your license key which you received in your purchase receipt in the License Key field, then click the Connect button.
The post Installing All in One SEO Pro first appeared on AIOSEO.]]>To get access to the settings and features in All in One SEO Pro, and be able to update the plugin, you'll need to activate your license key.
In This Article
Tutorial Video
Activating Your License Key
You can activate your copy of All in One SEO Pro by clicking General Settings in the All in One SEO menu and you should see the License Key field.

Copy the license key in your purchase receipt email and paste it into the License Key field. Click the green Connect button.
That's all! Your license key has now been activated.
The post How to Add Your License Key for All in One SEO Pro first appeared on AIOSEO.]]>This beginners guide will walk you through the simple steps to use these features for Facebook.
In This Article
Tutorial Video
Why Use the Social Networks Features?
These days a good presence on social media is just as important as a good presence on search engines.
You maintain this presence using your own Facebook Page or profile, but also through Like and Share buttons on your website where visitors can share your content on their Facebook profile.
When your content is shared on Facebook, it may be displayed with a title, description and an image like the example below.

Your goal is to attract the attention of people as they scroll through their Facebook feed and get them to click on your content and visit your site.
The Social Networks features in All in One SEO mean you can control how your content looks on Facebook, increasing the likelihood that people will see your content and click through to your site.
Now that we know why it's important, let's look at how we use All in One SEO to control how our content appears on Facebook.
Enabling Facebook Settings
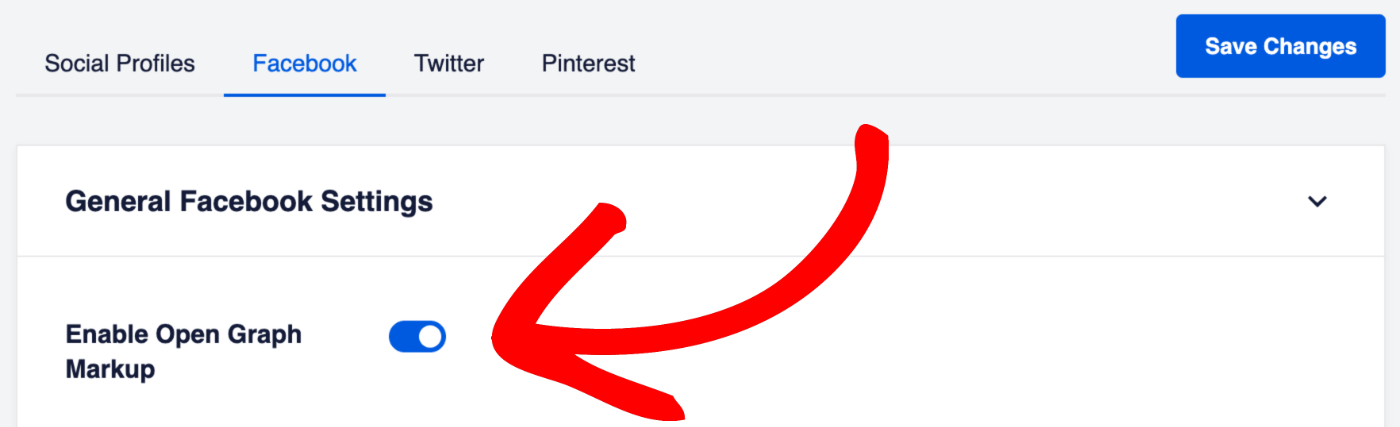
To get started, click on Social Networks in the All in One SEO menu and then click on the Facebook tab.
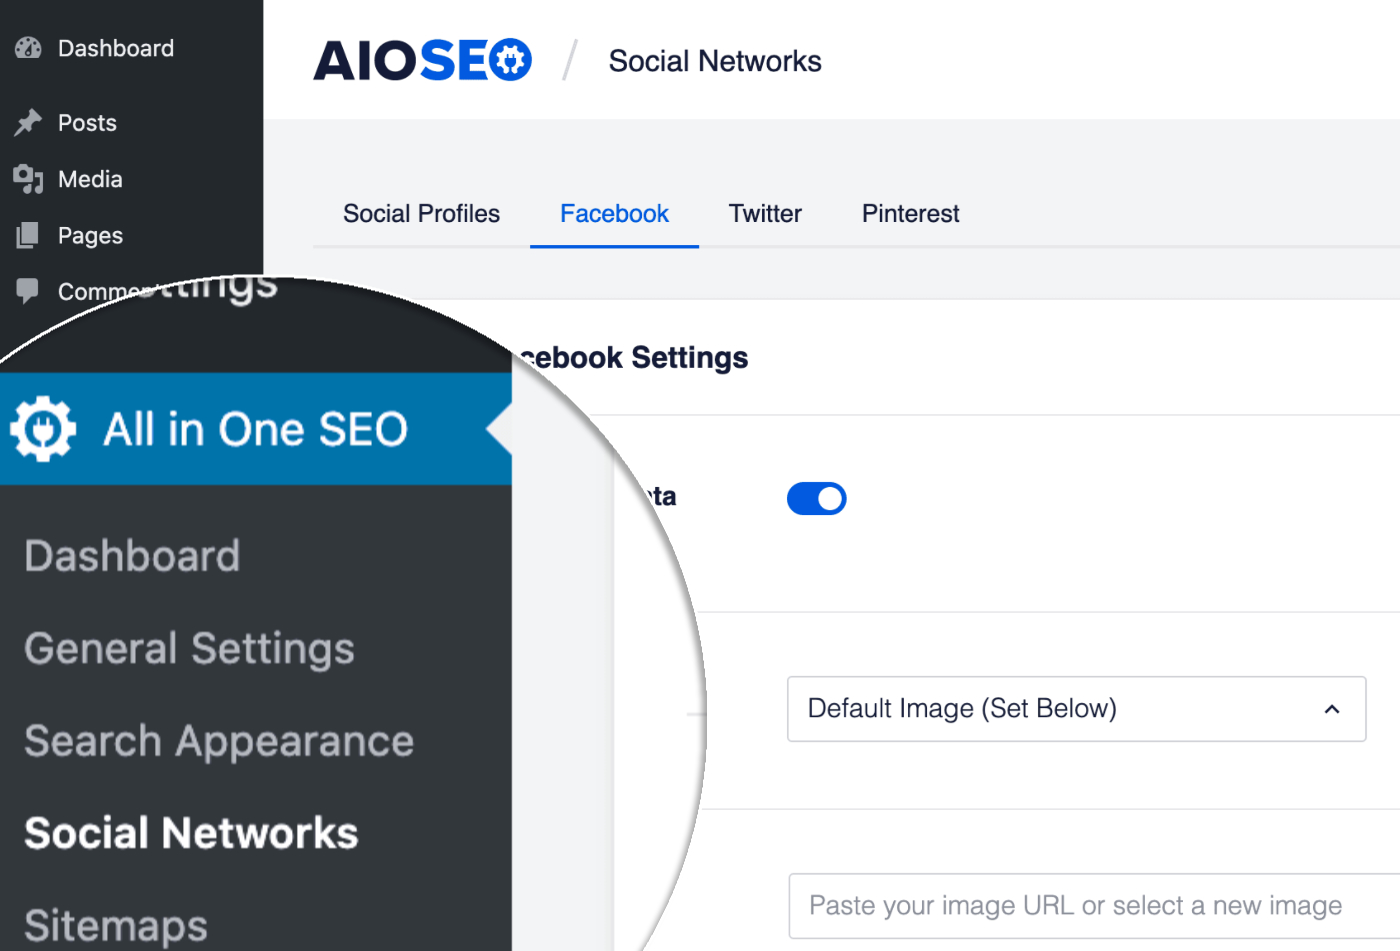
The first setting you'll see is Enable Open Graph Markup. Make sure this is enabled.
Facebook Image Settings
Next, we’re going to choose which image is used when your content is shared on Facebook. Follow these instructions for Setting the Facebook Image Source.
Once you've done that, you can set a default Facebook image which will be used as a fall back if no other image is set. Follow these instructions for Setting the Default Facebook Image.
Facebook Object Types
Next, we'll set the Object Types for our content. Facebook uses these to determine the appearance of your content when it's shared.
Follow these instructions for Setting the Default Object Types for Facebook.
Home Page Settings for Facebook
Now we're going to move on to setting the title, description and image for your homepage.
Where you set this will depend on whether your homepage is set to display your latest posts, or is set to a static page. If you're not sure, just go to Settings » Reading on your site and check the Your homepage displays setting.
If your homepage displays your latest posts, then follow these instructions for Setting the Facebook Social Meta When Your Homepage Displays Your Latest Posts.
If your homepage displays a static page, then follow these instructions for Setting the Facebook Social Meta When Your Homepage Displays a Static Page.
Individual Page/Post Settings
Now that we've set the Facebook settings for the homepage, let's set the title, description and image for an individual post or page.
Follow these instructions for Configuring the Facebook Settings for Your Content.
The post Beginners Guide to Social Networks Settings for Facebook first appeared on AIOSEO.]]>This beginners guide will walk you through the simple steps to use these features for Twitter.
In This Article
Tutorial Video
Why Use the Social Networks Features?
These days a good presence on social media is just as important as a good presence on search engines.
You maintain this presence using your own Twitter profile, but also through Tweet buttons on your website where visitors can share your content on their Twitter profile.
When your content is shared on Twitter, it may be displayed with a title, description and an image like the example below.

Your goal is to attract the attention of people as they scroll through their Twitter feed and get them to click on your content and visit your site.
The Social Networks features in All in One SEO mean you can control how your content looks on Twitter, increasing the likelihood that people will see your content and click through to your site.
Now that we know why it's important, let's look at how we use All in One SEO to control how our content appears on Twitter.
Enabling Twitter Settings
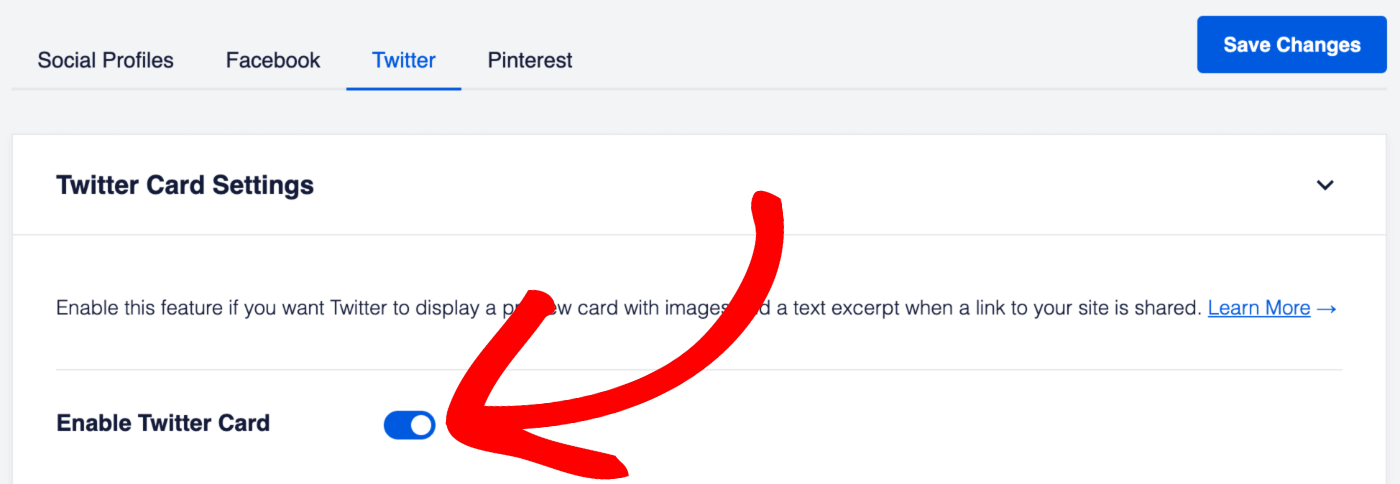
To get started, click on Social Networks in the All in One SEO menu and then click on the Twitter tab.
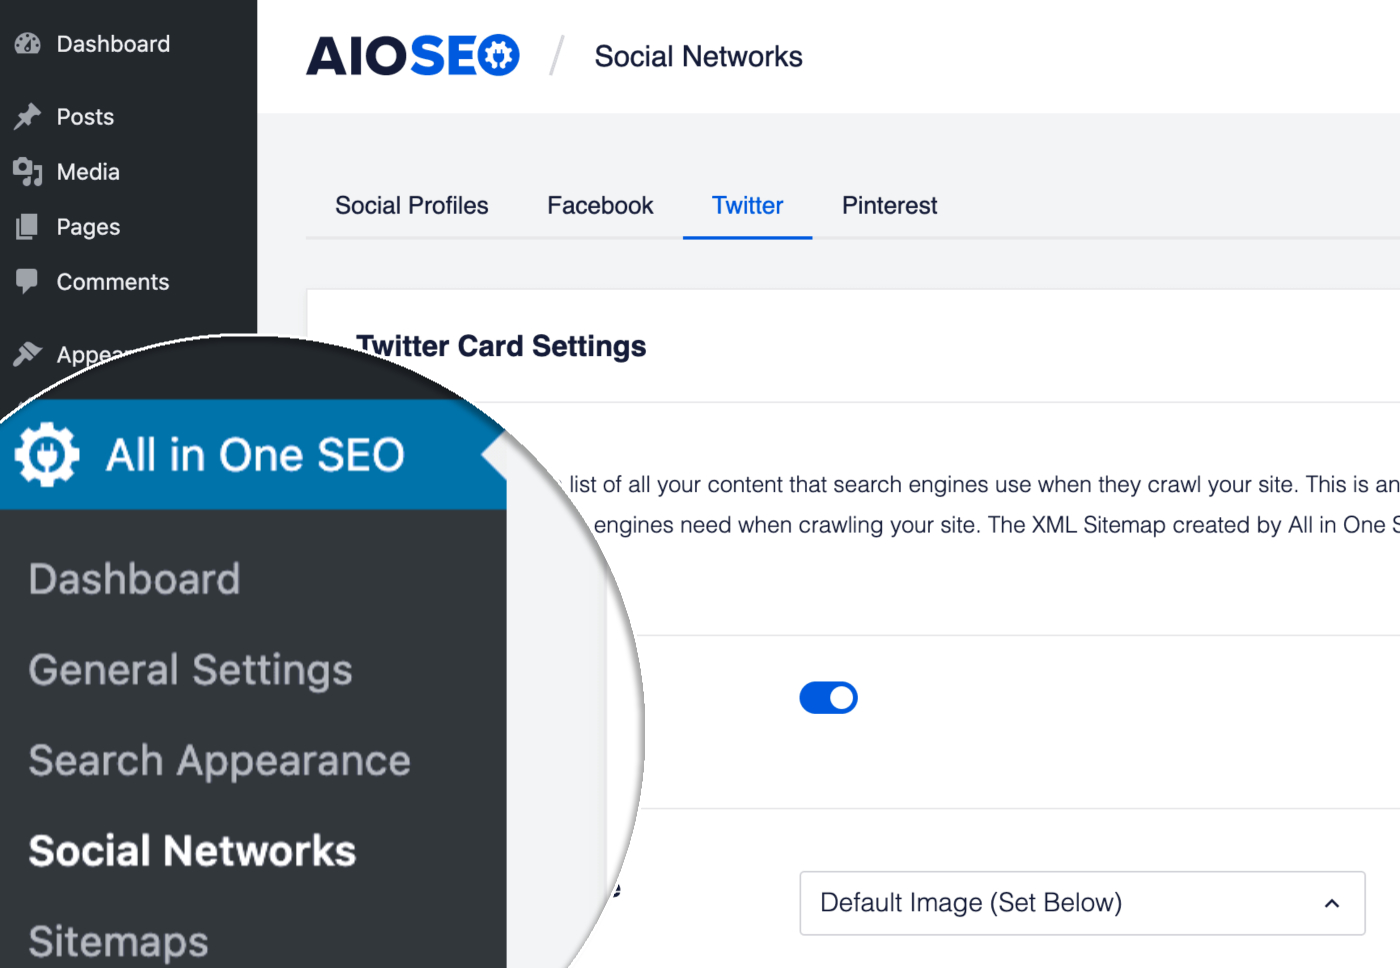
The first setting you'll see is Enable Twitter Cards. Make sure this is enabled.
Twitter Card Types
Next, we'll set the Card Type for our content. Twitter uses this to determine the appearance of your content when it's shared.
Follow these instructions for Setting the Default Twitter Card Type.
Twitter Image Settings
Next, we’re going to choose which image is used when your content is shared on Twitter. Follow these instructions for Setting the Twitter Image Source.
Once you've done that, you can set a default Twitter image which will be used as a fall back if no other image is set. Follow these instructions for Setting the Default Twitter Image.
Home Page Settings for Twitter
Now we're going to move on to setting the title, description, image and card type for your homepage.
Where you set this will depend on whether your homepage is set to display your latest posts, or is set to a static page. If you're not sure, just go to Settings » Reading on your site and check the Your homepage displays setting.
If your homepage displays your latest posts, then follow these instructions for Setting the Twitter Social Meta When Your Homepage Displays Your Latest Posts.
If your homepage displays a static page, then follow these instructions for Setting the Twitter Social Meta When Your Homepage Displays a Static Page.
Individual Page/Post Settings
Now that we've set the Twitter settings for the homepage, let's set the title, description and image for an individual post or page.
Follow these instructions for Configuring the Twitter Settings for Your Content.
The post Beginners Guide to Social Networks Settings for Twitter first appeared on AIOSEO.]]>To get started, please choose from the option below that best applies to you.
In This Article
Tutorial Video
Renewing an Expired License
Please follow the steps below to renew an expired license:
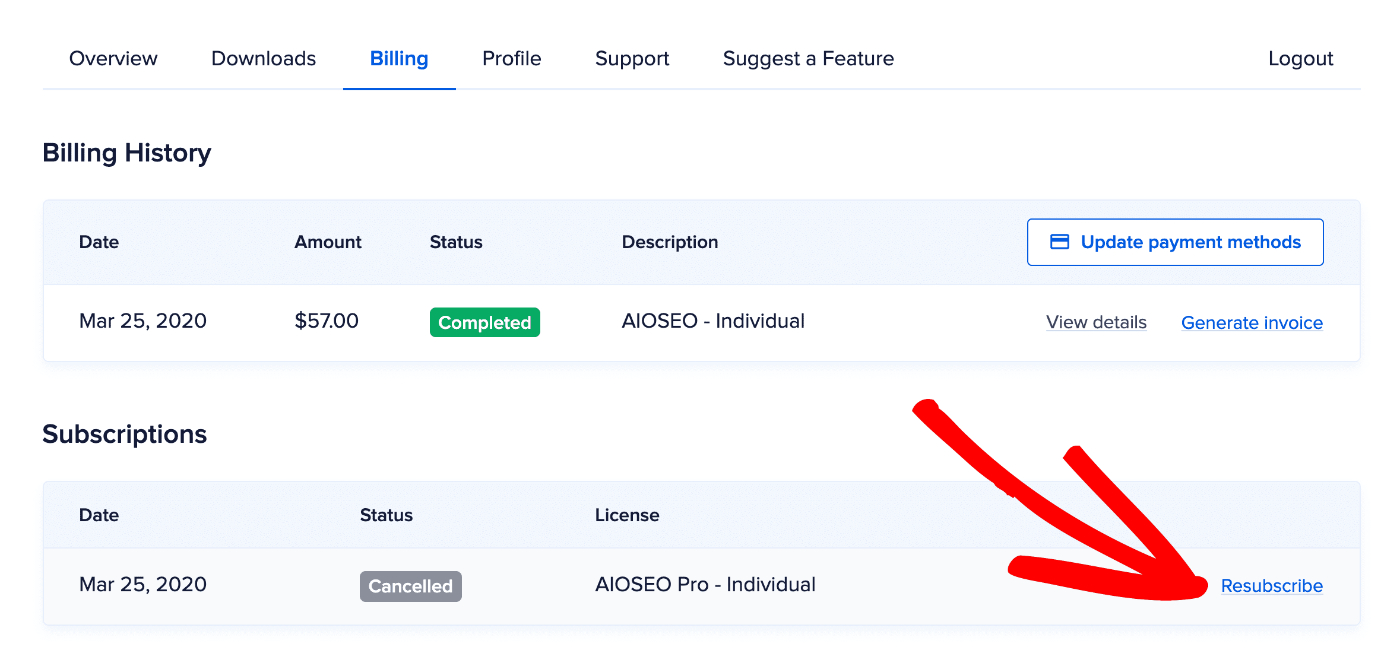
First, log into your account on our site here and click on the Billing tab at the top. You'll see a list of your subscriptions in the Subscriptions table.
Next, click on the Resubscribe link next to the subscription you want to renew.
Complete the checkout process on the Checkout page.
Renewing a License Before it Expires
If your license hasn’t expired yet, then in most cases you can simply wait until it does expire before you renew. Then, you can follow the steps for Renewing an Expired License above.
Resolving a Failed Renewal Payment
If your auto-renewal isn’t able to be processed for any reason, then you should receive an email from us letting you know about the issue. When this happens, your license may expire until you have a chance to update your payment details.
To get things back on track, please follow our FAQ on how to update your payment information.
If you've updated your payment information but your subscription status shows as On hold or Expired, then please follow the steps for Renewing an Expired License above.
Frequently Asked Questions
How do I renew with a different payment method?
To change your payment method, please follow our FAQ on how to update your payment information here.
Can I get an invoice for my renewal?
Yes, you can download a PDF invoice from the Billing tab of the Account area on our site. Click the Generate Invoice link and complete the form to generate your PDF invoice.
Alternatively, you can request an invoice by completing the basic contact form here. Please make sure to include your business name, address, and tax ID if you want these included on the invoice.
The post How to Renew Your AIOSEO License first appeared on AIOSEO.]]>If you haven't already installed All in One SEO Pro, please refer to the installation instructions.
All in One SEO works very well out of the box with the default settings, however, the steps below will guide you through some important configuration settings that every site owner should follow.
We have a Beginners Guide to All in One SEO at the bottom of this article.
In This Article
Tutorial Video
Step 1 – Setting Your Home Page SEO Meta
To set the SEO title and meta description for your homepage, please follow the steps in our article on Setting the SEO for Your Home Page.
Step 2 – Setting Your Person or Organization Details
To set the Person or Organization details for your site, please follow the steps in our article on Configuring the Schema Settings in All in One SEO.
Step 3 – Showing or Hiding Your Content in Search Results
To control which content you want to appear in search results, please follow the steps in our article on Showing or Hiding Your Content in Search Results
Step 4 – Setting the SEO Meta for Your Content
To set the SEO title and meta description for your posts and pages, please follow the steps in our article on Setting the SEO Title and Description for Your Content.
Next Steps
The steps you have followed above are the essential first steps for every site owner.
Next you should create an XML Sitemap by following our Beginners Guide to XML Sitemaps.
After that, you may wish to enable the Social Meta module and follow the steps in the Beginners Guide to Social Networks Settings for Facebook .
If you're interested in learning about all of the other settings and features in All in One SEO then review the plugin documentation or click on the Help links and icons in the plugin.
The post Beginners Guide for All in One SEO first appeared on AIOSEO.]]>Here we will review the main SEO meta data that search engines look for and All in One SEO lets you manage.
In This Article
Tutorial Video
Check out our video on SEO meta:
SEO Title (aka Title tag)
The SEO Title or Title tag (we use this term interchangeably in our documentation) that appears in the source code of your webpage looks like this:
<title>My Site Title</title>
The SEO Title is usually displayed at the top of the source code for a webpage and is wrapped in the <title> HTML tag.
SEO Title Length
Most search engines place a limit on the number of characters that they display in search results. This limit is typically between 60 and 70 characters in length. This means that a title that exceeds the characters limit will be cut off with a …
Google does not limit by the number of characters, instead they limit by the total pixel width of the title. This means that a title that is typed in all CAPS would take up more space because the characters are wider and therefore less characters would be displayed in Google search results.
Title lengths also vary depending on whether you're on a desktop/laptop or on a phone.
General guidance regarding titles is to keep them short and descriptive.
Remember that when you perform a search on Google or Bing you use the title that is displayed for each result to make a decision as to which site to visit. A poor title typically results in the visitor returning to the search results and trying a different site.
SEO Title Uniqueness
Every SEO Title on your site should be unique because each page of content on your site should be unique.
Search engines may penalize you for having duplicate Title tags. SEO Titles should be unique across all content including Pages, Posts, Categories, Tags, etc. meaning that the Title tag for a Page should not be the same as the Title tag for a Post or a Category.
Search Engines use of SEO Titles
Despite the fact that you may set a unique title for each page of content, search engines do not have to use your title when displaying search results. Search engines such as Google will automatically decide what to display as the title in search results, they can choose to display your Title tag or they can choose to display the H1 heading tag or something else from your webpage.
It is important to remember that you cannot force search engines to display exactly what you want them to display. They will display what they feel is best for their users and they can change what they display whenever they want, they are not beholden to you, they are beholden to the users of their search engine.
SEO Description (aka Meta Description)
The SEO Description or Meta Description (we use this term interchangeably in our documentation) that appears in the source code of your webpage looks like this:
<meta name="description" content="This is my description that will appear in search results." />
The Meta Description is usually displayed in the source code for a webpage below the All in One SEO comment line.
The Meta Description may be used by search engines as the description of a search result.
SEO Description Length
Most search engines place a limit on the number of characters that they display in search results. This limit is typically around 160 characters in length but can be as much as 320 characters.
General guidance regarding SEO Descriptions is to keep them descriptive.
Remember that when you perform a search on Google or Bing you use the title and the description that is displayed for each result to make a decision as to which site to visit. A poor description typically results in the visitor returning to the search results and trying a different site.
SEO Description Uniqueness
Every SEO Description on your site should be unique because each page of content on your site should be unique.
Search engines may penalize you for having duplicate Meta Descriptions. SEO Descriptions should be unique across all content including Pages, Posts, Categories, Tags, etc. meaning that the Meta Description for a Page should not be the same as the Meta Description for a Post or a Category.
Search Engines use of SEO Description
Despite the fact that you may set a unique description for each page of content, search engines do not have to use your Meta Description when displaying search results.
Google has always decided whether to display the description you provide or display some content from your webpage instead. They do this on a case by case basis depending on the term that is being searched for and whether it appears in your Meta Description or in your content.
It is important to remember that you cannot force search engines to display exactly what you want them to display. They will display what they feel is best for their users and they can change what they display whenever they want, they are not beholden to you, they are beholden to the users of their search engine.
SEO Keywords (aka Meta Keywords)
The SEO Keywords or Meta Keywords (we use this term interchangeably in our documentation) that appears in the source code of your webpage looks like this:
<meta name="keywords" itemprop="keywords" content="Keyword1, Keyword2, Keyword3, Keyword4" />
Meta Keywords are usually displayed in the source code for a webpage below the All in One SEO comment line.
Meta Keywords are no longer used by search engines and hold no value in modern SEO.
This feature is disabled by default in All in One SEO.
Should you wish to use Meta Keywords you can learn more by reading our documentation on Keyword Settings.
We have an FAQ about Meta Keywords here.
The post What is SEO meta? first appeared on AIOSEO.]]>All in One SEO makes this really easy. In fact it's enabled by default and there's very little configuration needed.
Here we'll show you how to review the settings and check your sitemap so that you can be confident it includes all the right content.
In This Article
Tutorial Video
What is an XML Sitemap
An XML Sitemap is a special webpage that lists all of your content. It includes information such as when your content last changed.
It's an essential part of SEO because it helps search engines find your content and tells them when you've changed or removed content.
Search engines use this information to decide what needs to be included and updated in search results.
Without an XML Sitemap, it would take longer for your content to appear on, or be removed from search engines.
It's very important that you understand what's included in your XML Sitemap. You should check it frequently to be sure that you're including the right content, and excluding content you don't want search engines to see.
NOTE:
The XML Sitemap created by All in One SEO is updated whenever it's requested by a search engine crawler. This means that it's always up-to-date.
We notify Google whenever content is published or updated. Bing and some other search engines use Index Now for notifications when content is published or updated.
Viewing Your XML Sitemap
First, let's make sure you can view your XML Sitemap.
To get started, go to Sitemaps in the All in One SEO menu.
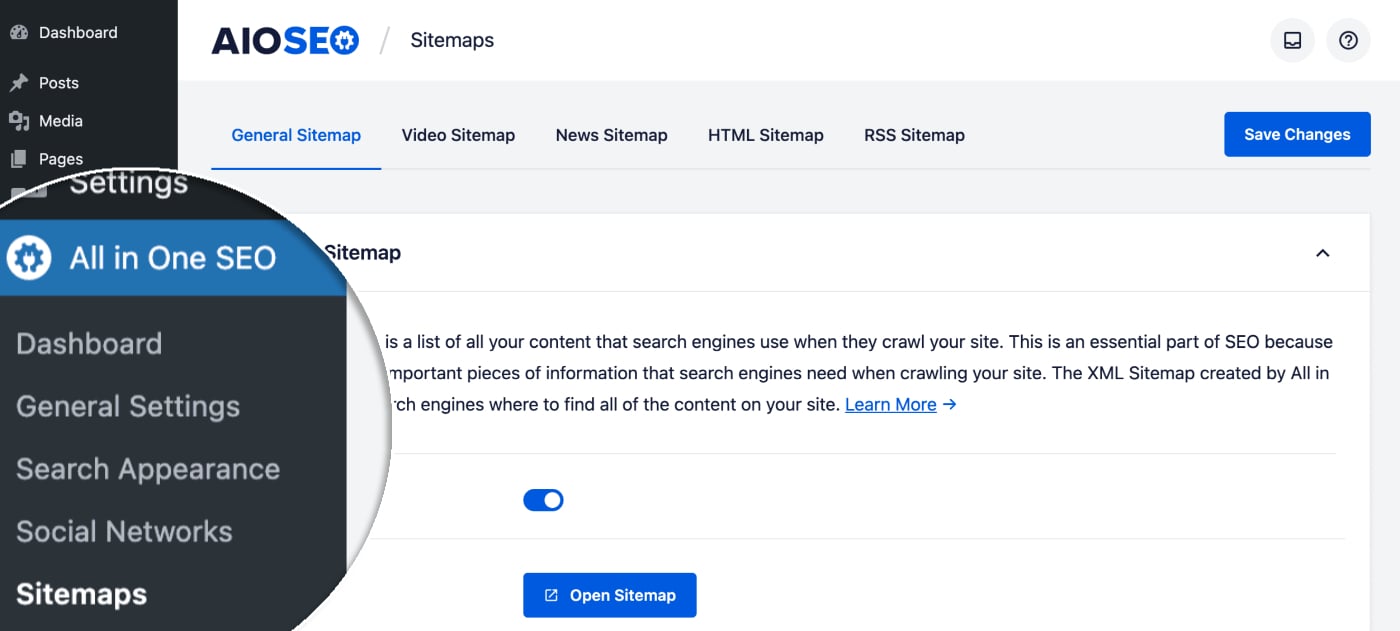
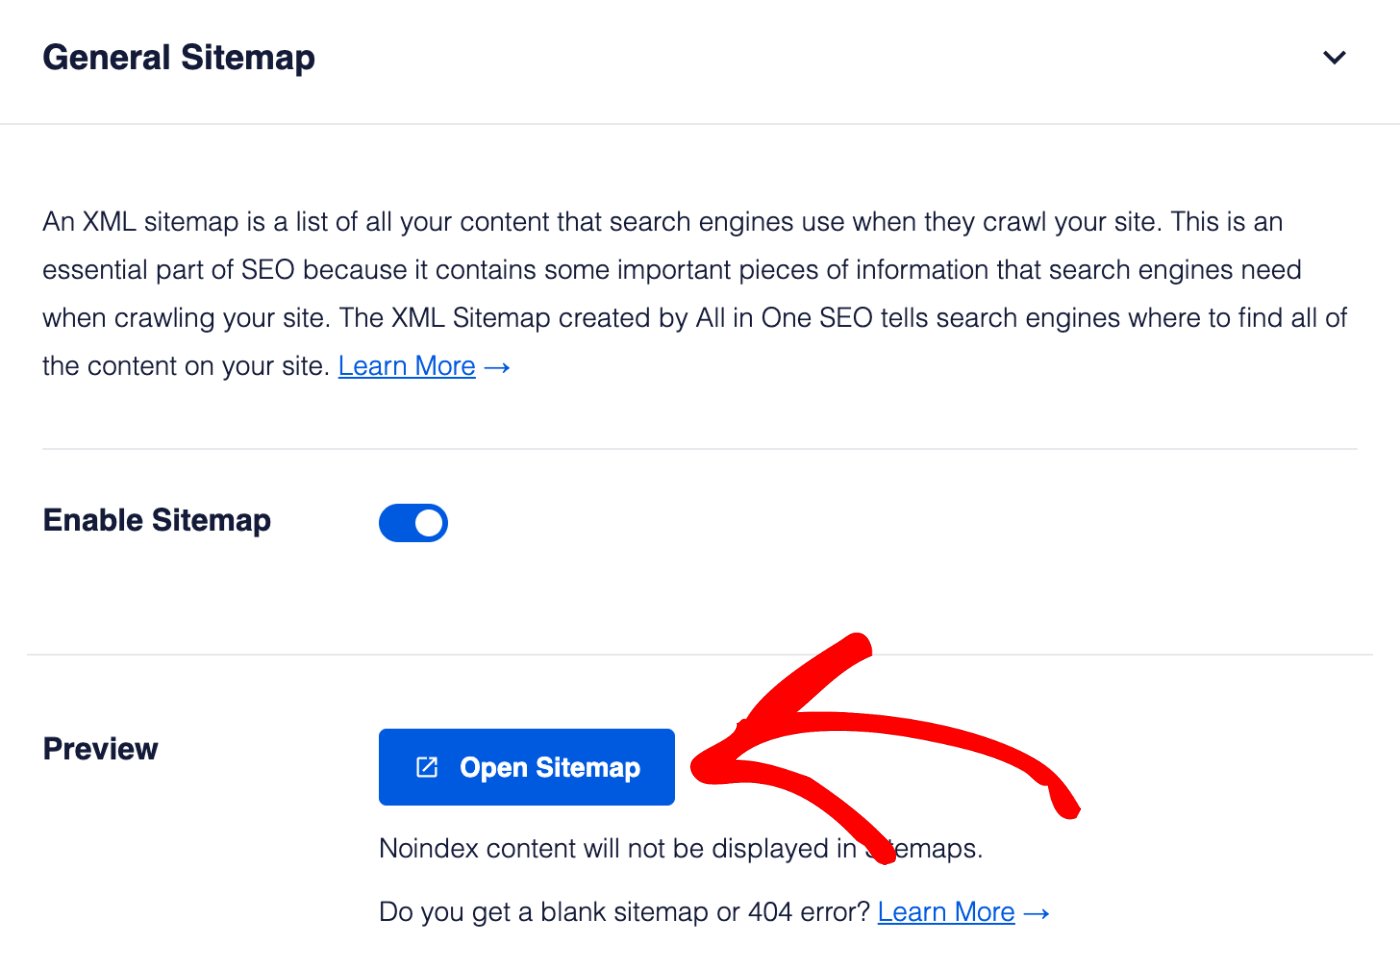
You'll see the General Sitemap screen and you should see that Enable Sitemap is on. If it's off, you'll want to turn it on.
Click the Open Sitemap button to view your XML Sitemap.
You should see an index page for your XML Sitemap that looks like this:
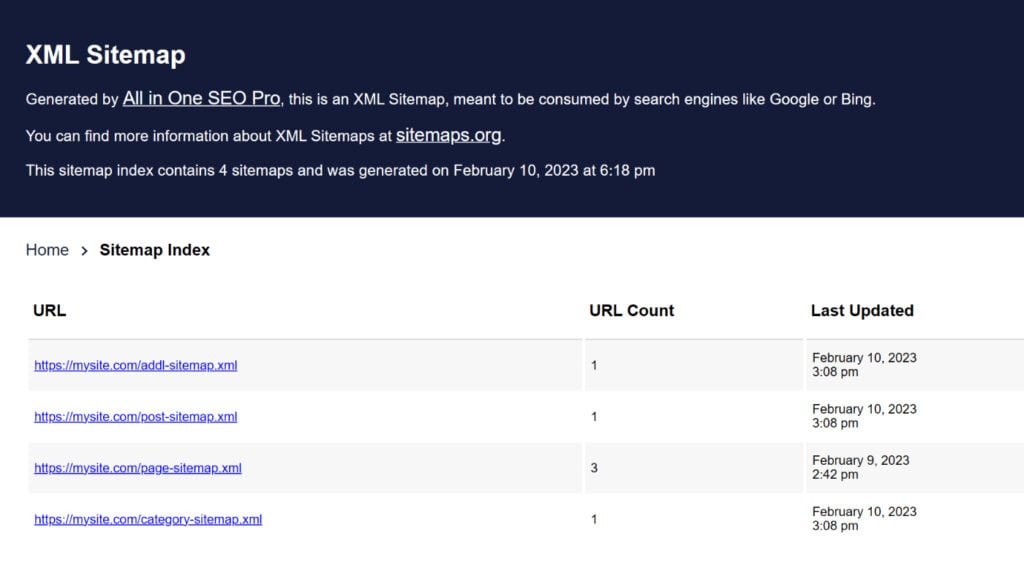
The index page lists all of the sitemaps for your site. Each sitemap contains a different type of content. For example, above you'll see there's one for Posts and one for Pages.
Click on each link in the index to see the list of that content.
Now that you know how to view your XML Sitemap, let's look at the basic settings.
Configuring the XML Sitemap
Let's start by deciding whether you want to have an index page for your sitemap.
If your site is very small (less than a few hundred URLs) then you may not need an index page. You can go ahead and set Enable Sitemap Indexes to Disabled.

If you're in any doubt, just leave this set to Enabled.
Next, we're going to decide how many URLs are listed in each sitemap.
When Sitemap Indexes are enabled, you'll see a setting for Links Per Sitemap.

We limit each sitemap page to 1,000 URLs. If you have more than 1,000 URLs for any type of content, we'll split the sitemap into pages, with 1,000 URLs in each page.
This helps to reduce the time it takes to create each sitemap so that search engines don't give up when it takes too long.
You can typically leave this setting alone. If it's taking too long to view your sitemap pages then lower this number.
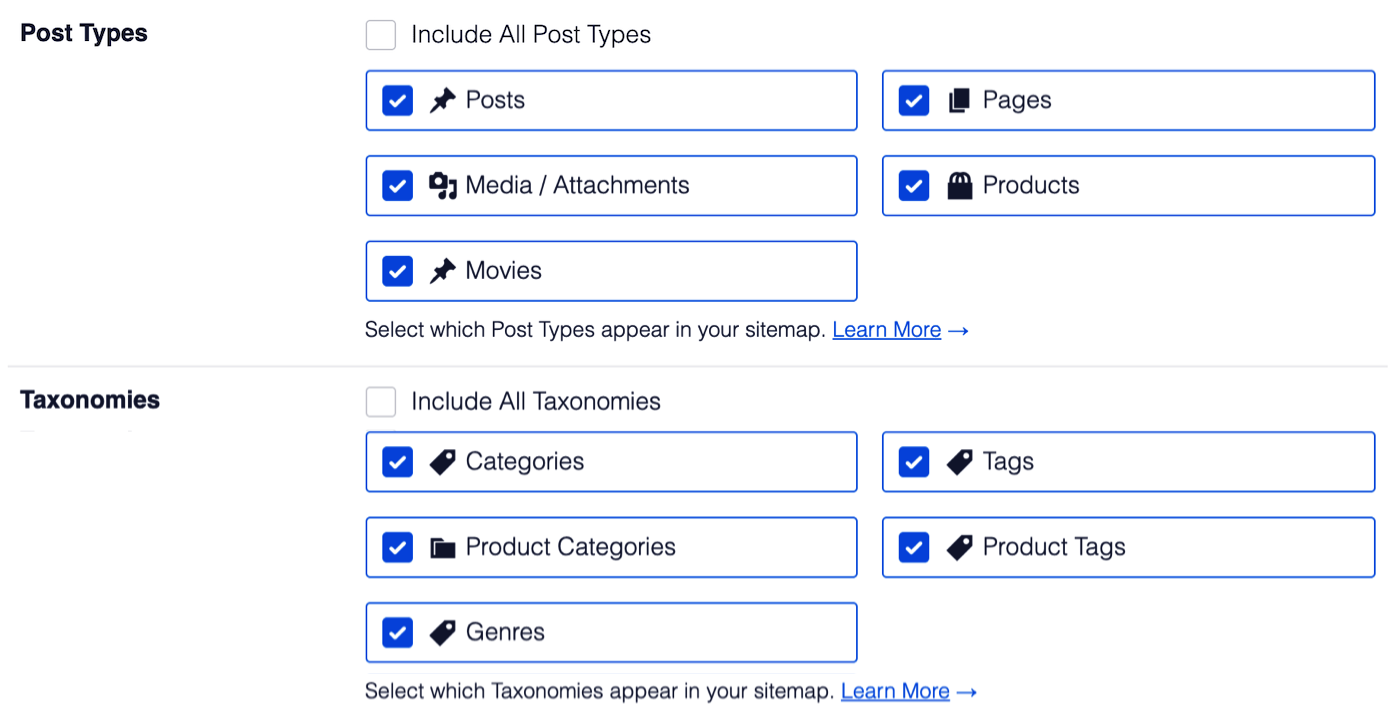
Next, we're going to decide what content we want to include in our sitemap. There are two settings here, Post Types and Taxonomies.
If you want to include all your content then you can leave the Include All Post Types and Include All Taxonomies check boxes set to checked.
If you uncheck these two check boxes you'll see a list of all your content post types and taxonomies and can select which to include in your sitemap.
IMPORTANT:
Any content that has been set to be excluded from search results or set to No index under Search Appearance will not appear in these settings.
The last two settings are for date archives and author archives that are created by WordPress when you've published posts. We normally don't include these in the sitemap because they have little value in search results. If you do want to include these in your sitemap then you can enable these settings.
NOTE:
Search engines can still index your content and display it in search results even if it's not included in your sitemap. Including content in your sitemap just means it'll be added, updated and deleted on search engines much faster than waiting until they find your content on your own.
Frequently Asked Questions
Does All in One SEO create a physical sitemap file?
No, All in One SEO does not create a physical file for your sitemap. Our sitemaps are all virtual web pages that are dynamically generated whenever a crawler visits the sitemap URL. This way it's always up-to-date, there's never an issue with it getting accidentally deleted, and you don't have to worry about server-side file permissions making it unavailable to search engines.
You can read more about why a dynamically generated sitemap is better in our article here.
What happens if I disable the Sitemap?
If you disable the sitemap by clicking on the Enable Sitemap toggle then All in One SEO will no longer generate a sitemap and the URL will return a 404 page not found error. Search engines will no longer be able to get this valuable information about your site and content, which is why we don't recommend disabling the sitemap in All in One SEO.
Next Steps: Submit Your Sitemap to Search Engines
Next, you'll want to tell Google and Bing that you have a sitemap.
Follow the instructions in these articles to submit your sitemap to each search engine:
The post How to Create an XML Sitemap first appeared on AIOSEO.]]>